Fix the annoying WordPress error Publishing failed. The response is not a valid JSON response., Updating failed. The response is not a valid JSON response., or The response is not a valid JSON response.
You may have seen these errors when trying to publish or update your WordPress posts or pages. You may even have see this error when trying to upload an image in your WordPress website.
If you don't deal with this error right away, you may lose all the changes that you have made for the past few hours (yes, we humans still go by hours without saving our work). This article is about rescuing you from that.
There are many reasons for why these errors can occur to your WordPress site. It can be related to your web server, .htaccess file, SSL certificate, a plugin, a theme, or for another reason. So depending on your specific scenario, a different solution may work for you.
Here, I have outlined all the methods that will help you solve this error. Be it Publishing failed. Error message: The response is not a valid JSON response., Updating failed. Error message: The response is not a valid JSON response., or just The response is not a valid JSON response.
Try using the following methods one by one and you should find the one that works for you. But in order not to lose your work progress, open your WordPress dashboard in a new window and try the solutions there.
Update Permalink
Warning: Updating permalink structure may change the URL of all your website pages and posts so the previous URLs to access your pages and posts won’t work. Your website’s SEO will also be affected by this. Therefore, if keeping your original URL is important, you may either not want to try this one or revert back to the original permalink structure as soon as the test is completed. But if your website is brand new, you don't have to worry about it.
The most common solution for publishing or updating failed the response is not a valid JSON response error is to update your permalink structure.
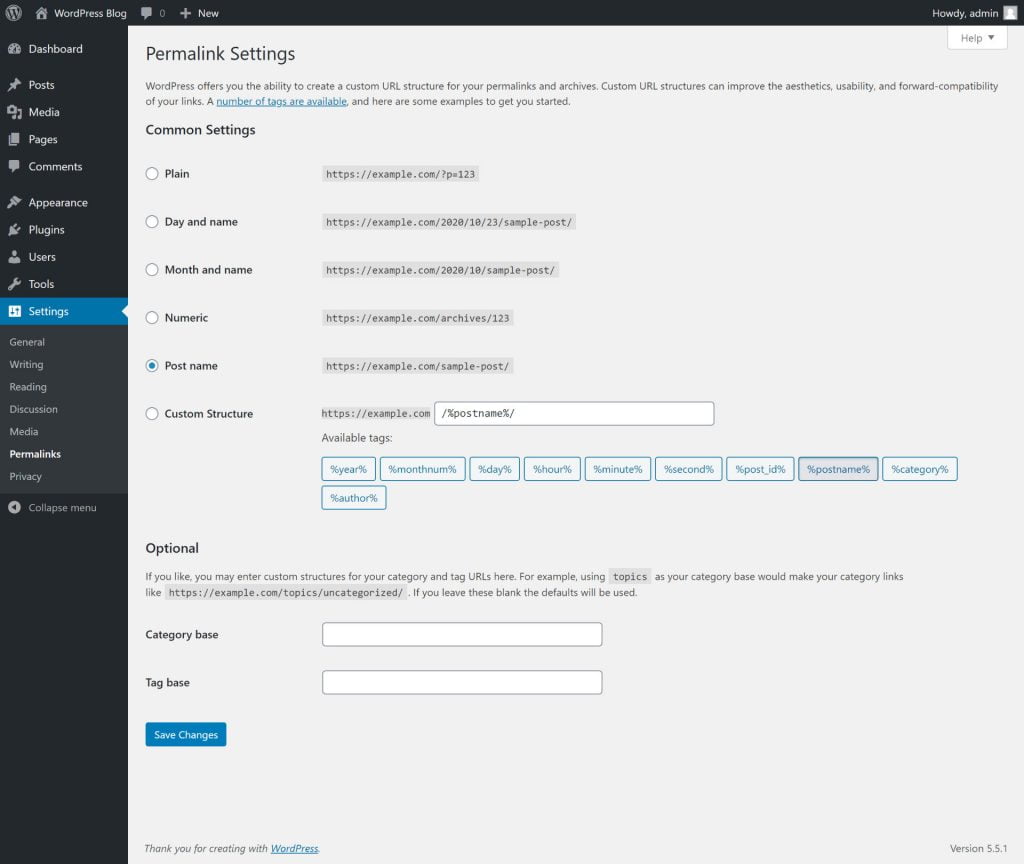
From your WordPress dashboard, go to Settings and then Permalinks. Then you can click on the Save Changes button to re-save or update the current permalink structure. Then check to see if the error is fixed.
If it doesn’t fix the error then you can go back to the permalink page and then select Plain from under the Custom Settings heading to change the permalink structure. Then click on Save Changes. Now check again to see if the error has been solved.
If the error hasn’t resolved, then you can try changing to all the other permalink structures and check if the error gets solved for any of them.
If this solution doesn’t work for you try the next one.
Use Classic Editor
In December 2018 WordPress updated their Classic Editor with the new Gutenberg/Block Editor. And since then many have faced this “Publishing failed. The response is not a valid JSON response.” and “Updating failed. The response is not a valid JSON response.” error.
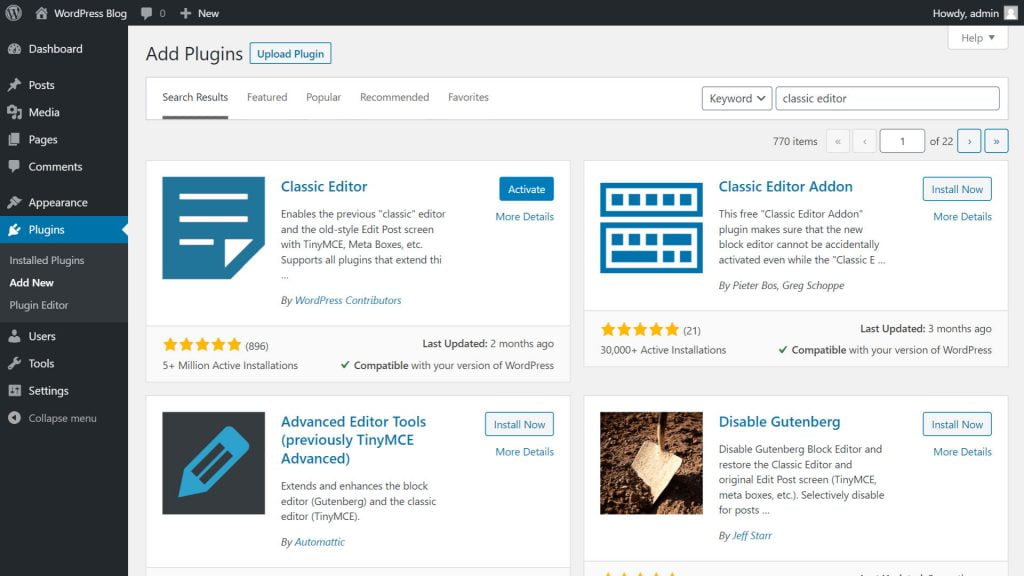
So, by going back to the Classic Editor many have been able to solve the error. In order to use Classic Editor, you will need to install and activate the Classic Editor plugin on your WordPress website.
However, if you use Classic Editor, this will replace the new Block Editor of WordPress with its old Classic Editor. This will change how you are used to editing your pages and posts. This may also affect the formatting and layout of your existing pages and posts that have been previously edited using the Block editor. So, you should safeguard your site first by changing a setting in the Classic Editor before you start using it.

So, to safeguard from affecting your existing pages, after you activate the Classic Editor plugin, go to Settings and then Writing from the WordPress dashboard. This will show you the settings for the Classic Editor plugin. From here, select “Yes” for the option “Allow users to switch editors”. Then click on Save Changes. This will let you use the Gutenberg/Block editor for your existing pages and posts so you won’t have to be concerned about losing existing work in case you want to edit any existing pages or posts on your site. This will also give you the option to edit any new pages or posts with either Block editor or the Classic editor.
Then try creating a new page or post using the Classic Editor and check if the JSON response error has been fixed.
From the plugin’s settings page, you can also select “Block Editor” as the option for “Default editor for all users” if you would like to make the Block Editor your default WordPress editor while using the Classic Editor plugin.
Using the Classic Editor might solve the JSON response error for you while updating or publishing your pages and posts. But if it doesn’t solve the error, then you can just deactivate the plugin and try out the next solution.
Configure SSL
Your website always needs to have TLS/SSL enabled or web browsers will show a warning message whenever someone tries to visit your website. That warning will make your site look dangerous so you will lose lots of your website visitors. That’s why properly setting up SSL certificate for your website is an important thing to do regardless of it solving “The response is not a valid JSON response” error.
In this part, I will tell you how you can properly set up your WordPress website to use SSL certificate which is also a very common solution to the JSON response error.
Use SSL Certificate
You can check if your site is using SSL certificate by looking at the URL of your website. After your website is loaded in a web browser, you can click on your website’s URL to see if the URL starts with HTTPS or HTTP. If it starts with HTTPS and if you see a padlock icon without a cross sign beside the URL, then your site is already configured with SSL certificate. So, you will just need to ensure that your website is using it properly.
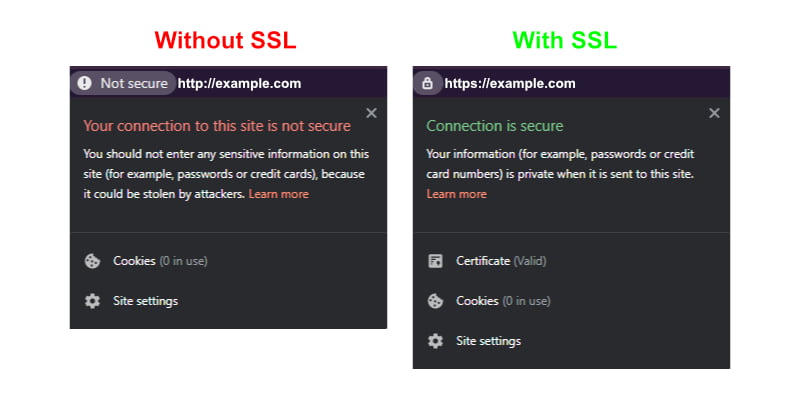
For instance, if your website is example.com then it will look like https://example.com and it will be marked with a padlock icon after it loads in your web browser if it is properly set up with SSL certificate.
However, having no padlock icon doesn’t always mean that an SSL certificate hasn’t been issued or your website. Instead, the reason might be that your website hasn’t been configured to automatically redirect all HTTP traffic to the HTTPS version of your website. To check if that is the case, change your website URL’s HTTP to HTTPS on the web browser and press enter. If the browser now shows a padlock icon beside the URL, then an SSL certificate has been issued for your site but it isn’t configured properly. So, we will need to configure it properly.
But if changing HTTP to HTTPS doesn’t work, then that it is probably because an SSL certificate hasn’t been issued for your website. And if that is the case, then you will first need to issue an SSL certificate for your website. If you are using cPanel, Plesk, DirectAdmin, CyberPanel or any other web hosting control panel, then you can easily issue an SSL certificate for your website from that web hosting control panel. See their guide on how to do that.
Additionally, the validity of SSL certificates expires after a certain period so you may also check if your SSL certificate is still valid. If it is not valid then you should first renew the SSL certificate to fix the SSL related issues. Once a valid SSL certificate is installed on your WordPress site, you can follow the next steps here to solve Publishing failed. The response is not a valid JSON response. or Updating failed. The response is not a valid JSON response. error.
Force HTTPS Redirect
Using your web hosting control panel like cPanel, Plesk, CyberPanel, etc., you can easily redirect all HTTP traffic to the HTTPS version of your website. The process of doing this will differ based on the hosting control panel you are using but you should easily find an option to do that in the SSL settings or in the domain settings option on the control panel. Look for settings that say something like force HTTPS redirect, redirect HTTP to HTTPS, and so on. See their guide on how to do that.
If you aren’t using a hosting control panel or if this doesn’t work for you then you can use the Really Simple SSL plugin to do that. I have described it further in the next step "Solve Mixed Content Error" which is also very important to solve SSL related issues for your WordPress site. So, even if this step solves the error, you should still follow the next step to solve the mixed content error on your website.
Solve Mixed Content Error
Your webpages will generally require linking multiple files like CSS, JS, images, etc. to display and function properly. And the links for these files may contain HTTP or HTTPS. If your website is configured to use HTTPS but if some of those links are using HTTP instead of HTTPS, there will be a mixed content error.
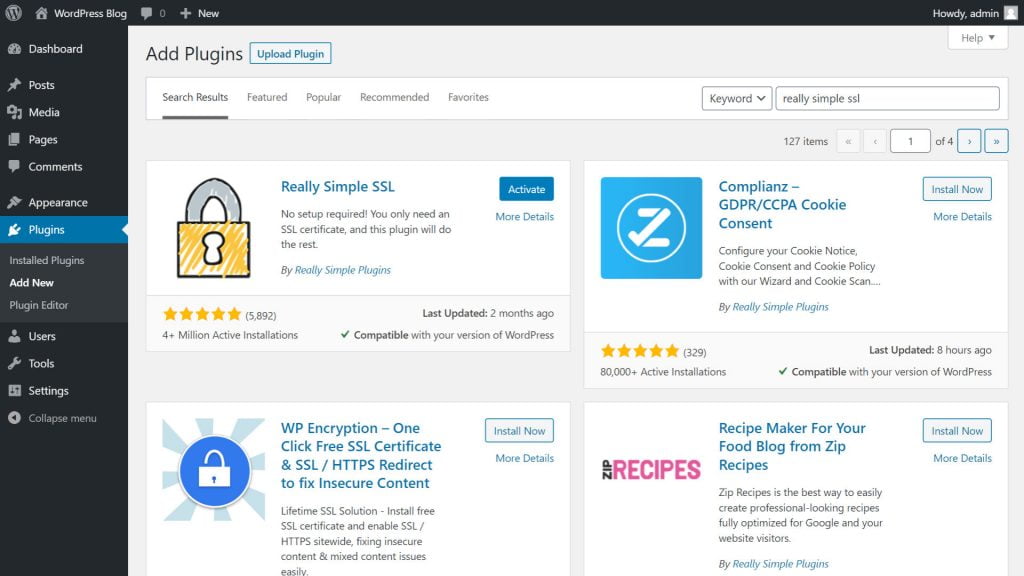
To solve this problem you can install the Really Simple SSL plugin on your WordPress site. It will modify all links on your website to use HTTPS and therefore solve the mixed content error.
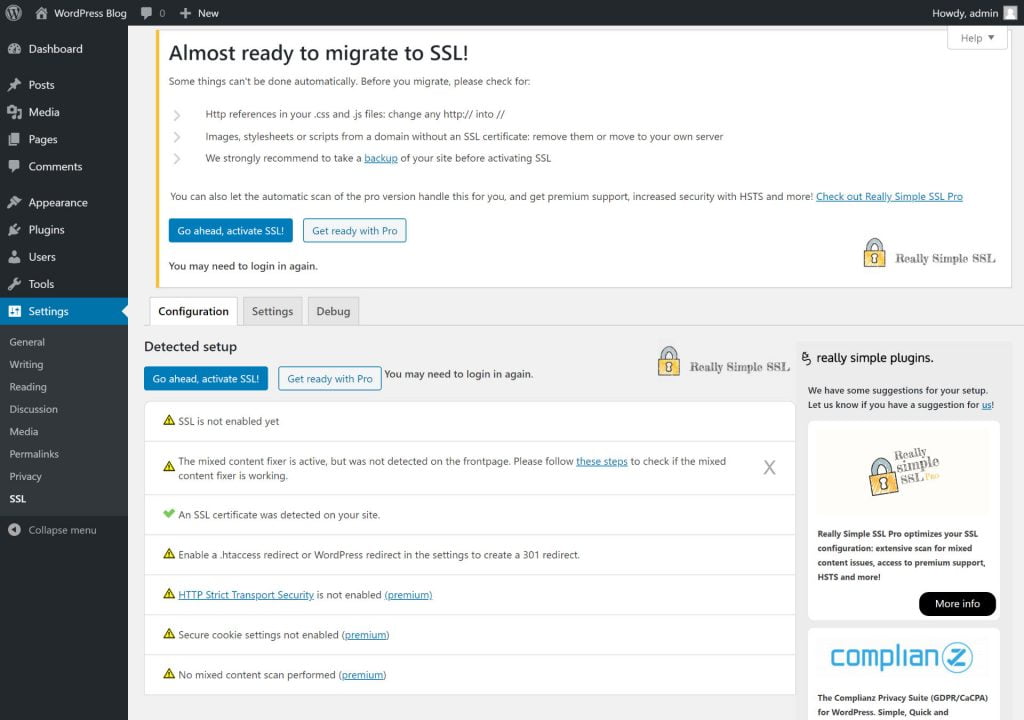
After you install and activate the Really Simple SSL plugin, you will get a notification to activate SSL. So, click on the “Go ahead, activate SSL!” button on the notification. But if you don’t see the notification then from your WordPress dashboard, go to Settings and select SSL.
Then you will see the same button saying “Go ahead, activate SSL!”. Once you click on the button it will activate SSL and set HTTPS redirect for your website.
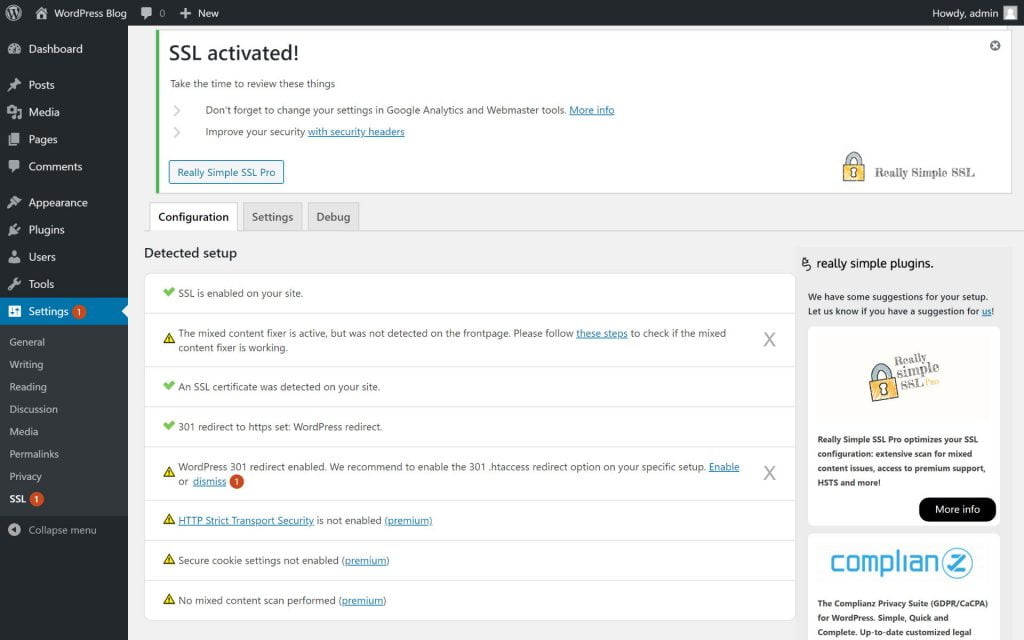
Then it will give you will see a warning that says “WordPress 301 redirect enabled. We recommend to enable the 301 .htaccess redirect option on your specific setup”. Beside that warning, you will see a link saying “Enable”. Clicking on the link will take you to the Settings tab on the plugin. You can also go to the same page from your WordPress dashboard by going to Settings then SSL and then by selecting the Settings tab.
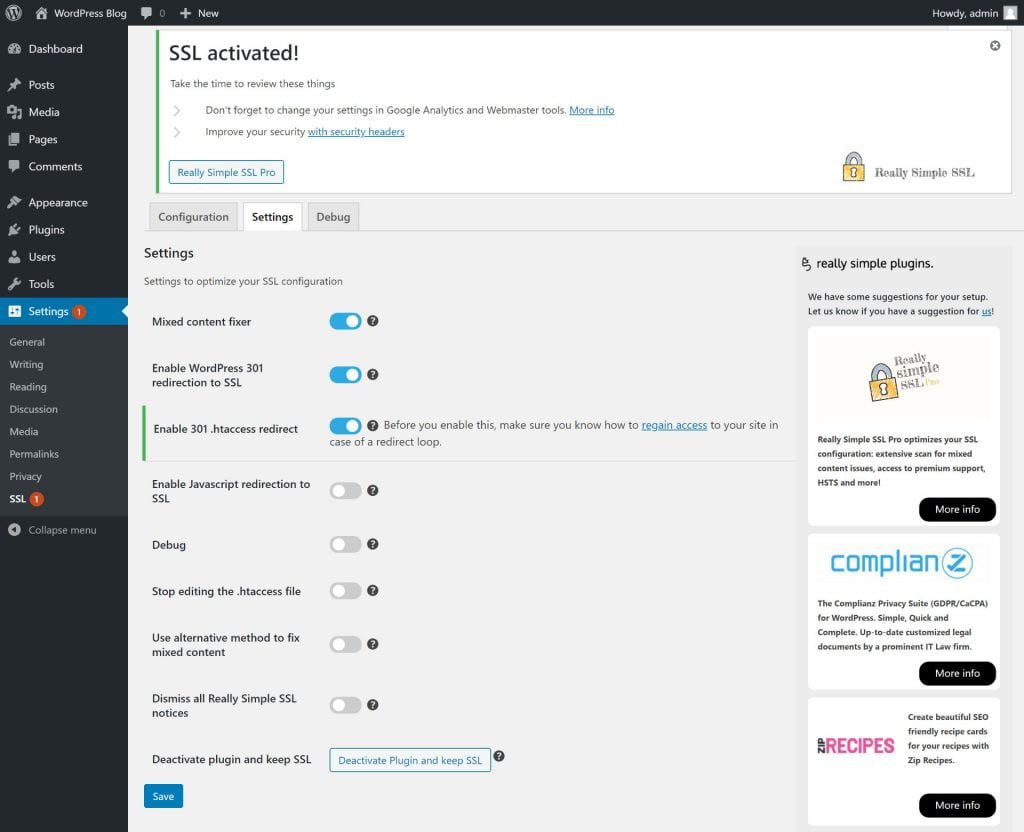
Here, you will see an option saying “Enable 301 .htaccess redirect”. Turn on the button beside that to activate HTTPS redirect from your .htaccess file. Before enabling the button you can also read the warning on how to regain access to your site in case of a redirect loop issue. Then after enabling the button click on Save.
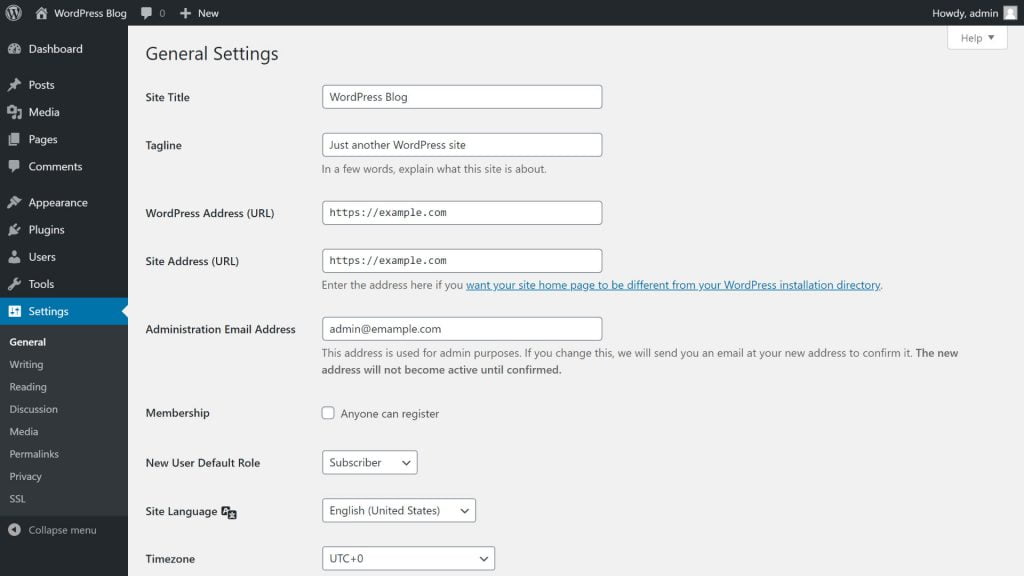
Also, from your WordPress dashboard, you can go to Settings then General. This will show you “WordPress Address (URL)” and “Site Address (URL)”. Make sure that these URLs are using HTTPS and not HTTP.
After doing this, check if the JSON response error has been fixed. If it doesn’t get fixed, you can also go to Settings > SSL > Settings and then turn on the button beside the “Use alternative method to fix mixed content” option and then save the change.
Now, check if the JSON response error has been fixed. If it hasn't, then turn off the button beside the “Use alternative method to fix mixed content” option and save the change again then follow the next solution.
Check Themes and Plugins
If the previous methods don’t work for you then you can try to find out if it is any theme or plugin that is causing the problem. So, first, go to Appearance and then Themes from your WordPress dashboard. Then activate the default WordPress theme (as of now it is Twenty Twenty) and check if the error is fixed. If not, then revert back to your original theme.
The error may also cause by a plugin and in that case you can deactivate all the plugins on your website and then check again to see if the error occurs. If the error doesn’t occur then it is probably a plugin that is causing the issue. So, to find out which plugin is causing the problem, turn on one plugin at a time and check if the error occurs. And if the error occurs after enabling a certain plugin, then you will know that is the one causing the problem. So, you can just deactivate that plugin and activate the rest of the plugins that you need.
Restart OpenLiteSpeed
If you are using OpenLiteSpeed web server, then there is a very high chance that a restart will solve your problem.
OpenLiteSpeed is the open source or free version of the LiteSpeed Web Server (also known as LIteSpeed Enterprise). One of the major differences between LiteSpeed Enterprise and OpenLiteSpeed is that LiteSpeed Enterprise autodetects changes in .htaccess file and adjusts as necessary in realtime but OpenLiteSpeed can't do that so it requires restarting for any changes in the .htaccess file to take place. And because WordPress uses the .htaccess file for many operations, those inactive .htaccess changes in the OpenLiteSpeed server may also cause The response is not a valid JSON response error. If you see this error after adding a new website on your OpenLiteSpeed server, this may also be the reason.
So, if you are using OpenLiteSpeed web server, a restart of the OpenLiteSpeed server can solve the error for you.
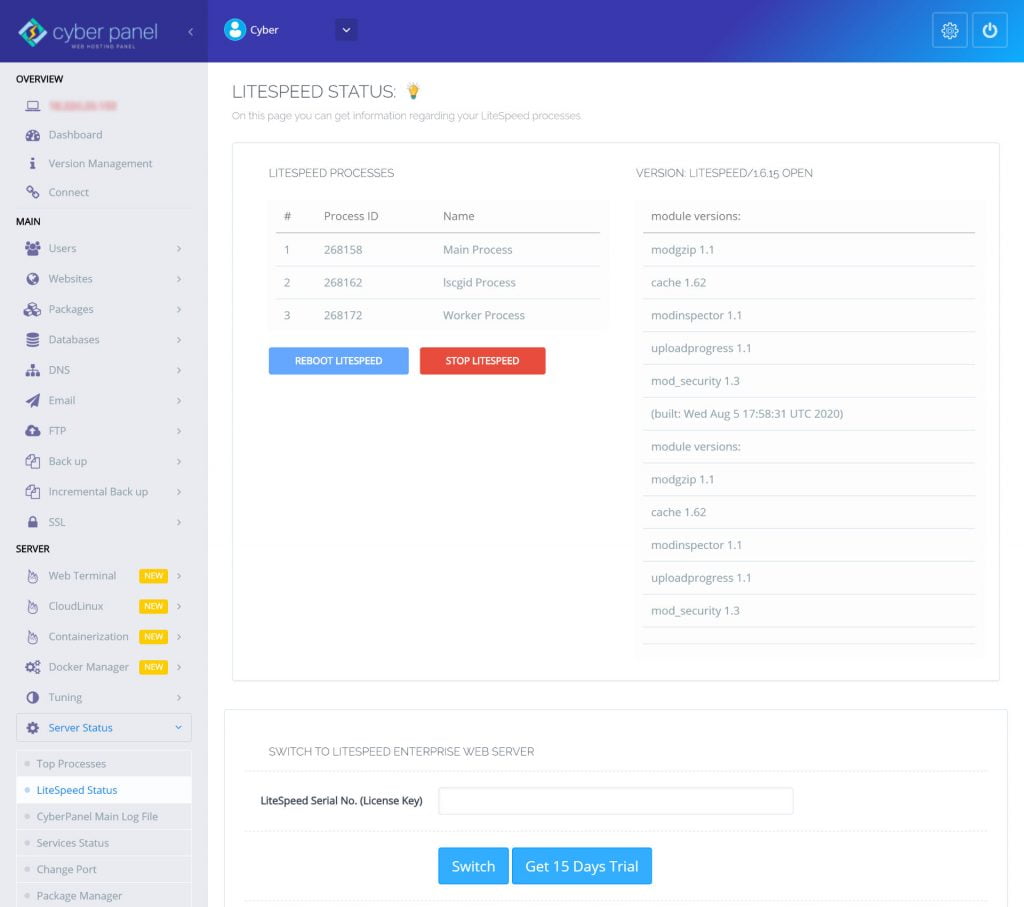
If you are using CyberPanel web hosting panel with OpenLiteSpeed, then you can open your CyberPanel dashboard then go to Server Status then LiteSpeed Status. Then you can click on the Reboot LiteSpeed button to restart your OpenLIteSpeed server.
But if you are using a different web hosting panel or if you aren't using any web hosting panel at all, then you will need to find out how to restart the OpenLIteSpeed server for your specific setup.
Update .htaccess
If none of the previous methods work then you can try configuring your .htaccess file.
In order to ensure that you can revert back to your original .htaccess file in case anything goes wrong, you can keep a backup of it by downloading it in your computer. If you know how to use an FTP client or the file manager of your web hosting control panel like cPanel, CyberPanel, etc., then you can download the .htaccess file from your website’s “public_html” folder.
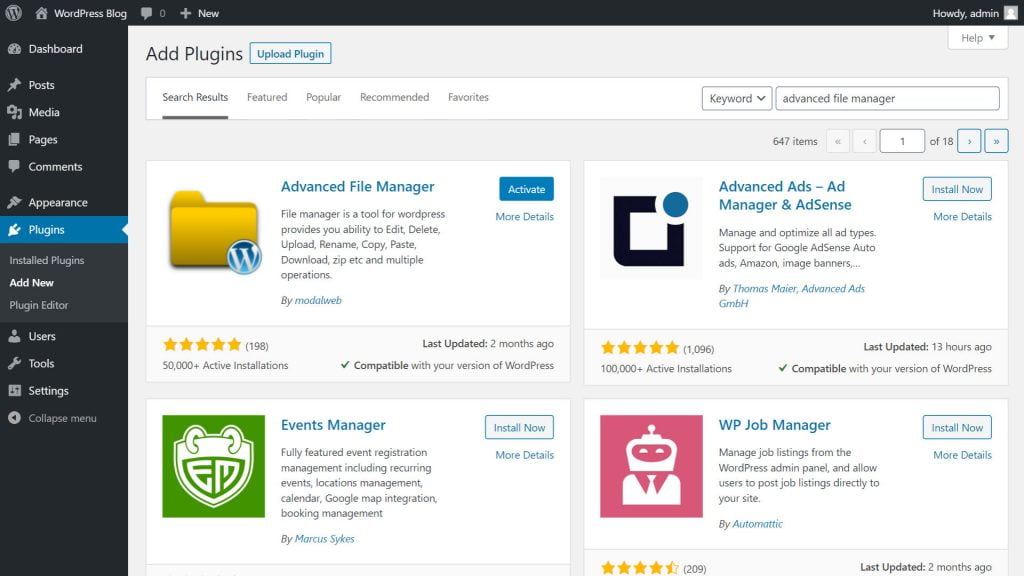
If you want an easy solution and want to do everything from WordPress dashboard then install and activate a file manager plugin like Advanced File Manager on your WordPress website.
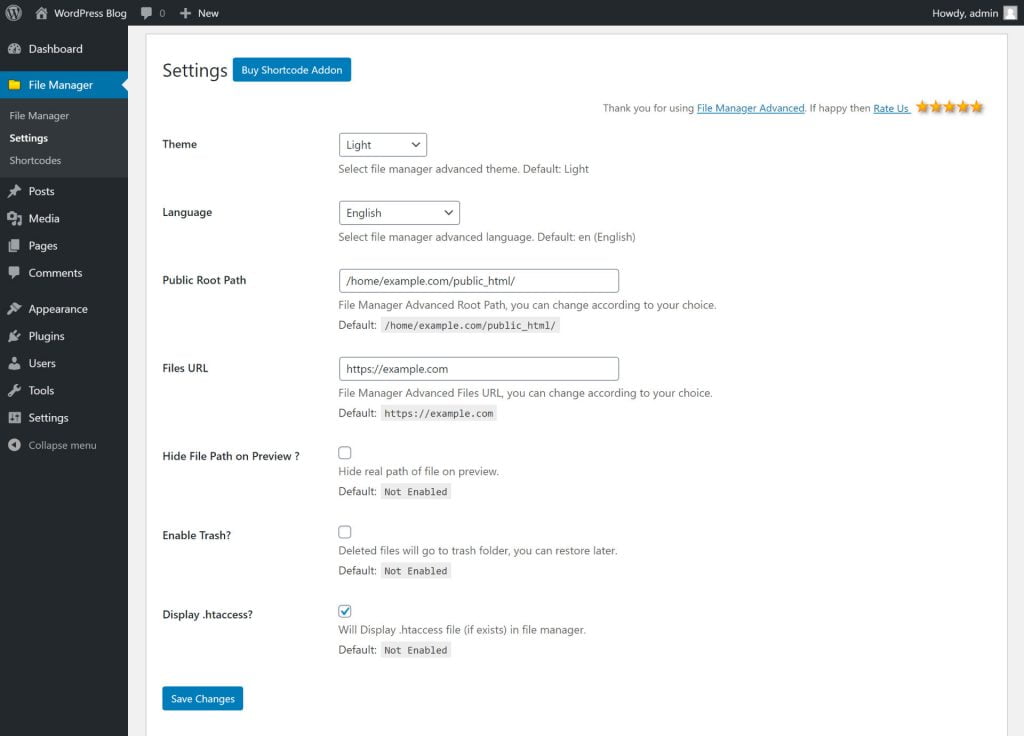
Then from your WordPress dashboard, go to File Manager then Settings. From here put a checkmark beside the Display .htaccess? option then click on Save Changes.
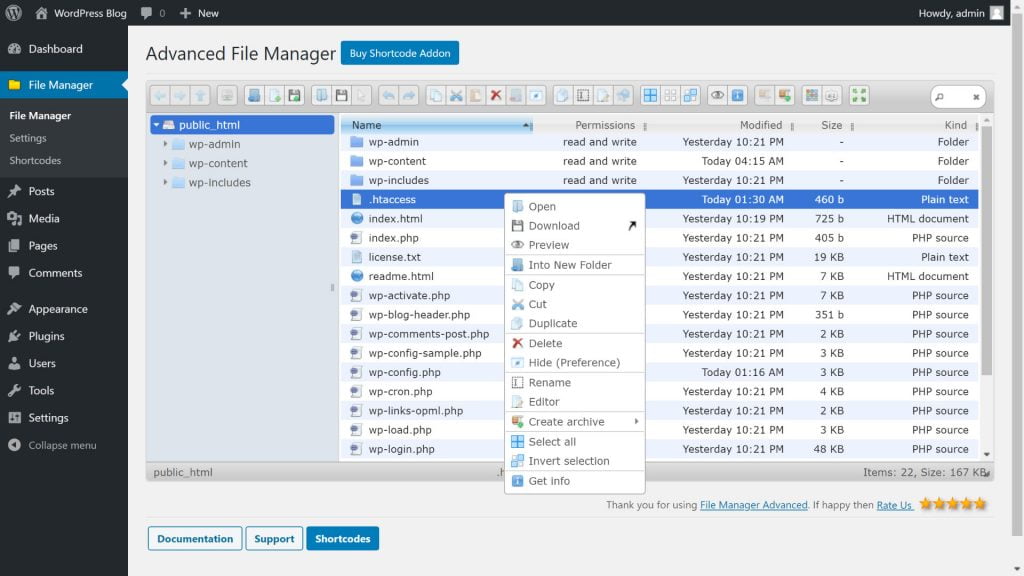
Now click on File Manager to see all the folders and files for your website. Here, in the “public_html” folder of your website, you will see the “.htaccess” file. Right-click on the file and click Download to keep a backup of it.
So, now you will be able to easily re-upload the original .htaccess file to the same location in case anything goes wrong.
Now, disable all the plugins on your WordPress site. Then delete the .htaccess file so that we can start from the beginning.
Now, go to Settings and then Permalinks from your WordPress dashboard. Then, make sure the permalink option of your choice is selected and then click on Save Changes. This will create a new .htaccess file for your website.
Now you need to check if “The response is not a valid JSON response” error is fixed or not.
If the error has been fixed, then you can turn on one plugin at a time and check if the error occurs again. If the error occurs after enabling a certain plugin then you can just deactivate that one and activate the other plugins as you need.
But if the error isn’t fixed after saving your permalink, then you can select the other permalink structures one after another and check if the JSON response has been fixed. Remember to change your permalink structure to the original one after your testing with different permalink structures is finished if you want to keep your previous URL structure.
But if that doesn’t fix “The response is not a valid JSON response” error, then you will need to follow the previously mentioned steps for Force HTTPS Redirect and Solve Mixed Content Error one more time. Do these steps while all your plugins are still deactivated.
This should solve the error for your website. And if the problem is solved, then activate all your plugins again one by one and check if any of them cause any problem. If the error doesn’t occur again, then the problem has been fixed but if the problem occurs after installing any specific plugin then just deactivate that plugin and activate the other ones.
After you activate the plugins, the .htaccess rules associated with the plugins should automatically be created to your new .htaccess file based on the existing plugin settings. So, you shouldn’t lose any configurations this way. But if something doesn’t work properly, then you can open both the .htaccess files in the editor or in a text document and compare the rules in both the .htaccess files. Then you can update the new .htaccess file with the changes you found. You can even delete the new .htaccess file and then upload the original one to go back to the previous state.
Check Site Health
From your WordPress dashboard, if you go to Tools and then select Site Health, then under the Status tab on that page, WordPress will show you any improvement recommendations that could help your website.
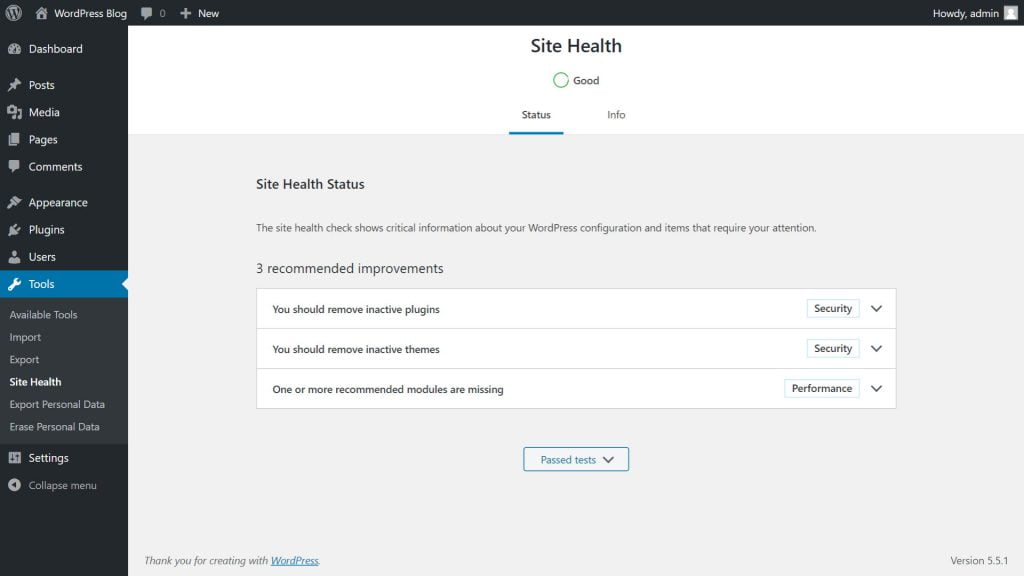
An issue related to Rest API could also cause the JSON response error on your website. Moreover, if you find any issue there, solving the issue might also fix the JSON response error for your website.
Fix Image Upload Error
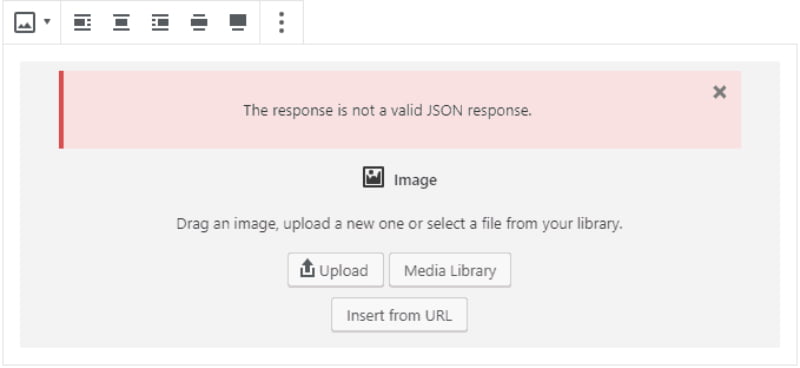
If you have tried the previous methods but “The response is not a valid JSON response” error still occurs when you try to upload images on your WordPress website, then you can follow the instructions in this section.
Use Media Library Instead of Direct Upload
If you are trying to upload images in an Image block using the Upload button, then you might get the JSON response error but surprisingly many people have found that if they first select Media Library then go to the Upload Files tab and then upload images from there then the error doesn’t occur.
This might be a temporary workaround but it can be helpful if you are in the middle of writing a post or if any other methods don’t work for you.
Remove Invalid Characters
You may also get “The response is not a valid JSON response” error if you try to upload images with unsupported characters in the image name. So, you can rename your image using only English letters, numbers, and supported symbols like hyphens. Then you can upload that renamed image to see if the error has been fixed.
Use Default to GD plugin
Some people were also able to solve The response is not a valid JSON response error by using the Default to GD plugin. This plugin isn't available on WordPress so you will need to download it from the Default to GD GitHub link.
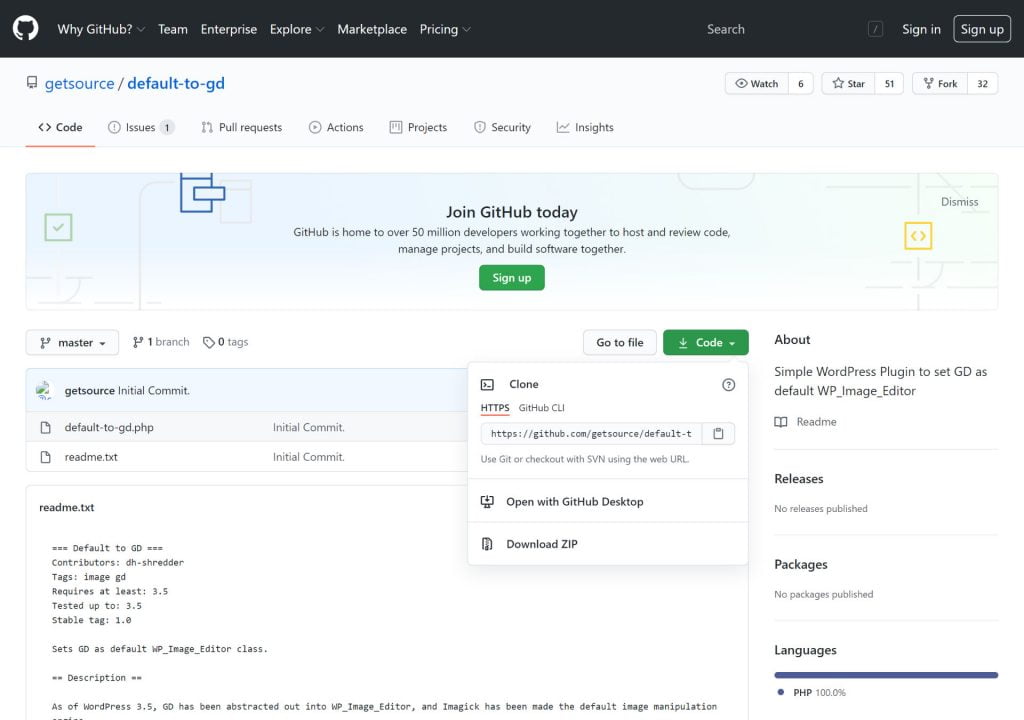
To download the plugin click on the "Code” button on the page. Then select Download ZIP. This will download the plugin on your computer.
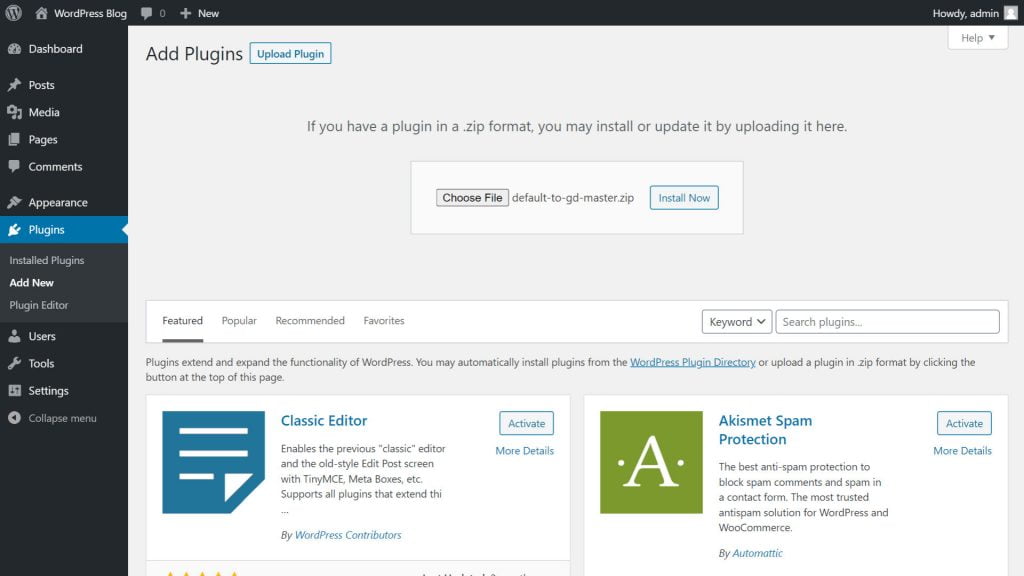
Then go to your WordPress dashboard then Plugins then Add New. Now click on Upload Plugin button then upload the plugin you just downloaded by clicking on the Choose File button. Then click on Install Now. After the installation is completed, click on Activate Plugin. It doesn’t require any set up so you can now check if the JSON response error occurs while uploading images to your WordPress site. And if the error still occurs, then you can just deactivate and then delete the plugin.
These methods for solving “The response is not a valid JSON response” error works for most people but if it doesn’t work for you then you may have a specific problem in your WordPress settings or in your web server setup. This error can also cause because of an issue related to the REST API, misconfiguration in NGINX server, security plugins like Wordfence or for security rules like WAF or Web Application Firewall. In these cases, you can look for solutions specific to those areas.
I hope one of these methods works for you and if works let me and others know which one worked for you. And if you found any other solution tell us in the comments section so that it can help others.
Arrived here because I'm currently battling the insidious "...not a valid JSON response." monster. So far, no solution I've read applies to my current problem. I never experienced this problem until the arrival of the Gutenberg editor. In my opinion, Gutenberg is the problem, not all of the other whack-a-mole solutions that I've encountered.
Here's a suggestion for the WordPress development team...no more new features until you resolve this black eye of an issue.
It is related to the ModSecurity tool.
ModSecurity is an Apache module that works as a web application firewall. It blocks known exploits and protects from a range of attacks against web applications. However, sometimes, mod_security may incorrectly determine that a certain request is malicious while it is actually legitimate. In such situations, you can whitelist the triggered mod_security rule on the server so that you can bypass the block. I contacted my hosting, explained the situation, and they whitelisted all the rules that were being blocked by ModSecurity incorrectly.
They did it in a matter of minutes, and everything worked!
Ditto on this. I also had to contact my host (Namecheap) because for the server some of my sites were on (where this problem existed), mod_security hasn't whitelisted the respective triggers related to WordPress/Block Editor. I tried so many different things, only to end up asking support and have them solve it in a few minutes because that's something I don't have access to lol
It works with me.
I have contact with team support, hosting Namecheap.
And the problem is mod security hasn't whitelisted.
Thanks Georg Kevin Paquet
same , simply talk with namecheap chat , they solve problem just in second.
same here contacted Namecheap and fixed in 10 minutes
Thanks. This worked for me too.
Thanks a heaps for posting the solution as a comment, i spent about 4 hours looking for the solution.
Disabling the mod security on namecheap cpanel fixed the problem for me.
you saved me alot of trouble.
thanks again.
My problem was just the permalink issue. Thanks.
I tried the methods but couldn't solve the issue.
Now post published in the website but inside post image is not uploaded in classic editor.
on the other hand, If i want to publish post in block editor then .json problem is still remain.
I have the exact same problem. For some reason I can post a blank post with an title, but when trying to type things into the body, it will give me the json error
Any solution?
I recently migrated from local host to live server. Did the recommended sql find & replaces for my urls. Install went fine, but when I visited my site, the homepage was the only one that would display (got 404's for all other links). I got the notorious "Publishing failed. The response is not a valid JSON response." and arrived here. Started with your first suggestion regarding Permalinks (and I already had "Post Name" selected in the Site Permalinks section)...so all I did was hit "Save". Revisited links and tried updating and now EVERYTHING IS FIXED!!!!!. Just wanted to say THANK YOU and share for anyone else having issues while migrating. Much appreciated!!!!!!!!!
-AJ
Just contacted Namecheap and explained what is wrong with my web and after 2 minutes everything went as it should.
Namecheap Says:
"It appears there are some ModSecurity rules which result in blocks for your site. We installed ModSecurity to increase the security of our servers. It is an Apache module which works as a web application firewall. It blocks known exploits and provides protection from a range of attacks against web applications. Its activity may cause such issues from time to time when requests sent to the server match ModSecurity rules. Sometimes such requests are false-positive."
Got same answer from them, but problem with JSON error not fixed 🙁
My hosting provide is same but they are not responding to my ticket. Is there any solution I could do by myself?
Hello plz how I can contact namecheap
Download classic editor.1.6.2.zip
Permalink issue solved it for me! Thanks for making my life have meaning today: I didn't fritter it away trying to solve this ridiculousness!
Thank for sharing Informational post.
On my site this error was triggered in a page that contained '' in the body text somewhere. This triggered Cloudflare and generated the 'The response is not a valid JSON response' error on Save. Specifically this Cloudflare rule:
[Rule #100173] Cloudflare specials - XSS, HTML Injection - Script Tag
disabled ModSecurity in Cpanel help me solved the problem
thanks .u solved my problem
On cpanel,disable ModSecurity ,then enable again.
Is it working ?
Thank you!!! I read numerous articles about this issue and continued to have the problem. Then you explained it clearly. My problem is now resolved!!
Hello team, I am still getting the "Updating failed. The response is not a valid JSON response.
" error. I have done the suggested options, uninstalled and re-installed wordpress,.but still the same error. I am thinking it could be a server issue. I am hosting with Namecheap.
For me this is related to Cloudlare. If I change my local host file to point straight to the A record I don't receive the JSON error and my content is updated succesfully. The only downside is I'm using Cloudflare's universal SSL so I get a insecure message but after I accept that all is good.
installing and activating the classic editor worked for me.
I was dealing with the same issue with a freshly installed WP site on Namecheap hosting. I contacted Support like the other commenters suggested and... it worked. They were able to identify and fix the issue in minutes.
Woo,
This is what we say "A Complete Tutorial". Keep it Up Buddy.
wow it really worked thanks my problem resolved
Thanks for providing an informative post.
Installing 'Classic Editor' solved my issue related to Json failed.
This is very good information, I got to learn a lot from it, keep sharing such informative things, Thanks
This is so helpful. Thanks a ton.
If you are using IIS, you need to make sure "OPTIONS" is permitted as one of your "HTTP VERBS".
Launch Internet Information Service (IIS) Manager at Windows Start > All Programs > Windows Administrative Tools.
In IIS Manager, expand SERVERNAME > Sites > click example.com > Handler Mappings (under IIS).
Find the handler which is used by the website and double-click on it.
Double-click on your PHP handler (there may be more than one listed)
Click Request Restrictions....
Switch to the Verbs tab.
Add required verbs in to the verbs field, for example:
GET,HEAD,POST,OPTIONS
Click OK to apply the changes in both windows.
Confirming that the Namecheap mod-security whitelist fix worked for me. A few minutes of live chat with support and the WordPress block editor is happy.
It was just Namecheap mod-security that wasted my time for hours but support fixed it in less than five min
My issue is complex. I migrated a site from an old host to a new one. The point is, the old hosting is using Apache as a server, whereas the new hosting is using Nginx. You can check this in WordPress dashboard>> Tool >> Site Health >> Info >> Server >> Web server.
My solution is to change the Wbd server of the new hosting to Apache, which is the same as the old hosting. Now the problem is solved.