It is a must to use LiteSpeed Cache Best Settings in WordPress. Otherwise, it won't work properly, or even worse it may break your site. Especially, its caching feature is very delicate and requires the best LiteSpeed Cache settings to output expected results.
If you have ever faced any of the LiteSpeed Cache features not working like the image optimization, CSS and JS optimization, or anything else, there is a very good chance of it happening because of misconfiguration in the plugin. Additionally, wrong settings may cause your website to behave unexpectedly, like seeing contents in your website that doesn't have proper styles when it starts loading, known as Flash of Unstyled Content (FOUS), noticing any functionality in your website not working, and so on.
I have thoroughly tested LiteSpeed Cache plugin and all its settings before coming up with this LiteSpeed Cache best settings guide. So, I have seen which settings cause which issues. Now, I will guide you through all those so that you can get the most out of LiteSpeed Cache plugin without facing any problems.
About LiteSpeed Cache
I think LiteSpeed Cache is the best cache plugin for WordPress if you are on a LiteSpeed server. And if you are on a different server like NGINX or Apache, LiteSpeed Cache is still one of the top performers for WordPress optimization. You just won't be able to take advantage of its amazing server-level caching capabilities on other servers. But, you know what, you can use any other caching plugin to make up for that. They all do pretty much the same thing without much of a specialization.
Regardless of the web server you are using, you can use its HTML, CSS, JS, database, and other optimizations without any problems. In fact, you can even take advantage of its special features like Critical CSS, Image optimization, Low-Quality Image Placeholder, and QUIC.cloud CDN in any WordPress site. These services don't even consume your server resources instead they are done in their QUIC.cloud servers. That's awesome considering that you get a pretty generous free monthly limits for these services when everyone else is charging for them. And all other features in LiteSpeed Cache are completely free.
Speaking of which, check out this article to know about the free limits of LiteSpeed Cache features that require QUIC.cloud.
Combining all its features, you can get a very fast website loading speed. It may well be all that your website needs to go from a low score in Google PageSpeed Insights to a very high score like in the 90s range.
See this LiteSpeed Cache review to know more about why LiteSpeed is different from any other caching plugins in WordPress.
LiteSpeed Cache Best Settings
The following LiteSpeed Cache best settings guide is based on my first-hand experience with the LiteSpeed Cache plugin for WordPress. I have tried and tested all these settings on multiple sites and found the most optimized settings that actually work. What I mean is that some of its settings conflict with other settings and cause various issues like broken site, FOUC, etc. Additionally, some settings cause more damage than good for individual requirements.
That's why I have described all the LiteSpeed Cache settings in detail so that you can tell if a setting is useful for your need and also if that setting is going to conflict with any other setting that might result in unwanted outcomes.
Let's start with installing and activating the LiteSpeed Cache plugin.
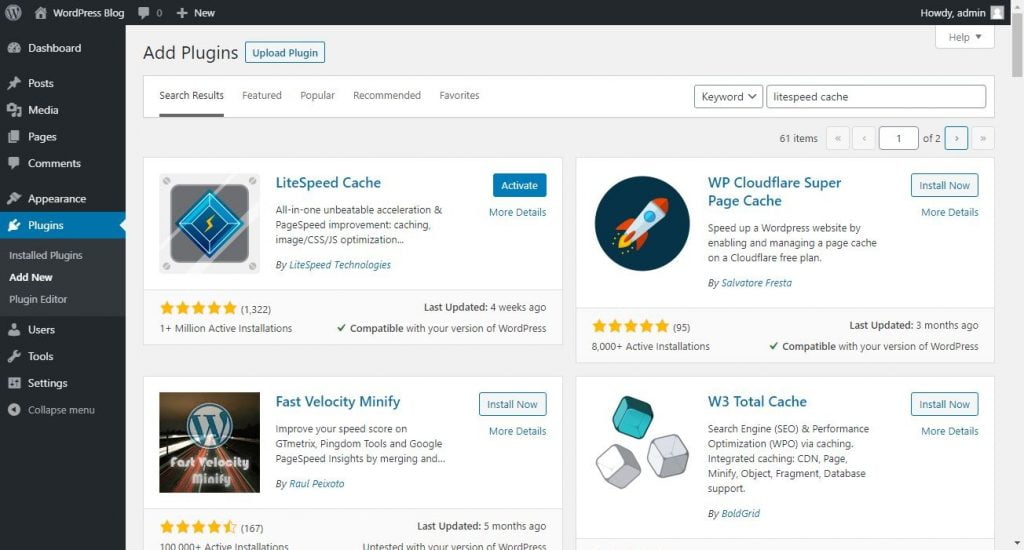
From your WordPress dashboard, go to Plugins > Add New. Then search for LiteSpeed Cache. Then for the LiteSpeed Cache plugin result, click on Install and then Activate.
Now your LiteSpeed Cache plugin is installed on your site. This will add a LiteSpeed Cache item in the menu of your WordPress dashboard. Click on LiteSpeed Cache from that menu to open its settings.
Dashboard
LiteSpeed Cache > Dashboard.
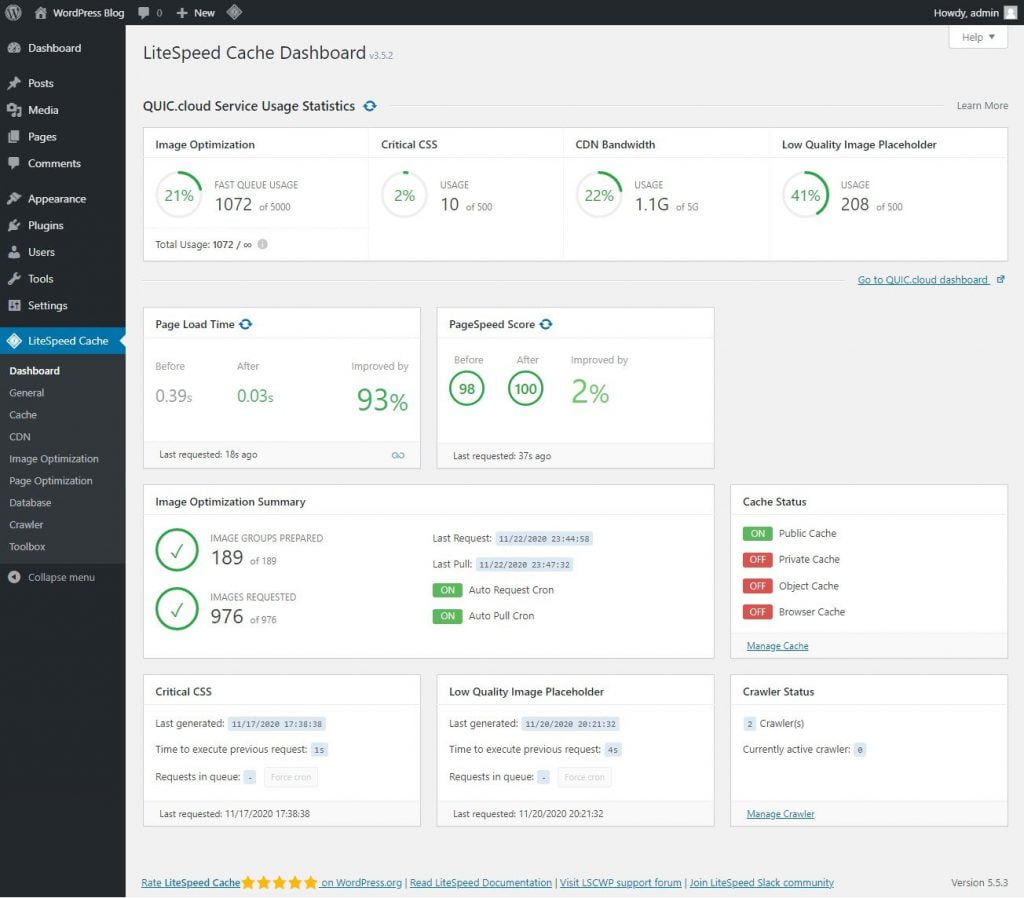
It is just a summary of different service status. On the first row, you will see your current month's usage of the services that require QUIC.cloud.
QUIC.cloud isn't just used for CDN by LiteSpeed Cache, it is also used for Image optimization, Critical CSS (CCSS) generation, and Low Quality Image Placeholder (LQIP) generation.
Also, QUIC.cloud services are based on a monthly free usage limit. Though their free tier limits are pretty generous, you will need to pay if you exhaust your limits or wait for the next month when the limit will reset again. That is to say, all the features of LiteSpeed cache that doesn't require the use of QUIC.cloud are completely free to use.
See this page to know about the free limits of the QUIC.cloud services in LiteSpeed Cache and the cost after the monthly limits are used up.
Back to the LiteSpeed Cache dashboard. after the QUIC.cloud services you will see tabs containing how much LiteSpeed helped increase your site performance in terms of Page Load Time and PageSpeed Score.
Then some additional information about Image Optimization Summary, Critical CSS, and Low Quality Image Placeholder activities. It also shows you the Cache Status that tells you which caching is enabled and which are disabled. Then there is some information about the Craws Status on your site.
General
LiteSpeed Cache > General.
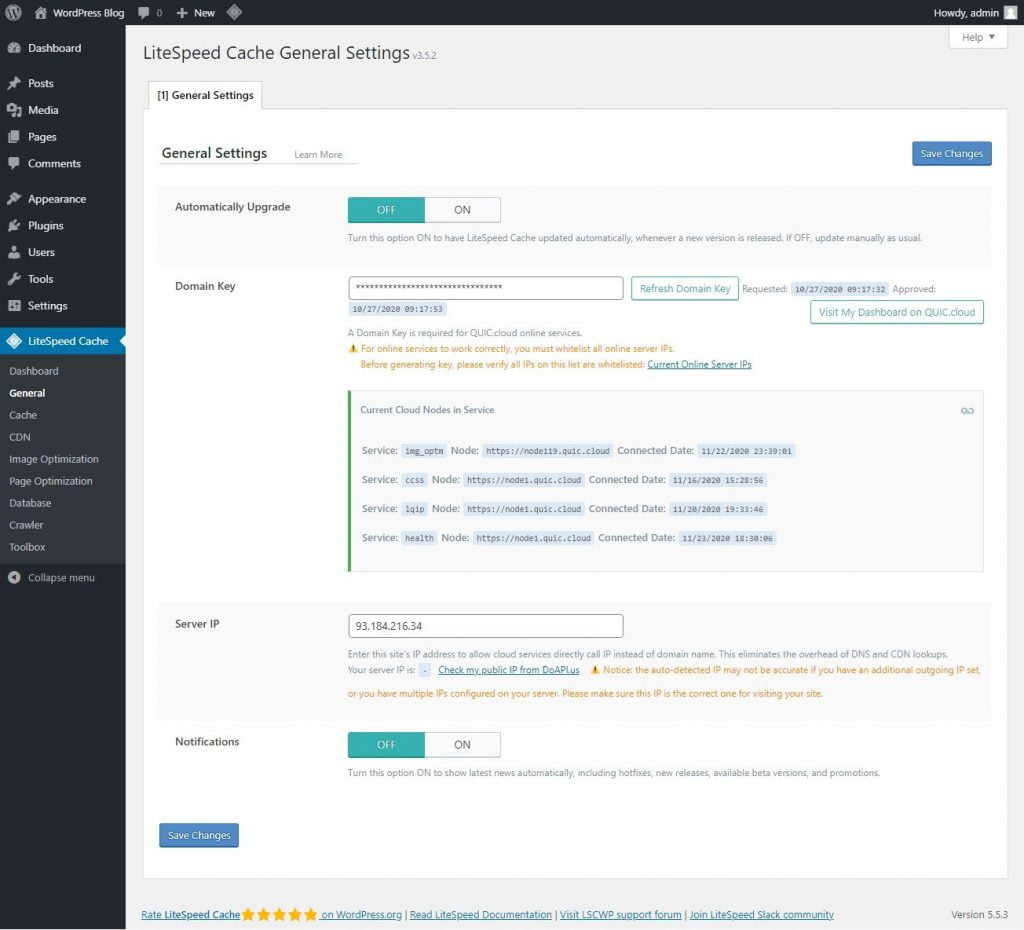
Automatically Upgrade - You can turn it On but I don't want to be surprised by a big change overnight and face any issues though this is rarely the case. But if there happens to be an issue, the automatic upgrade would leave me clueless about why the issue might have happened. Also, I sometimes like to see the update log of the new versions but automatic upgrades would take that away for me. That's why I turned this option Off.
I would like the option of automatically upgrading only minor versions but not major ones. But that isn't available in LiteSpeed Cache, at least yet.
Domain Key - In order to use any of the services in LiteSpeed Cache that requires the use QUIC.cloud, you will need to have a domain key from QUIC.cloud. The services of QUIC.cloud include Image Optimization, Critical CSS generation, Low Quality Image Placeholder generation, and the CDN service of QUIC.cloud.
You can use the first three services by just getting a domain key for your site which doesn't require linking your site to a QUIC.cloud account. But to use the QUIC.cloud CDN, you will also need to link your site to your QUIC.cloud account. Additionally, if you run out of the free monthly quota of QUIC.cloud services and want to buy more, you will need to connect your site with QUIC.cloud and then buy from there. Below are the steps describing how to do both of those.
To get a domain key for your site, click on the Request Domain Key button.
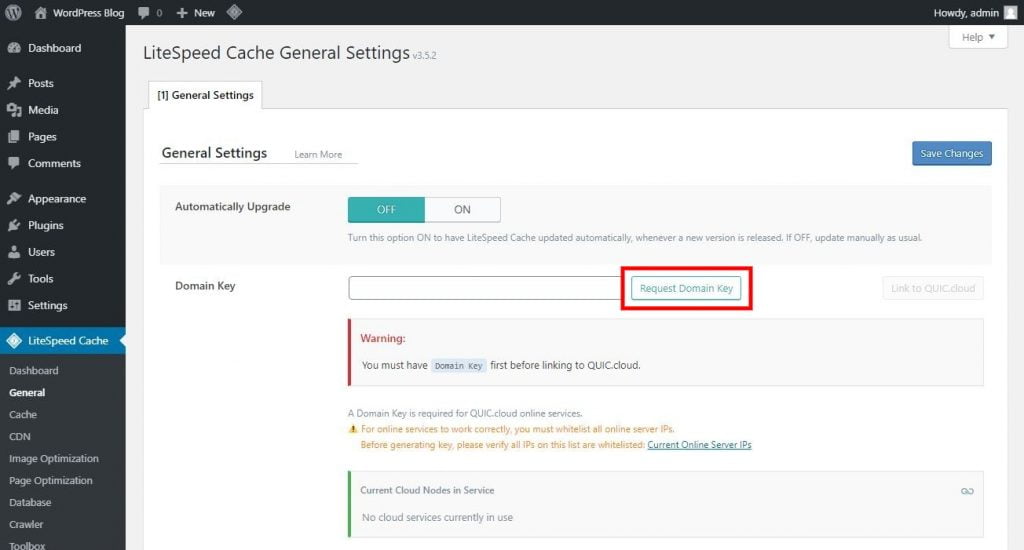
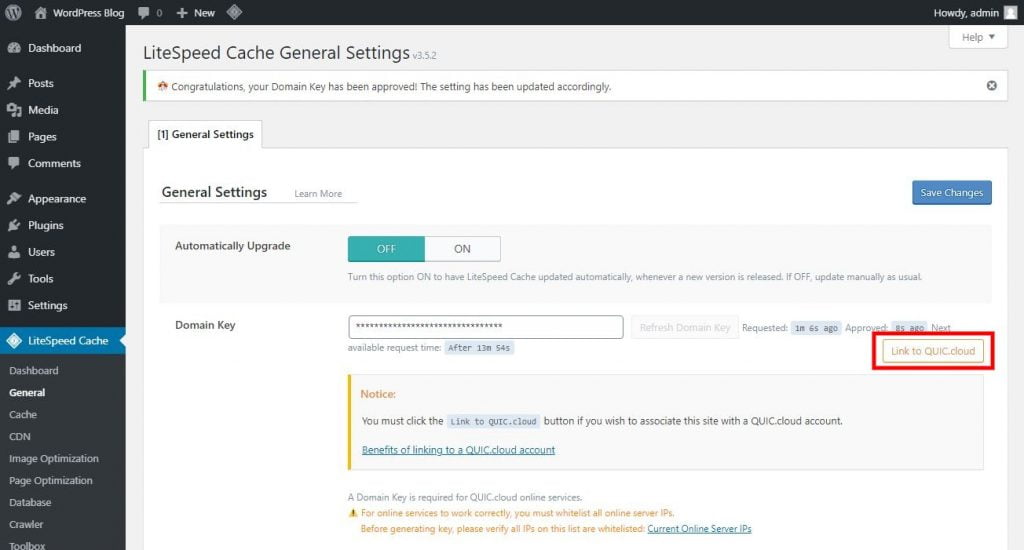
Now wait for sometime like a minute or so for your domain key to be automatically generated. Then refresh the page and you will see some asterisks in the Domain Key field. This will mean your domain key has been successfully generated.
Now to link your WordPress site to your QUIC.cloud account, click on the Link to QUIC.cloud button.
Then you will be prompted to log in to your QUIC.cloud account.
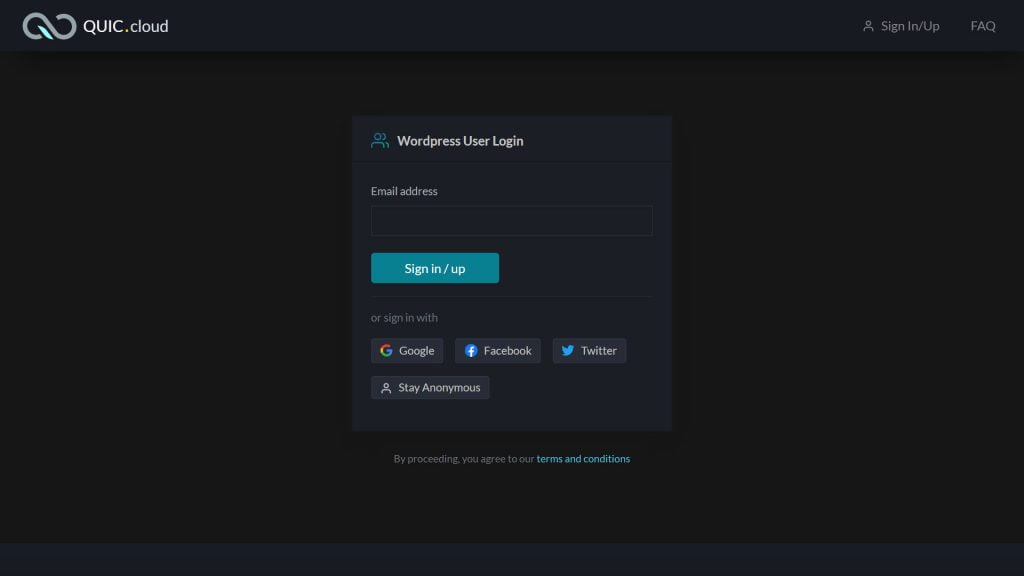
From this page, you can log in to your existing QUIC.cloud account or create an account for free. Then once you are logged in, you will be automatically returned back to the LiteSpeed Cache settings page.
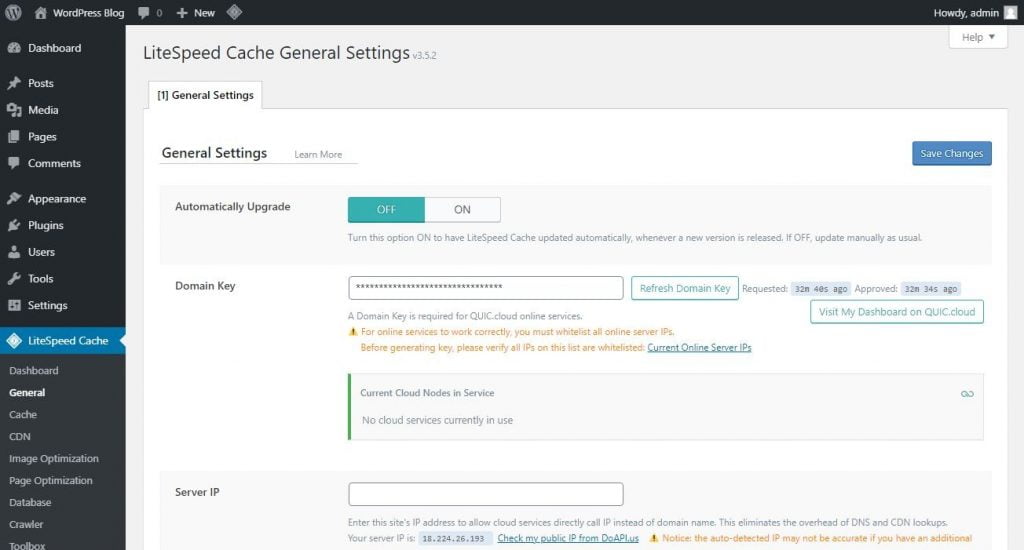
Now you will see the Visit My Dashboard on QUIC.cloud button instead of the previous Link to QUIC.cloud button. This will mean your LiteSpeed Cache plugin is now successfully connected to your QUIC.cloud account.
One more thing, if you ever change your web server type like going from a non-LiteSpeed server to a LiteSpeed server, upgrading from OpenLiteSpeed to LiteSpeed Enterprise, or do anything like that and want your QUIC.cloud free monthly limits to reflect that change, you can click on the Refresh Domain Key button. Otherwise, LiteSpeed Cache wouldn't automatically reflect that.
If you are on a LiteSpeed server and using a reverse proxy like Cloudflare on your site, you may only get the free monthly usage limits of the basic tier of QUIC.cloud after you get your domain key because QUIC.cloud will see your server type to be say Cloudflare. That's why you can disable the reverse proxy first and then request or refresh your domain key to get the right QUIC.cloud free tier. After that, you can enable the reverse proxy. This way your QUIC.cloud free usage limits will stay the same even after enabling the reverse proxy.
Server IP - You can use the IP address of your server in this field. This will eliminate the extra DNS or CDN lookup time that is associated with using domain names. Therefore, QUIC.cloud will be able to communicate faster with your server thereby improving the speed at which your site can receive the QUIC.cloud services. You can click on the Check my public IP from DoAPI.us link to see the IP address of your server.
But this may not always give you the right IP address so it is better if you can get the IP address from your web hosting provider. Then enter that IP in the Server IP field. But if you aren't certain for sure about your IP address, keep that field empty.
Notifications - Turning this notification On will show their updates in the WordPress dashboard. But I found that some of these update notifications can't be remove from the LiteSpeed Cache settings pages like when there is a beta version available. That's why I turned this Off.
Cache
LiteSpeed Cache > Cache
The settings in this category are mostly applicable for the users of the LiteSpeed web servers like LiteSpeed Enterprise and OpenLiteSpeed and QUIC.cloud CDN. However, this category also has object caching and browser caching features which can be used with other web servers like Apache and NGINX.
LiteSpeed Cache > Cache > Cache
Settings on this page are ONLY applicable for those using either a LiteSpeed web server or QUIC.cloud CDN or both.
By the way, the HTML/full-page caching feature in the LiteSpeed Cache works directly from the LiteSpeed web server. As such, LiteSpeed Cache provides server-level caching and not application-level caching which is provided by other WordPress cache plugins. This is one of the reasons you won't find the HTML cached files by the LiteSpeed Cache plugin in your WordPress files directory.
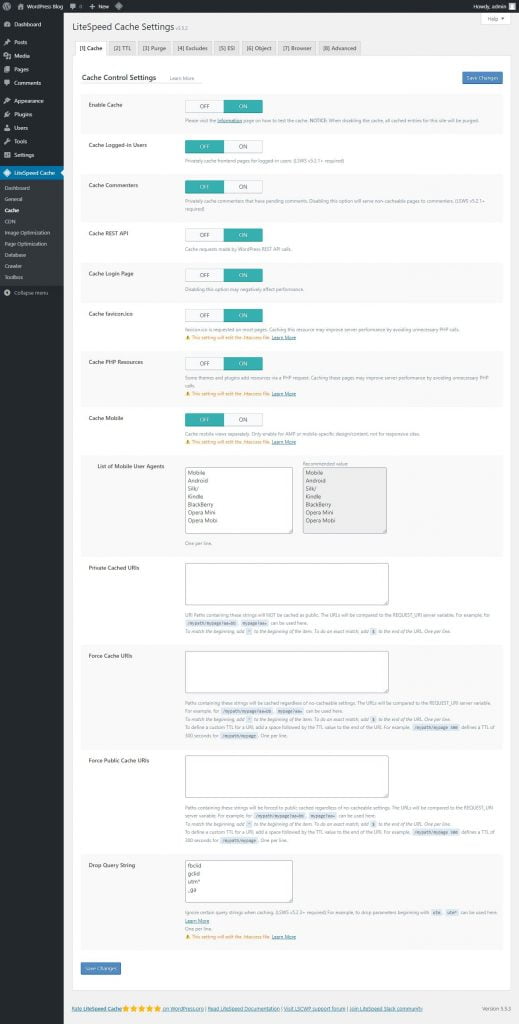
Enable Cache - This is the magic switch for the amazing server-level caching of LiteSpeed Cache plugin. It is required to turn ON this option to enable the caching feature of LiteSpeed Cache. If you turn this option to OFF, the full page caching feature of this plugin will be disabled. So, I recommend turning this option ON.
Cache Logged-in Users - This option is for the private caching of front end pages. If your site has a lot of people who browse your WordPress site as logged-in users like members in a membership site, admins, authors, subscribers, and other WordPress user roles, your website's cache size will grow significantly if you turn this option ON. So, if you don't care about your web server storage, you can turn this option ON for faster delivery of your webpages to these users.
However, the pages won't be cached until the second visit so the speed improvement will not be available to the users in their first visits. That's why if most of that logged in users don't visit the individual webpages more than once, you won't really get many benefits from this. But if you have a handful of logged-in users, you can turn ON this option. Still, the handful of the logged-in users are already your site users so they probably wouldn't mind the small speed improvement because of the caching. That's why I turned it OFF.
Cache Commenters - This allows you to separately cache webpages for the visitors who have left a comment that comment is still pending to be approved or discarded. Its usage is similar to the usage of the previously mentioned Cache Logged-in Users option. So, I turned it OFF.
Cache REST API - This is generally used by the WordPress developers for functionality in themes and plugins. So, it wouldn't be something to worry about for most people. You can keep its default status of turned ON.
Cache Login Page - Your WordPress login page will load faster while it is turned ON. This will also allow the login page to handle more requests. Because many online bots attack the login pages, a login page that loads faster and can handle more requests will do a better job at safeguarding your entire site from going down amid this attack. So, I recommend keeping it turned ON.
On a side note, LiteSpeed Enterprise web server and LiteSpeed WEB ADC come with some built-in security measures for the WordPress login page URL like protection against brute force attacks. This is why if you are on any of those servers, it may be better to not change your default WordPress login page URL which is wp-login.php because then LiteSpeed wouldn't know what your login page is.
Cache favicon.ico - If your WordPress site doesn't have a site icon that is shown in the browser tab beside your webpage name, favicon.ico is requested for using in place of that. This ultimately loads a WordPress icon. That's why keep this option turned ON to make this favicon.ico response faster.
Cache PHP Resources - Some themes and plugins load CSS and JS files by running PHP scripts but those files are generally static files so they can cached without any problems. Also, by caching those files you can avoid running some PHP scripts which would improve your server performance. So, keep this option turned ON.
Cache Mobile - This option is pretty deceptive as it gives an idea that it should be turned ON when your site is mobile friendly. But that totally isn't the case. Instead, it is meant to be used for only mobile specific content like when your site has an Accelerated Mobile Pages (AMP) version. So, regular responsive websites don't usually require turning this ON. This is also the case for me so I turned it OFF.
List of Mobile User Agents - This is only applicable if your previous Cache Mobile option is turned ON. The list provided in the recommended field is also the default list used in WordPress so keep it alone or add more devices to the list if you know you need additional ones.
Private Cached URIs - This is applicable if you want some specific pages, posts, or anything on your site not to be cached as public (caching where everyone is served the same thing regardless of who is visiting the page) but as private. A good example would be the user profile or account pages where each user needs to see different contents on the same webpage. Because of private caching, its usage would be similar to the earlier Cache Logged-in Users option found earlier in this settings page. That's why its usage doesn't seem very attractive to me so I don't use it.
Force Cache URIs - If you want to force some of your pages, posts, or anything on your site to be cached, this is the option for you. It isn't generally necessary unless you have some specific use case.
Force Public Cache URIs - This option can be used to force some of your pages, posts, or anything on your site to be cached as public. Most sites don't need to be doing anything in this but if you need to use this option, you would already know about it.
Drop Query String - This is an important setting. Query strings are generally used to mean the presence of dynamic contents (e.g. content changes because of things like changes in language, currency, etc) on the page. So, in order to serve the right contents to the right visitors, it is better to serve a non-cached version of the page or to separately cache the page for each separate query string when there is any query string present on an URL.
However, not all query strings are used to mean dynamic contents. For instance, when you click on a link from say Facebook, the link will automatically have a query string attached to it which is used for tracking but not for indicating dynamic contents. Query strings are also used for tracking purposes in marketing campaigns and so those query strings also don't indicate dynamic contents. That’s why the webpages render the same with or without these query strings. So, you can safely serve cached pages when those types of query strings are present on the URL.
As you know serving cached contents can improve the website load time. So, you will be better off by serving cached contents or by not making multiple cached versions for these types of query strings that don't indicate the presence of dynamic contents on the page.
In the Drop Query Strings field, you can use such query strings that should be ignored from the URL to allow the serving of cached pages without creating multiple cached versions by LiteSpeed Cache. The default list is this field is pretty good. You can also use some other query strings on the page if you think they are useful.
You can also get some other query string/parameter idea from Cloudlare's APO supported Query parameter list for WordPress from this link.
LiteSpeed Cache > Cache > TTL
Settings on this page are ONLY applicable for those using either a LiteSpeed web server or QUIC.cloud CDN or both.
This TTL (Time to Live) setting page is for telling the LiteSpeed Cache plugin about the maximum time it should keep the different cached files. Once that time expires, any new request to the expired cached files will not be served from the cache. Instead, the new request will be dynamically generated and then served to the first new visitor. That newly generated page or response will also be cached for serving to any subsequent visitors.
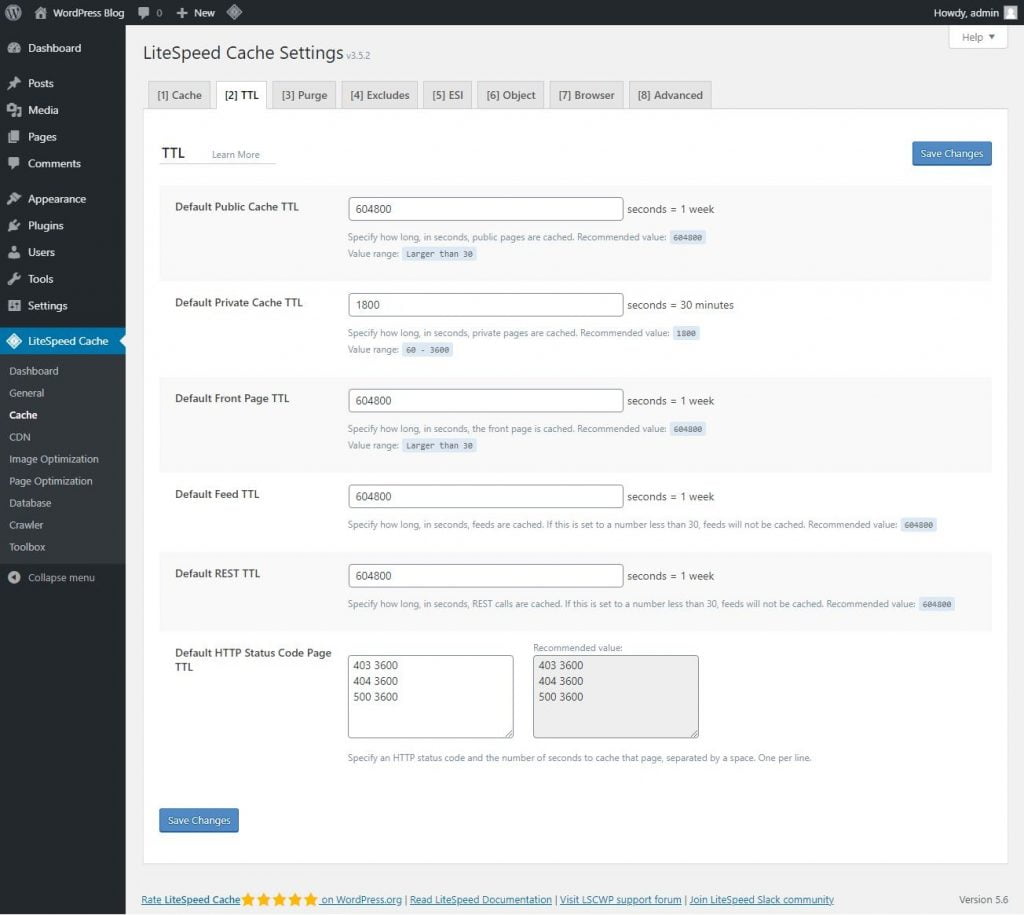
Default Public Cache TTL - This is where you set the expiration time for the public pages or the pages that can be shown to anyone regardless of who is visiting the page. The default value is 1 week which is represented as 604800 seconds. Keeping the default value will do just fine. But you can increase or decrease it as per your need.
A larger value will increase your cache hit ratio or the chances of the pages being served from the cache. So you may want to increase this value especially because this affects most of the pages on your site. LiteSpeed Cache automatically purges/removes the cache for all related webpages when you update the contents of any of your webpages. So, even if you use a higher value, you won't need to worry about serving stale/old content after updating any of your website content.
Default Private Cache TTL - This is similar to the Default Public Cache TTL settings except that it is for caching private pages or the pages that show different contents based on who is visiting the page. The default value is 30 minutes which is represented as 1800 seconds. Keeping this value will do just fine.
A larger value may cause your website's cache size to significantly increase if your site needs to cache a lot of private pages. This may happen because of having many webpages and/or many private visitors. In this situation, you may want to keep a lower value.
Default Front Page TTL - You can specify the cache expiration time of your website's front page in this field. Default value is 1 week or 604800 seconds. Keep this value or change at your discretion. If you want to decide about changing the value, see the Default Public Cache TTL field mentioned previously because these two will be similar.
Default Feed TTL - This field is for specifying how long your website feeds should be cached. Default value is 1 week or 604800 seconds. Keeping this value will do just fine.
A higher value will increase your cache hit ratio. LiteSpeed Cache automatically purges the cached feed pages on updates and on comments, so you won't have to worry about keeping the page up to date while using any higher value.
Default REST TTL - As discussed in the Cache Rest API option in the previous section, this option wouldn't be something to worry about for most people. So, you can just keep the default value of 1 week or 604800 seconds.
Default HTTP Status Code Page TTL - This is for specifying how long you want to cache the pages for different status code response. For instance, you can cache pages that return the HTTP 404 Not Found error for a certain expiration time. So, in this field, you need to specify the specific status code and the cache expiration time for that status code with a space between the two. You can include multiple status codes with their cache expiration time in separate lines. Just keep the default values or change at your discretion.
LiteSpeed Cache > Cache > Purge
Settings on this page are ONLY applicable for those using either a LiteSpeed web server or QUIC.cloud CDN or both.
LiteSpeed Cache > Cache > Excludes
Settings on this page are ONLY applicable for those using either a LiteSpeed web server or QUIC.cloud CDN or both.
LiteSpeed Cache > Cache > ESI
Settings on this page are ONLY applicable for those using either a LiteSpeed Enterprise web server or QUIC.cloud CDN or both.
LiteSpeed Cache > Cache > Object
LiteSpeed Cache > Cache > Browser
LiteSpeed Cache > Cache > Advanced
CDN
LiteSpeed Cache > CDN
LiteSpeed Cache > CDN > CDN Settings
LiteSpeed Cache > CDN > Manage
Image Optimization
LiteSpeed Cache > Image Optimization
LiteSpeed Cache > Image Optimization > Image Optimization Summary
LiteSpeed Cache > Image Optimization > Image Optimization Settings
Page Optimization
LiteSpeed Cache > Page Optimization
This section contains the main optimization settings options of the LiteSpeed Cache Plugin. These optimizations include HTML, CSS, JS files, and others. The aforementioned three files represent all the codes used on any website. So, they require optimizing properly, otherwise, your site may look broken. Also, an option from a settings page in this section can cause conflict with another option. That can make your site behave unexpectedly.
This is why you will need to be careful when setting up the options in this section. Also, if you find your site broken after setting up this plugin, there is a high chance that this section is the reason for that. So, properly read the option details and follow the recommended settings described in this section in order to avoid any of the issues caused by these optimizations.
LiteSpeed Cache > Page Optimization > CSS Settings
CSS files are used to design your website. So, they are required for your webpages but at the same time unoptimized CSS can slow down your website. Additionally, CSS files usually need to be loaded before any of your website contents can load on the screen which makes them render-blocking. And render-blocking resources contribute to slowing down your website's perceived load speed. This means website visitors will think your site loads slower than it actually does.
So, properly optimizing CSS files is very important for a good user experience. However, optimizing CSS can be a little tricky because it may introduce the FOUC or Flash of Unstyled Content (FOUC) problem, and cause your site to look broken. But I will tell you how you can properly optimize CSS in the LiteSpeed Cache plugin.
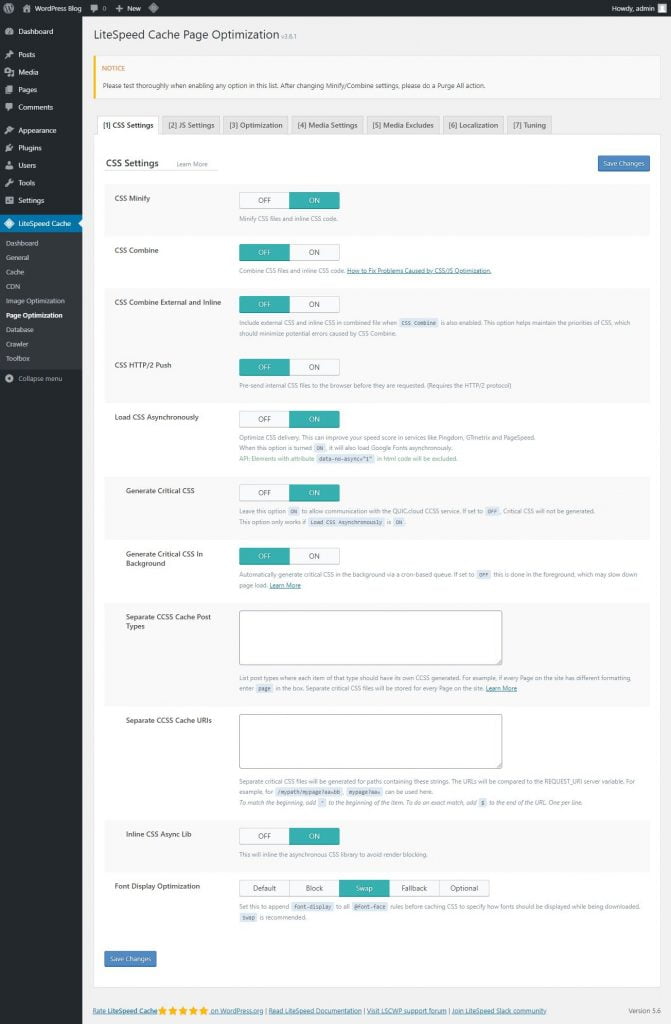
CSS Minify - CSS minification will remove any extra white space characters, new line characters, and comments from the CSS files. This can make your site load a little faster because of the slightly reduced file size but the ultimate difference won't be something very significant.
This minification process will take some time and use some server resources. However, the minification will only be necessary once per webpage until the minified CSS file is removed from the cache or the cache gets expired. So, the page load time for the first visitor of any webpage will be longer because of the necessity to generate the minified file. But all the subsequent visitors to the webpages will enjoy faster page speed.
Therefore, if your site has lots of visitors, you will benefit by turning this option on. But if your site has only a few visitors, you may not see much improvement in the website speed because of the extra time required to serve the first visit. In fact, this may also negatively impact your website speed for low traffic sites. However, you can solve this issue by using the Crawler feature of LiteSpeed Cache considering that your website is on a LiteSpeed server and your hosting provider allows using crawler. You will see more about Crawler in the Crawler section below in this article.
If your website has only a small number of visitors (and if you can't use a crawler that will automatically trigger these minifications), you may be better off keeping this option turned OFF. But if your site has at least some decent number of visitors, you can get better results by turning it ON. But the ultimate result may not be very significant so you may also see similar results with or without minification.
You can read more about how minification affects your site speed from this article. This article will also discuss another option of how minifying CSS in CDN compares with this option of minifying in your web server.
CSS Combine - This option will combine all your internal CSS files (files that are loaded from the same domain of your website instead of from a different subdomain or an external domain) that are necessary to load a webpage. So, it reduces the total number of requests necessary to load your webpages but not the total size of your CSS files. Regardless, this reduced number of requests could make your site faster in the previous days because of the limitation in the then technology. But that limitation doesn't exist anymore so CSS Combine is kind of unnecessary nowadays. In fact, in many cases, it can do more harm to your site speed than good.
You can read more about why you shouldn't combine CSS files from this article. This article also tells you why you might see an increase or decrease in your website speed from both with or without combining CSS files. But regardless, you will ultimately get better results from not combining your CSS files.
In addition to all these, combining CSS files can sometimes cause issues and can break your site. So, it would be a safer bet to not combine the CSS files if you don't want to worry about possible website issues. So, I recommend keeping the CSS Combine option turned OFF. But if you still decide to try it out, make sure to thoroughly check your WordPress site and see if there are any issues after combining your CSS files.
CSS Combine External and Inline - This option is similar to the previous CSS Combine option which combined only the internal CSS files. But enabling this option will also combine external CSS files (CSS files from a different subdomain of yours or from any external domains) and inline CSS (these are the CSS codes found inside the <style> tag inside the <head> tag of your webpages so these CSS codes aren't from a different CSS file liked with the href attribute).
In other words, if you turn on both the previous CSS Combine option and this CSS Combine External and Inline option, all the CSS files of any webpage will be combined into a single CSS file and that file will be served from your web server. So, this will also localize any external CSS files and serve them from your server instead of the external servers which can also bring some speed benefit to your site. You can read this article to know how localizing external files may improve your site speed.
When this option is enabled, the combined CSS file will be able to maintain the original order in which all the CSS files are loaded on the webpage. So, enabling it may solve some issues on your site which might have caused after enabling the previous CSS Combine option. If you have enabled the previous CSS Combine option and faced any issues on your site, you can try turning on this option and check whether it solves the problem.
As you have guessed, this option is dependent on the previous CSS Combine option. So, the CSS Combine option will need to be enabled in order for this CSS Combine External and Inline option to work. And as discussed in the previous CSS Combine option, you can get more benefits by keeping the CSS combine option turned OFF and that follows for this option too. But if you have, for some reason, decided to turn ON the CSS Combine option, also doing so for this option may be a better choice.
CSS HTTP/2 Push - HTTP/2 server push allows web servers to send needed website files to the browsers without waiting for the browsers to discover those files from the webpages and their additional resources and then making requests for those files. So, it can eliminate the delay before starting to download the required files because of the conventional file discovering request making process. Therefore, it accelerates the downloading which in turn improves your website speed.
But pushing too many files or pushing files that aren't immediately necessary to load the webpage can negatively affect your website speed. You can read more about how HTTP/2 server push affects website speed in this article.
That's why I recommend pushing only the resources that are necessary to load the above the fold contents (these are the contents that are visible on the browser screen without ever scrolling the webpage). However, this CSS HTTP/2 Push option will push all the CSS files regardless of whether they are needed in the above the fold contents. So, I recommend keeping this option turned OFF.
But CSS files are needed very early in the website loading process to avoid FOUC issue and to properly load your website design. So, pushing all the CSS files using HTTP/2 server push can be a good idea for achieving a faster CSS load speed. But LiteSpeed Cache plugin has the Critical CSS feature which will help us achieve better CSS loading behavior. So, you wouldn't need to enable this CSS HTTP/2 option. Critical CSS is another option in this settings page so it has been discussed there.
Load CSS Asynchronously -Normally when browsers do something like downloading a CSS file, it will stop doing all other things. To extend, CSS files are placed at the header/top of webpages so it is placed before any of the website contents like text, images, and others. that you see on your screen. As such, the browser first needs to download and execute all the CSS files before it can show anything on your screen. Because the CSS blocks showing/rendering of the HTML document or the website contents, it is called render-blocking. This is why you see the CSS render-blocking warning when testing your site in the Google PageSpeed Insights.
Asynchronous loading allows web browsers to do multiple things at the same time. In this context, the browser can do other things like rendering/showing website contents on your screen while it downloads the CSS files. So, you don't need to wait for the CSS files to get downloaded before you can start to see contents on the webpages. This way, as soon as the CSS files are downloaded, the browser can execute those files and apply them to the webpages.
So, the big benefit of loading CSS files asynchronously is that the visitors get to see website contents on their screen as soon as possible. Consequently, it gives a better experience to the users. That is also why you can see a higher Google PageSpeed Insights sore if you use asynchronous loading. However, because in asynchronous loading, the browser isn't downloading fewer resources or executing fewer files, the total website loading time doesn't actually improve. Instead, it makes the website speed look faster to the visitors by enabling them to see the website contents quicker.
There is an issue with asynchronously loading the CSS files. That is because CSS files are used to design the contents of the website. So, when the browsers start to show website contents before downloading and executing the CSS files, the contents load without any design and that makes the website look bad. This loading of website contents without any designs is called FOUC or Flash of Unstyled Content. But as soon as those CSS files are downloaded, the browser immediately executes them and applies the styling to the webpage so the FOUC issue only lasts for just a while and then everything goes back to normal.
There is a good way called Critical CSS for solving this FOUC issue while using asynchronous CSS loading but Critical CSS may not always work perfectly for some sites. Critical CSS is the next option on this settings page of LiteSpeed Cache plugin and it has been discussed there.
In the end, asynchronous CSS can work on most sites but can cause issues for a few sites while combined with Critical CSS. So, you can keep it turned OFF as long as you want the safer option. But it generally works fine for most sites so you can turn it ON if you want to further improve your perceived website loading speed (which also improves user experience) and also if you are willing to spend the time testing out whether your site works fine after enabling it.
Generate Critical CSS - Critical CSS is only that portion of a webpage's entire CSS which is required to design only the above the fold contents of the webpage. Above the fold contents are the contents of a webpage that can be seen on the browser screen without ever scrolling the webpage.
Asynchronously loading CSS files causes webpages to show unstyled content for a while when the webpage first loads (or FOUC issue). That's because the necessary CSS to style the webpage doesn't load until after those contents are loaded. But if you can extract the CSS necessary to style the above the fold contents and load that CSS before any of the website contents is loaded on the screen, you can not only avoid the FOUC issue but also get the benefit of asynchronous loading. And that's the purpose behind Critical CSS.
As you may already realize this option only works when the previous Load CSS Asynchronously option is turned on.
Using Critical CSS, you are just copying the CSS necessary for the above the fold contents and placing it at the top of the webpages for it to load before any of the website contents are loaded. But you aren't removing these CSS from their original source files which will still be downloaded asynchronously and then executed. Therefore, Critical CSS will actually add more CSS on top of the existing CSS.
So, Critical CSS will make your total webpage size slightly larger which will ultimately make the total website loading speed slightly slower. But at the same time, it will enable website contents to start appearing faster on the screen which will improve the user experience of your visitors and consequently improve your Google PageSpeed Insights score.
However, generating Critical CSS is an automated process and it may not always work perfectly especially because there are so many different types of sites with so many different types of content on them. And improperly generating Critical CSS may even cause your site to look broken. But because LiteSpeed Cache is already pretty good at this and the original CSS will be loaded afterward anyway, normally you shouldn't ultimately worry about losing any design or functionality. Regardless, it may sometimes cause some inconsistencies.
However, for most sites, Critical CSS should work just fine. So, I recommend turning it ON if you have already enabled the previous Load CSS Asynchronously option but be sure to check your site thoroughly after enabling this option.
Generate Critical CSS In Background - This option allows you to select whether you want the previous Generate Critical CSS option to work in the background or in the foreground. If you turn this option off, it will work in the foreground. And if you keep it on, it will work in the background.
The foreground feature will generate Critical CSS immediately when someone visits a page that doesn't already have its Critical CSS generated. In this way, the page load time for the very first visitor will be a little i.e., by the time it takes to generate Critical CSS which is usually a second or two. That's because the Critical CSS will be generated after he requests to view the page but before the page is served to him. But this waiting time will only be necessary for the very first visitor to a page and not for any subsequent visitors.
Additionally, LiteSpeed Cache, by default, generates only one Critical CSS per post type. So, even if you have thousands of posts on your WordPress site, only one Critical CSS will need to be generated for all those posts. And by extension, only one visitor will need to wait that extra second regardless of how many posts you have on your site. Then again, WordPress sites have only a few post types like post, page, attachment, and others. So, Critical CSS will need to be generated only a few times on your site.
On the contrary, the background feature will not generate Critical CSS in between the page is requested and the page is served. So, it will not interfere with the page load time for even the first visitor. Instead, after a page is requested, LiteSpeed Cache will add this Critical CSS generation task to a queue and then generate it in the background. Then the subsequent page visits will load with the Critical CSS after it has been generated.
But this Generate Critical CSS In Background option will ultimately be in use if the previous Load CSS Asynchronously option is enabled. And when that option is enabled, the first visitor to a page without Critical CSS will encounter the FOUC issue if Critical CSS is working in the background. That's because the website contents will start to show up before any CSS is loaded.
To make the matter worse, if you have enabled (full-page/HTML) caching of this LiteSpeed cache plugin or in any other Caching plugin on your WordPress site, the first visit to a page will be cached. So, if a page has FOUC issue on its first visit, that page will always have the FOUC issue until the cache is cleared/purged. So, regardless of whether it is the first, second, third, or any visitor to that page, they all will face the FOUC issue just because of generating Critical CSS in the background.
That's why I recommend this Generate Critical CSS In Background option to be turned OFF.
Separate CCSS Cache Post Types - By default, LiteSpeed Cache will generate only one Critical CSS per post type. There are only 5 default post types in WordPress which are page, post, attachment, revision, and nav_menu_item. Then some WordPress themes and plugins might also add some additional post types. For instance, the WooCommerce plugin will add 3 additional post types like product, shop_order, shop_coupon, and shop_webhook. Among these, only the public post types are usually used for separate Critical CSS. In addition to these, taxonomy archive pages (categories, tags, product categories, etc.) pages are also eligible for separate Critical CSS.
LiteSpeed Cache, by default, generates only one Critical CSS for all the pages in a post type because the designs of all those pages are usually the same. But if the individual page designs in any of the post types are different from one another, the Critical CSS generated for one page won't be suitable for other pages on that post type.
For instance, if you use a page builder to individually design all the pages in your page post type, all those pages will need to have separate Critical CSS instead of just one. In that case, you can enter that post type in this Separate CCSS Cache Post Types box. This way LiteSpeed Cache will generate separate Critical CSS for all the individual pages on that post type. So, if you use page in this box, LiteSpeed Cache will generate separate Critical CSS for all your individual pages instead of just one for all the pages in the page post type.
Separate CCSS Cache URIs - This option is similar to the previous Separate CCSS Cache Post Types option with the difference that instead of using the post types, you can use matching URIs in this box.
URI or Uniform Resource Identifier is the part of a website address or URL that is used to identify the resource you are accessing using that URL. For instance, if your website has an About Us page and the URL for that page is
https://example.com/about-us/, theabout-uspart is the URI for the About Us page.
In this box, if you use about-us, LiteSpeed Cache will generate a separate cache for the About Us page and any other pages whose URI has a match with about-us. Say, if you have a different page with the URI about-us-page, this URI will also match with about-us and therefore will be eligible for separate Critical CSS.
To avoid these, you can use ^ at the beginning of the matching URI to mean the beginning of a URI. Also, you can use $ at the end of the matching URI to mean the ending of a URI. These two can be used separately in different URIs or in the same URI. So, if you use ^/about-us/$, it will only match the About Us page.
Inline CSS Async Lib - Enabling this option will place the JS necessary to asynchronously load the CSS files directly inside the <script> tag inside the <head> tag of the webpages. On the contrary, disabling it will create a new JS file with all those JS necessary to asynchronously load the CSS files and then add that new file inside the <head> tag. So, when enabled, the JS will be an integral part of the webpage's HTML file and when disabled, the JS will be a separate file. Therefore, in both cases, the total page size will remain the same.
So, when this option is disabled, the browser will need to make another request to download that new JS file. Also, this new JS file will be loaded synchronously (without preload, async, or defer attributes) so it will be render-blocking. And consequently, you may get the eliminate render-blocking resources warning while testing your site in Google PageSpeed Insights.
However, when the JS will be loaded as a separate file instead of loading inline, you can use browser caching with that file. Therefore, the file can be cached separately in the visitor's browser after they visit the webpage for the first time. Then if they visit any other pages on your site, that JS file won't need to be downloaded again. Instead, the browser will be able to reuse the cached file which can save a small amount of load time for those other pages.
But the size of this JS file is very minimum like under 1kb so it may not result in any noticeable speed improvement. Also, the load speed of the first time visitor may be affected slightly because of that additional request making process and you may get the render-blocking resources warning from Google PageSpeed Insights for having the JS as a separate file. So, even though enabling or disabling it may not bring any noticeable speed difference, I recommend keeping it turned ON.
Font Display Optimization - This option is used to instruct web browsers how fonts on your website should be displayed while they are being downloaded. This happens when the font used on your website isn't already downloaded or installed in the web browser. So, the browser first needs to download the required font and then display it. Here is how different options work:
auto (default) - This option lets web browsers decide how fonts are displayed. Most browsers use the next block option as their default font display option.
block - This option will instruct the browser not to show any fonts (more specifically, displaying an invisible font) on the screen until the required font is downloaded and ready to be displayed. Then as soon as the required font is ready, the browser will replace the invisible font with that required font. The problem with this option is that visitors won't see any text on their screen until the required font is displayed. So, users will need to wait before being able to see any text which may not give them the best user experiece.
swap - This option instructs browsers to show a fallback font until the required font is ready to be displayed. Then as soon as the required font is ready, the browser will replace the fallback font with that required font. The problem with this font is that visitors will see a font being displayed on their screen and then the font getting changed to a different one in a brief moment. So, it may not give users a very good viewing experience. This issue is called the FOUT (Flash of Unstyled Text) issue.
fallback - This option is a mix of the block and swap options. As such, this option will instruct browsers to show an invisible font for up to the first 100ms and if the required font isn't ready to be displayed within that time, a fallback font will be used to replace the invisible text. Then as soon as the required font is ready, the browser will replace the fallback font with the required font. But if too much time passes before the required font is ready to be used, the fallback font will keep being displayed for the rest of the page's lifetime.
optional - This option is similar to the previous fallback option with the difference that the browser can decide whether it ever wants to display the required font. For instance, if the user has a very weak internet connection, the browser may decide not to download the required font at all. That's because it may take too much time to download the font and that may not result in the best user experience.
So, Block will be the best option if you want to completely avoid the FOUT issue but it will also mean your visitors may need to wait before they can see any text on their screen until the required fonts can be displayed. This may not result in a very good user experience which is why you may see the ensure text remains visible during webfont load warning while testing your site with Google PageSpeed Insights. So, you can use Swap to avoid that warning and to give users a better user experience.
LiteSpeed Cache > Page Optimization > JS Settings
JavaScript is necessary to add different kinds of functionalities in your website like adding an image slider, popup box and for many other features. Most JS files are placed after all the contents on the webpage so they generally don't affect how your website loads. Sure, these affect your total website loading speed but they don't generally affect the perceived load speed of your website. In other words, JS files that are placed at the bottom of the webpage don't slow down the loading speed of the above the fold contents of your website and this is what matters the most to the website visitors.
But some JS files are placed at the beginning of the webpages mostly because they are needed very early in your website loading process. For instance, if the above the fold contents of a webpage has an image slider that requires JS, you would want that JS to be loaded before your website contents so that the image slider can be functional as soon as it loads on the screen. Now, because these JS files need to be loaded before any of your website contents can load on the screen, they become render-blocking. And render-blocking resources make your website load speed appear slower to the visitors than it actually is.
So, properly optimizing these render-blocking JS files is very important for a good user experience. However, improperly optimizing JS files can break your site and its functionalities. But here's how you can properly optimize your JS files using the LiteSpeed Cache plugin.
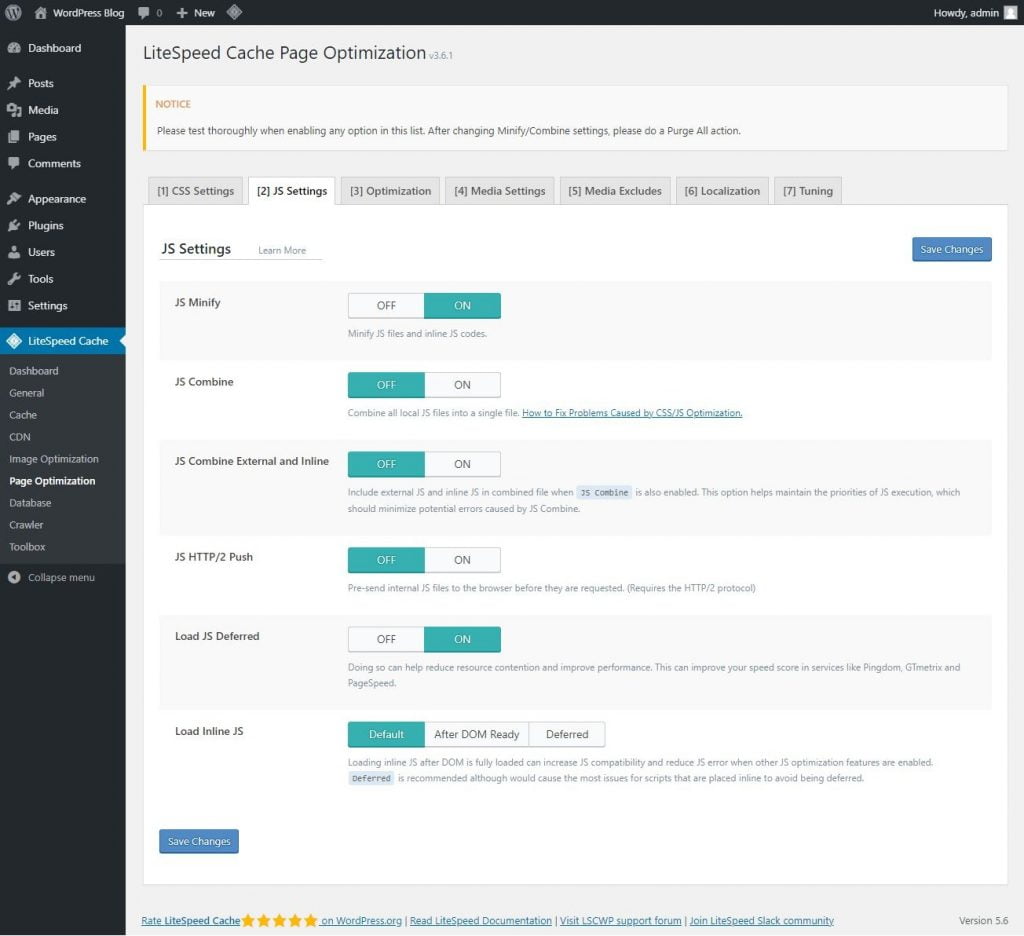
JS Minify - If your website has only a small number of visitors (and if you can’t use a crawler that will automatically trigger these minifications), you may be better off keeping this option turned OFF. But if your site has at least some decent number of visitors, you can get better results by turning it ON. But the ultimate result may not be very significant so you may also see similar results with or without minification.
This option works similar to the CSS Minify option from the previous LiteSpeed Cache > Page Optimization > CSS Settings page. See the explanation in that option.
JS Combine - Keep it turned OFF.
This option works similar to the CSS Combine option from the previous LiteSpeed Cache > Page Optimization > CSS Settings page. See the explanation in that option.
JS Combine External and Inline - Keep it turned OFF.
This option works similar to the CSS Combine External and Inline option from the previous LiteSpeed Cache > Page Optimization > CSS Settings page. See the explanation in that option.
JS HTTP/2 Push - Keep it turned OFF.
This option works similar to the CSS HTTP/2 Push option from the previous LiteSpeed Cache > Page Optimization > CSS Settings page. See the explanation in that option.
Load JS Deferred - Depending on your particular website, deferring JS files may work just fine or it may cause issues on your site. So, keeping it turned OFF will be the safer option. But deferring JS files usually works pretty good on most sites so you can turn it ON if you want to further improve your perceived website loading speed (which also improves user experience) and also if you are willing to spend the time testing out whether your site works fine after enabling it.
This Load JS Deferred option works somewhat similarly to the Load CSS Asynchronously option from the previous LiteSpeed Cache > Page Optimization > CSS Settings page. The similarity is that, both asynchronous and defer allow the specified resources to be download simultaneously when the browser is doing something else. And the difference is that the asynchronous files are executed immediately after they are downloaded but the defer files are executed after the parsing of the HTML document is completed.
That's why the effect of the asynchronous files can be seen pretty early on the webpages compared to the defer files. This is why you may want to be more careful while using defer with JS files. For instance, if the above fold contents of a webpage have an image slider whose functionality is dependent on a JS file that uses defer loading, it may take a while for the image slider to become functional after it has already loaded on the screen.
You can read more about the differences between asynchronous and defer loading as well as other similar options of preload and server push in this article.
One of the reasons, Load JS Deferred can be even less compatible than Load CSS Asynchronously is because the LiteSpeed Cache has Critical CSS feature to overcome the issues with the Load CSS Asynchronously but it doesn't have any such feature to overcome the issues with the Load JS Deferred option.
Load Inline JS - If you haven't enabled any other JS optimization features from the previous options in this page, going with Default will be the best option. But default may cause issues if you are using other JS optimization features. So, in that case, you can go with Deferred but if that causes any issues go with After DOM Ready. Either way, be sure to check whether your site works fine with your selected option.
This option lets you decide how the inline JS files should load on your website. Inline JS are the JS codes found inside the <script> tag in the <html> document of your webpages so these JS codes aren't from a different JS file linked with the src attribute.
Sometimes, inline JS is placed inline instead of in a separate JS file as a strategy to avoid being deferred. In that case, it might be important for those JS to load in the order it appears on the webpage in order to make the site function properly without breaking anything.
Deferred option, however, is the recommended option by LiteSpeed Cache. It will make the JS inside the <script> tags treatable as a new file and defer their loading. So, it will basically be the same as the previous Load JS Deferred option. But this can cause errors when the JS has been placed inline to avoid being deferred in the first place.
After DOM Ready option works similar to Deferred in that both will execute specified JS after the contents of the website have been loaded. But as for a difference, Deferred JS files are executed before the After DOM Ready JS files where the DOMContentLoaded event listener is used for loading JS.
If you have enabled other JS optimization options like JS Combine, Load JS Deferred, and others, selecting either Deferred or After DOM Ready can improve compatibility. So, you can thoroughly check your site to see whether there are any issues because of this option with respect to enabling or disabling other JS optimization options.
LiteSpeed Cache > Page Optimization > Optimization
CSS/JS Cache TTL - This is where you specify the maximum time that the optimized CSS and JS files should be cached by the LiteSpeed Cache plugin. Once that time expires for any cached CSS and JS files, those cached files will no longer be used. So, when the next time those files are necessary, they will need to be reoptimized. Then those reoptimized files will be stored in the cache to serve any subsequent visitors until those files are purged or they get expired. That is to say, those optimized CSS and JS files are stored by the LiteSpeed Cache plugin in the /wp-content/litespeed/cssjs/ files directory in your WordPress site.
The default value is 1 week which is represented as 604800 seconds. Keeping the default value will do just fine. But you can increase or decrease it as per your need.
A larger value will increase your cache hit ratio or the chances of the CSS and JS files being served from the cache. So you may want to increase this value especially because the CSS and JS files don't usually change that often. As a general guide, you may use a lower value if you are constantly making design and functionality changes to your website like changing themes, customizing their options, activating or deactivating plugins, and modifying their options. Otherwise, you can increase it to a higher value.
HTML Minify - If you are using full-page/HTML caching on your site, only then you should turn ON this option. Full-page caching refers to the previous Enable Cache option from the LiteSpeed Cache > Cache > Cache page of this plugin or enabling HTML caching from any other plugin. But if you aren't using full-page caching, you should keep this option turned OFF.
This option works similar to the CSS Minify or JS Minify option from the previous LiteSpeed Cache > Page Optimization > CSS Settings or LiteSpeed Cache > Page Optimization > JS Settings page respectively. But with a main difference in that CSS, and JS files get cached automatically after they have been minified but HTML files don't.
Because the minification process takes some time to complete and uses some processing power from your web server, it will add some extra loading time to your webpages as well as add burden to your server.
But if the HTML is being cached, this minification will only be necessary once per webpage until the minified HTML file is removed from the cache or the cache gets expired. So, even though the very first visitor to a webpage will face a slightly slower page loading speed, any subsequent visitors to the page will enjoy a faster webpage loading speed. So, the minification can ultimately be worthwhile.
But if the HTML file isn't' being cached, the pages will need to be minified every time they are visited regardless of whether it is the first, second, or any other visitors. So, all your webpages will always load slower and more of your server resources will be used up for no benefit at all.
LiteSpeed Cache > Page Optimization > Media Settings
LiteSpeed Cache > Page Optimization > Media Excludes
LiteSpeed Cache > Page Optimization > Localization
LiteSpeed Cache > Page Optimization > Tuning
Database
LiteSpeed Cache > Database
LiteSpeed Cache > Database > Manage
LiteSpeed Cache > Database > DB Optimization Settings
Crawler
LiteSpeed Cache > Crawler
LiteSpeed Cache > Crawler > Summary
LiteSpeed Cache > Crawler > Map
LiteSpeed Cache > Crawler > Blacklist
LiteSpeed Cache > Crawler > General Settings
LiteSpeed Cache > Crawler > Simulation Settings
LiteSpeed Cache > Crawler > Sitemap Settings
Toolbox
LiteSpeed Cache > Toolbox
LiteSpeed Cache > Toolbox > Purge
Purge All - CSS/JS Cache - Be aware of using this option. Because it will remove all your existing CSS and JS cached files that have been optimized previously. But if any of your webpages (HTML files) that use those CSS and JS files are getting served from cache, those pages will lose their design and functionality because those required CSS and JS files can no longer be found after removing them using this option.
Because of this issue, I would suggest LiteSpeed Cache remove this option from the plugin. So that the only way you can purge CSS and JS cached files is if you also purge the HTML cache which can be done using the Purge All option from this page.
However, if those webpages weren't being served from cache, those pages would need to be generated before getting served to the visitors. Therefore, LiteSpeed Cache could also step up and regenerate those removed CSS and JS files and then serve those to the visitors which would avoid the issue caused after purging CSS and JS files.
Man, this thing is great! You are doing a great job here without a doubt, however, I can't help but ask:
- are some section missing on purpose?
- if so, why?
- if not, is the page semi-broken? Are you adding this information any time soon?
Thanks for such nice words!
To answer your questions, I haven't completed writing those sections yet. As you can see, the article is already very big and it takes a lot of time to write in such details. Anyway, I will add these sections as soon as I finish writing them.
But I think your concerns are valid and I probably should just write Coming Soon in those sections.
I think leaving these sections empty only undermine your work. I realised myself how big the article already is but your effort and the quality of your work makes it worthwhile.
Believe me - I am read many guides out there. Most are giving the same settings and recommendations you do but no one really explains as they probably try to avoid going overboard but this doesn't tell you why you do what you which for me simply creates more issues down the line when something breaks or doesn't work as intended.
After all, not all sites are built the same!
Thanks, Stelios!
To be completely honest, I was doubtful whether people would want to go through such a big article. But your feedback is really helpful. I see people can at least use it as a reference point that they can come back to if they ever face any issue down the line.
Will try to complete it ASAP.
By the way, I would be happy to have any other feedback that you might have about how this guide could be improved from a reader's perspective.
From a readability perspective, it feels fine. Easy to understand and fairly straightforward, no fluff. You can always make it more interactive or faster to digest by including a summary or TL;DR per section. This way it would be suitable for both those who want to learn and understand and those that just want to just change some settings and get good results.
I am an SEO professional so I want to get be able to determine the changes needed for my clients rather than just change some settings.
Hope that helps! Feel free to email me for some more direct feedback.
Thanks again.
I will surely consider the TL;DR section in future updates.
When I checked your files on the Network tab, all of them have obscure filenames instead of the actual filenames.
Also all of these files are stored in the lite-speed server instead of their individual WordPress plugins as with other websites. Is this on purpose? If so how does it help and how can I do it on my website.
Thanks.
When you optimize any files (in this case CSS and JS) using any WordPress optimization plugin (e.g., LiteSpeed Cache), those optimized files get a name set by that optimization plugin, in addition to that, those files are saved in and delivered from a folder of that plugin.
That’s why you see those obscure filenames and those files getting delivered from a folder from the LiteSpeed cache plugin. It just means the LiteSpeed cache is optimizing your website files.
Follow this LiteSpeed Cache settings guide, and you will see a similar outcome.
I will implement Litespeed on a WP install but wonder if I will skip the Image Optimization fully instead for the Optimole plugin. The reason would be that the Optimole serve mobiles the right images on autopilot (Picks the right image size for the visitor’s browser and viewport) and Litespeed seems to not have this - or at least not easy settings for this.
https://optimole.com/
There are several sites that offer this but this site was blazing fast - very good optimization so you get a very good impression.
What do you think...is this a good combo or not?
Thanks for all web speed advice posts you have here . they are really good!
Regards!
Mike
Hi, Mike.
The short answer I would give is if your website doesn't have a lot of visitors, you may get better results from using just the image optimization feature of LiteSpeed cache. That's because, when using Optimole or any such image optimization provider, each of their CDN nodes will deliver the same image from cache only from the second visit and the image resizing for every different device size will require some extra time. But if your site has a lot of visitors or if your site is accessed by only a particular geographical area or if only a few of your website pages are visited by most of your website visitors, you may get better results using any of those image optimization services.
Thanks for your reply.
I have been using your LiteSpeed settings and have not had any issue so far. I removed the critical CSS feature as that was giving FOUT for me.
I also note that you are using QUIC. I have been using Cloudflare full page cache but recently I had to stop as I built a membership site and using full page cache made things a bit complex. How has your experience been with QUIC so far?
Also is the free plan enough for you or do you have to pay for bandwidth?
Thanks 🙂
You can try turning OFF Generate Critical CSS In Background from LiteSpeed Cache > Page Optimization > CSS Settings and then clear cache. This might solve your FOUC issue. And if you want to avoid FOUT, try changing the Font Display Optimization option to BLOCK from the same page.
QUIC.cloud is doing pretty good for me though I have found their CDN offline a few times. As for the limit, you get 5GB free CDN if you are using OpenLiteSpeed and 10GB free CDN if you are on LiteSpeed Enterprise server. For the rest of the services, their free limit should be enough for most sites.
Thanks!
Can you please share a post on your QUIC settings including CDN?
You don't really need many settings inside QUIC.cloud because it automatically syncs with the LiteSpeed Cache settings. So, all you really need to do is set up your domain then turn on or off CDN caching. But as you asked, I will consider writing an article on that. Thanks!
This is great thank you! I changed my settings to yours and saw a bit of an improvement with Pagespeed and GT Metrix. Looking forward to seeing the rest of the sections when you get the time.
Cheers!
Hi Shizane,
Glad this guide helped improve your website speed.
Hi Admin,
How would you want to set up my website, I mean LiteSpeed Cache+Cloudflare or quic.cloud?
Thanks!
Hey Maricuta,
You can read my QUIC.cloud vs Cloudflare article. It will help you decide the best one for your particular scenario.
Thank you very much for the answer!
Can you tell me what are the best page rules in cloudflare for caching all pages (dynamic and static), without APO. I installed APO, but the website has become slower than before.
The website has 5k visitors per month. In this case, it's better quic.cloud or is it fine cloudflare?
Thank you!
You can read my LiteSpeed Cache with Cloudflare setup guide. It will tell you exactly what you will need to do to properly set up Cloudflare. You can also read my QUIC.cloud vs Cloudflare article. It will help you choose the best one for your particular scenario.
Thank you so much!
Hello Admin,
When I check my site in this tool:
https://check.lscache.io/?host=https%3A%2F%2Fvutruso.com%2F
LSCache is not supported.
I really install Litespeed and Litespeed cache plugin and config correctly. But I got the above message.
How to fix it. Thank you so much.
Hi,
LiteSpeed Cache is supported in all WordPress sites, at least on all the latest WordPress versions. You may just miss out on some of its features if you aren't on a LiteSpeed server. But I see you are using a LiteSpeed server so you should be able to use LiteSpeed Cache just fine.
Thank you very much.
I will contact the host provider and ask for support.
This Is Working Setting My Page Speed Is Up From Copy This Settings.
Litespeed cache miss styles
HOpe it's server not QUIC CDN issue.
https://i.imgur.com/T53a0UM.png
Thanks for the heads up, Alex!
I don't necessarily think it's a CDN issue as I recently updated the website design and I don't see this happening in my tests. Maybe you can try clearing your browser cache or browse the page from an incognito or private window as a temporary fix while I look into this further.
Hi
Any chance you could post screen shots of the settings for the other sections and worry about the write up later?
I must say, I never read any kind of stuff like this. Super-duper details noted with pros-cons about the LiteSpeed plugin. You've explained each step in very simple language.
Hi Laxmikant,
Thanks for your nice words.
Although this article hasn't been complete, this is awesome, I just follow all your steps and see the improvement. Looking forward to your incomplete section.
Thank you.
Thanks, Alan. Glad I could help!
This has been so helpful thank you. When do you think you will do CDN quic.cloud optimal set up?
great article for newbies like me. I turned on Quic and within 2 days I got a message that my site maxed out and needed to buy more credits. They then figured the readings were wrong, but they couldn't go back and check it because too much time had lapsed. I since deleted it from my site, as I found the whole thing shady.
Dear,
This was very long article... but you explained very well... I would suggest that you should have export all the best settings of this plugin. Any one could download and apply these settings to their site...
Really would be great to either write coming soon... or publish a finished article. Got halfway through and figured it would be best to go elsewhere as this is already outdated.
Hey, WebSpeedTools Team! Big thanks from me for so the best info post about Litespeed cache plugin. Mommentbox foto kaste homepage now are flying with A grade in gtmetrix.
Thanks for providing such an indepth explanation as to the workings of LSCACHE, I have to say their own documentation is very superficial, and finding a writer who can explain what the settings mean and how to best optimise a site was brilliant!
Now for the uber lazy people out there (I should know) do you think a config file is something you would consider adding to the post.
I have set these up myself to cloine between sites on the same server, but I'd be curious as to your opinion as to whether this is something that would be usable?
unfortunately wevy bad content
Thanks for great post on how to use litespeed cache and speed up the website. thanks
Hi,
Can I increase the Object Cache TTL from 360 seconds to 3600 seconds? Will it improve page speed or does it negatively affect my site?
Hello, I have a question about LiteSpeed Cache. Do you need to use these third-party cloud and redis services in this plugin to see positive differences in website speed. And why, after installing this plugin, the database is many times larger. I have a small website on the lite speed server https://totemat.pl/ and I do not know why it is that when I run this plugin, the website works slower than faster according to google page speed. Maybe you have any suggestions?
Dear,
This was very long article... but you explained very well... I would suggest that you should have export all the best settings of this plugin. Any one could download and apply these settings to their site...