The best of both worlds. That's how I see LiteSpeed Cache with Cloudflare setup. This Cloudflare LiteSpeed Cache setup will allow you to use the best WordPress CDN provider with the best WordPress optimization plugin. Combining them properly will give you a very fast website loading speed.
But there is one biggest problem you will face when using them together. The problem is with the automatic management of full page caching for LiteSpeed Cache Cloudflare separately. In this article, I will tell you exactly how you can solve that. Keep reading to know the gem of this article.
What Is LiteSpeed Cache

LiteSpeed Cache is one of a kind plugin for WordPress caching and speed optimization. There are many plugins that offer pretty much the same features as LiteSpeed Cache but it has some great features that make it a very special one.
The most unique feature of LiteSpeed Cache is that it is a server-level caching plugin. While there are many other great plugins out there, most of them, if not all, are application-level plugin. It simply means that you get better caching performance from LiteSpeed plugin than any other plugins because it doesn't even need to run WordPress to serve cached files. This in turn gives the fastest initial server response time for your website.
However, you need to use LiteSpeed web server to avail this feature. But LiteSpeed Cache provides so much benefit that even if you aren't on a LiteSpeed server you will get overwhelmed by its offerings.
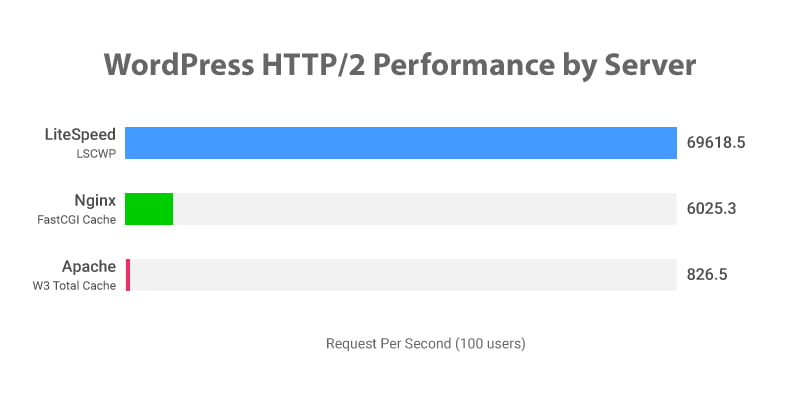
This is how LiteSpeed Cache performs with LiteSpeed web server compared to other web servers.
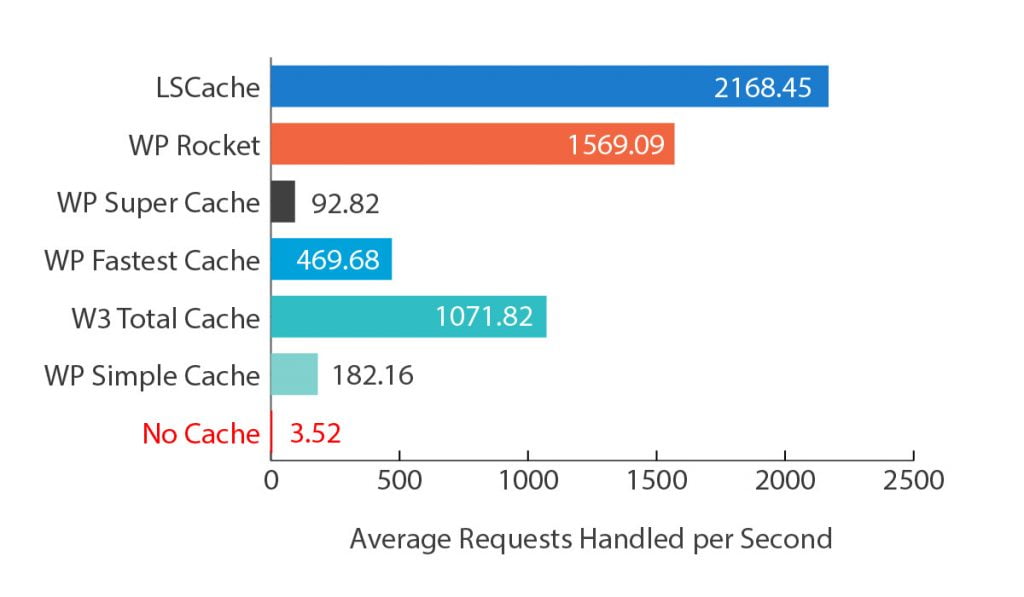
This is how LiteSpeed Cache performs compared to other WordPress caching plugins.
Speaking of server response time, see this article about how to make your server response time extremely fast like under 100 milliseconds fast.
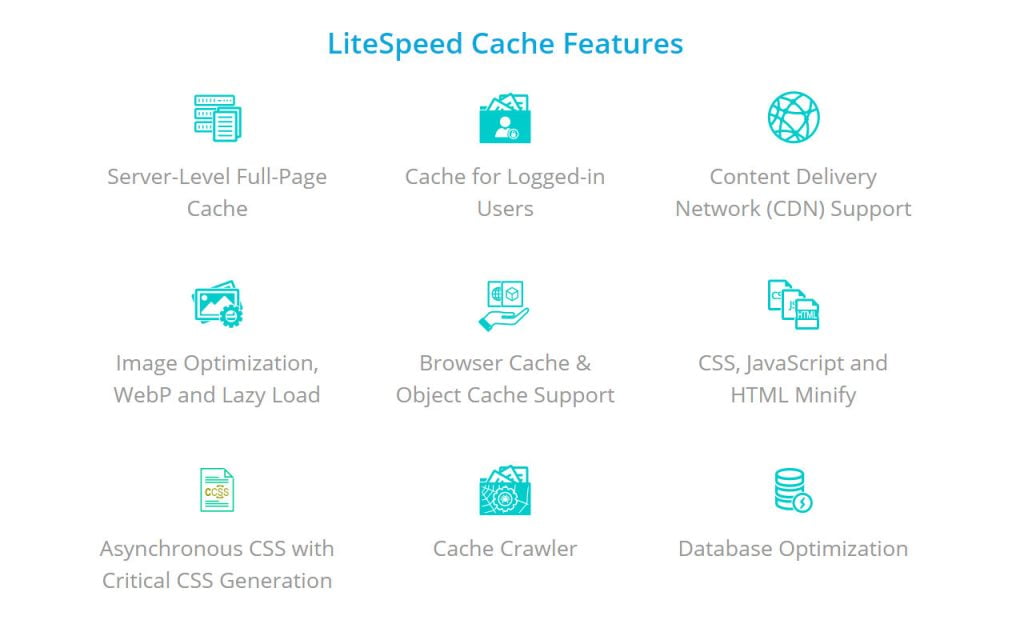
LiteSpeed Cache gives all kinds of speed optimization features for your site. From minimizing HTML, CSS, and JS files, to optimizing images, generating critical CSS, optimizing database, and many other things that are built into the LiteSpeed Cache plugin. In short, you get a complete package that is necessary to optimize your site.
In fact, you will get some features in it for free that all other plugins charge for. That is to say, it is a completely free plugin. Sure, a few of its features are based on monthly free limits. So, you will need to buy or wait for the next month if you exhaust this limit. But this limit is very generous and so you may get away without buying at all.
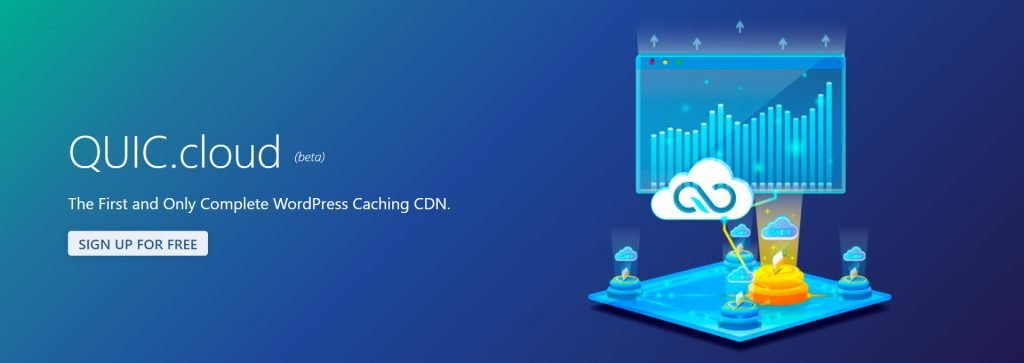
QUIC.cloud CDN
Why am I dragging QUIC.cloud CDN in this article?
Simple! QUIC.cloud is the CDN service provided by LiteSpeed Technologies which is the same company that developed LiteSpeed Cache. And these two are meant to work seamlessly with each other. In fact, this setup is the most convenient and effortless setup for using CDN with WordPress. Especially considering QUIC.cloud is a reverse proxy CDN provider similar to Cloudflare.
The number of reverse proxy CDN providers is already low. Then setting them up with WordPress gives you very unreliable results (yes, I also include Cloudflare in this list). You constantly need to worry about maintaining your WordPress cache and CDN cache separately. Then making sure that the CDN cache is always up to date, aka not serving stale contents to the visitors, is the biggest challenge of all.
QUIC.cloud takes all this pain away from you. You just set it up once and forget about it. It is that simple. Setting it up is also a breeze. There isn't anything like it.
LiteSpeed Cache talks to QUIC.cloud in the background and does everything for you. So, no need to worry about separately managing caching in the CDN. The biggest problem of using reverse proxy CDN with WordPress is now gone.
Wait! We are still interested in Cloudflare CDN because it gives faster performance than QUIC.cloud and it is more reliable because of being a lot older than the very new QUIC.cloud.
Here, is my QUIC.cloud review where you will get to know everything you wished you knew about it.
What Is Cloudflare
Cloudflare is mainly a DNS and CDN service provider though there are many other services that they offer alongside those two. It is a very popular provider mostly because of their free unlimited offerings of those two main services. Also, both its DNS and CDN are amongst the best few.
See the below DNS speed testing results of the best providers by DNSPerf and it will tell you how good Cloudflare is. Try to find out where Cloudflare is located. Hint: start from the top.

Now see how fast Cloudflare's CDN performs from the testing of CDNPerf.
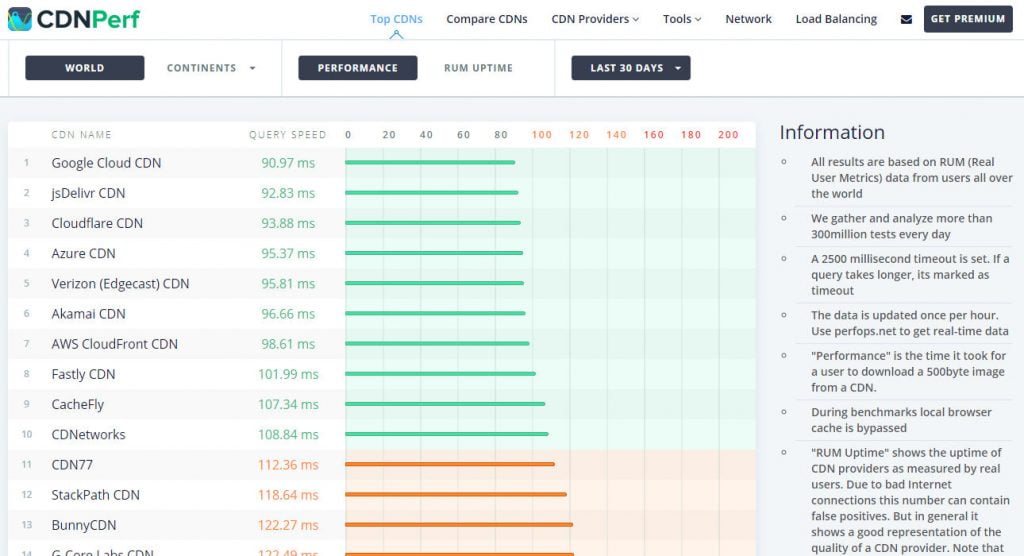
As you can see Cloudflare shows outstanding results in both the testings. So much so that you can find it ranking 1st for DNS and within the first 10 for CDN in pretty much any month. So, it gives better performance than most other paid providers out there.
You can use both Cloudflare's DNS and CDN for your website and use LiteSpeed Cache on there. But the Cloudflare CDN is the one we are most interested in here. That's because it is the one requiring proper setup to work properly where DNS setup is just a very simple thing. I will show you how to setup both DNS and CDN as you need to use the DNS to be able to use the CDN of Cloudflare.
Back to Cloudflare CDN, apart from being very fast, it is also a reverse proxy CDN. That's where it shines the most from other CDN providers. Reverse proxy CDN, in short, caches/stores your entire website (including the dynamic HTML files not just the static files like CSS, JS, and others) in their data centers and therefore makes their delivery super fast by delivering them to the visitors from the data centers that are closest to them. This in turn significantly reduces your Time to First Byte (TTFB) and also the total page load time.
That is to say, check out this article about how to reduce WordPress TTFB to under 100 milliseconds.
Cloudflare APO
Cloudflare APO is a CDN optimization service for website building platforms like WordPress. As of now, this service is only available for WordPress sites. Cloudflare took into account the difficulty of serving dynamic HTML contents from the CDN and the solution they come up with is called Automatic Platform Optimization (APO).
Previously, it was very difficult to server entire WordPress websites from Cloudflare's CDN. That is because the HTML files in WordPress are created dynamically for every visitors and based on their specific scenario. So, serving the contents generated for someone to someone else wouldn't be appropriate. And the thing CDNs do is cache/save a copy of the webpage assets and then serve those to everyone.
That's why delivering the right content to the right people as well as delivering up-to-date content is a big challenge for reverse proxy CDN providers like Cloudflare. But the advent of the APO addresses this problem and solves them for you so that you can serve your website contents without worrying about what is happening in the background.
APO significantly increases the usefulness of Cloudflare's CDN for WordPress sites. Now you can effortlessly use Cloudflare CDN to server your entire website from the CDN not just the static contents.
Cloudflare APO is, however, a paid service. It costs $5/month. But if you don't want to use this paid service, there is a great alternative for you. In fact, this article is about how you can use LiteSpeed Cache with Cloudflare's CDN completely for free without requiring APO.
But if you are interested to know more in details about Cloudflare APO, see this Cloudflare APO review article.
Why Use Cloudflare LiteSpeed Cache Setup
The Cloudflare LiteSpeed Cache setup takes advantage of the amazing optimization capabilities of LiteSpeed Cache and the very fast CDN speed of Cloudflare. So, you get best WordPress optimization solution as well as the best CDN solution using these two services together. A best of both worlds solution.
The solution of LiteSpeed Cache with its QUIC.cloud CDN would give you one of the best performances and the best convenience of all WordPress optimization and CDN setups. In fact, I recommend this for many people especially for global websites with low monthly traffic. By low traffic, I mean less than 100 visitors a day on average so about 3,000 visitors a month.
That's because QUIC.cloud has little over 45 data centers as of now. And this comparatively low number of CDN can actually result in much higher cache hit ratio than for Cloudflare which has over 200 data centers. Read this article about why Cloudflare CDN may not be the right choice for low traffic websites in this article.
Now for Cloudflare CDN, you can't really go wrong with it. It will give you one of the fastest CDN speed and even that for completely free. The speed of its CDN is the main reason you would want to choose Cloudflare over QUIC.cloud when using with LiteSpeed Cache. Here is an article comparing QUIC.cloud with Cloudflare CDN which will help you better understand the differences between them.
Now for the WordPress optimization capabilities, LiteSpeed Cache is surely the winner when compared with Cloudflare's optimization. Cloudflare isn't really a service for optimizing WordPress sites, so the comparison isn't that fair. The Cloudflare APO is also a CDN specific optimization and not WordPress content specific. So, LiteSpeed Cache is the best bet here.
Setup LiteSpeed Cache with Cloudflare
It is pretty easy to setup LiteSpeed Cache with Cloudflare. I will give you step by step instructions on how you can do that. And also how you can use a free plugin as an alternative to Cloudflare APO. Though that plugin wouldn't give you all the same features of Cloudflare APO, it will give you enough to properly setup Cloudflare CDN with your WordPress site. But if you can spend $5/month, go with Cloudflare APO. I strongly recommend that.
This setup article is specifically for serving your entire WordPress site from Cloudflare CDN. Normally, Cloudflare only serves static files like CSS, JS, images, and other files but not HTML files as this is generally considered as dynamic file type. Serving dynamic files from CDN creates all sorts of problems if not set up properly. That's why Cloudflare doesn't automatically serve HTML files. But being able to also serve the dynamic HTML files from the CDN will give your site the fastest speed. Your website's TTFB will reduce significantly, and the total load time will also decrease.
Static file caching is automatically done from Cloudflare without requiring any special setups. That's why this article will be about properly setting up HTML file caching so that you can serve both static and dynamic files from Cloudflare CDN.
Setup Cloudflare DNS
In order to use the CDN of Cloudflare, you will also need to use its DNS. So, let's start by setting up that.
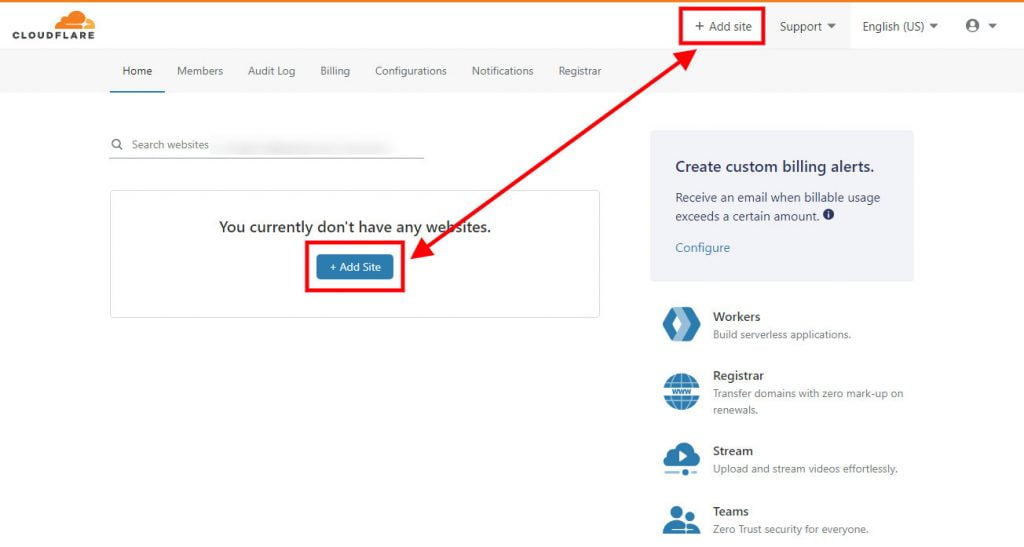
First, go to dash.cloudflare.com then log into your account. If you don't have an account, create one for free and then log in.
Now you will be inside the cloudflare dashboard. From here click on the + Add site bttuon.
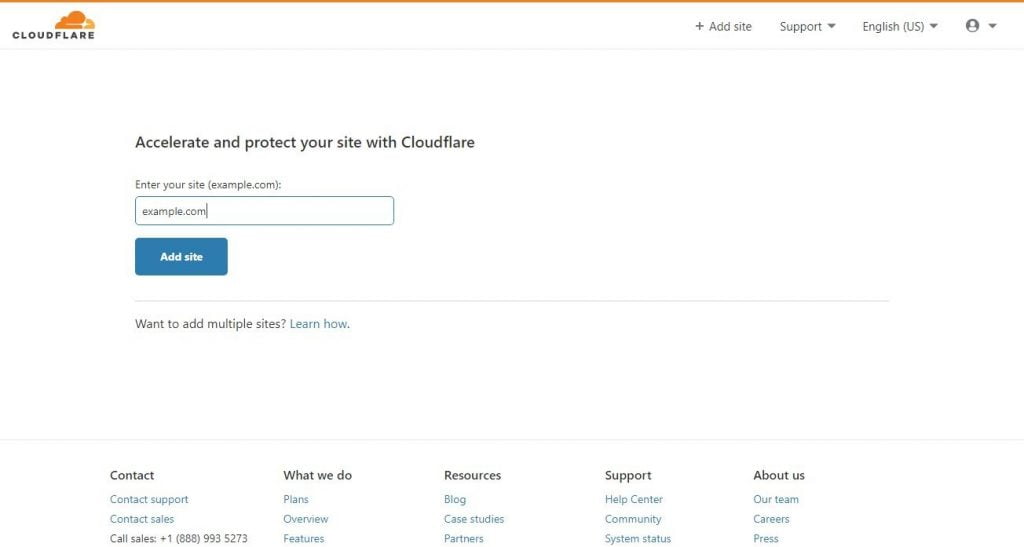
Then on the next page, enter your site in the specified format. Then click on Add site button.
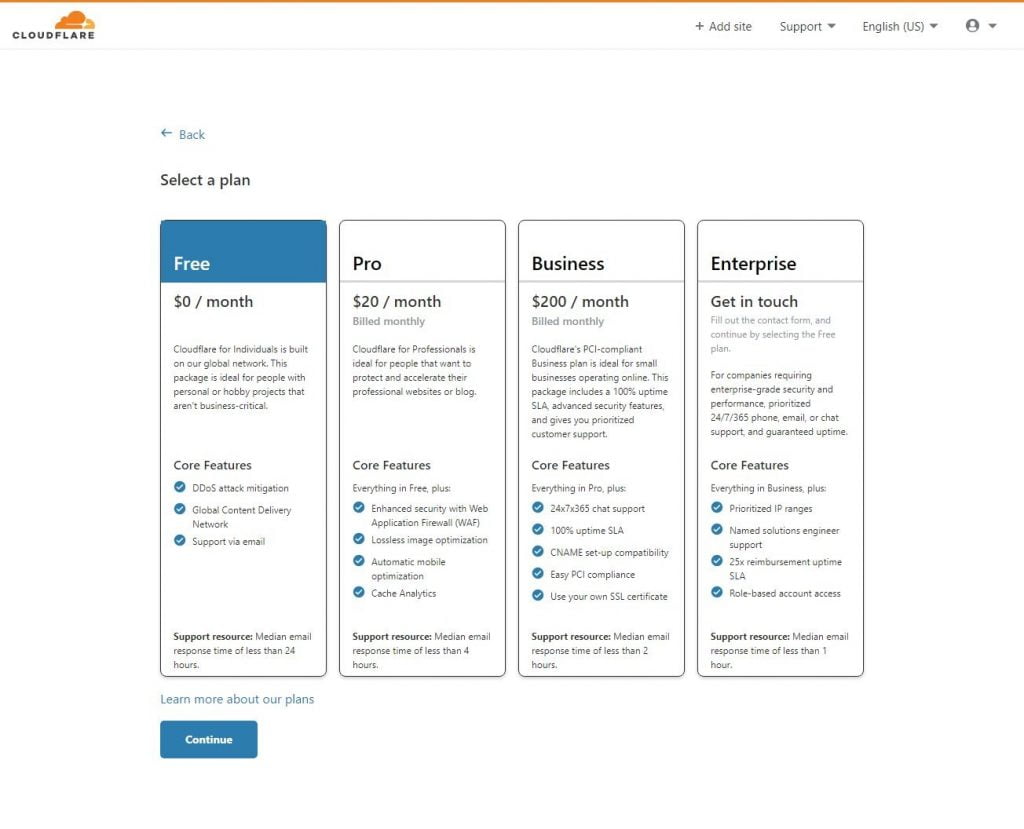
Then you will be prompted to choose a Cloudflare plan. Choose the Free plan from here then click on Choose.
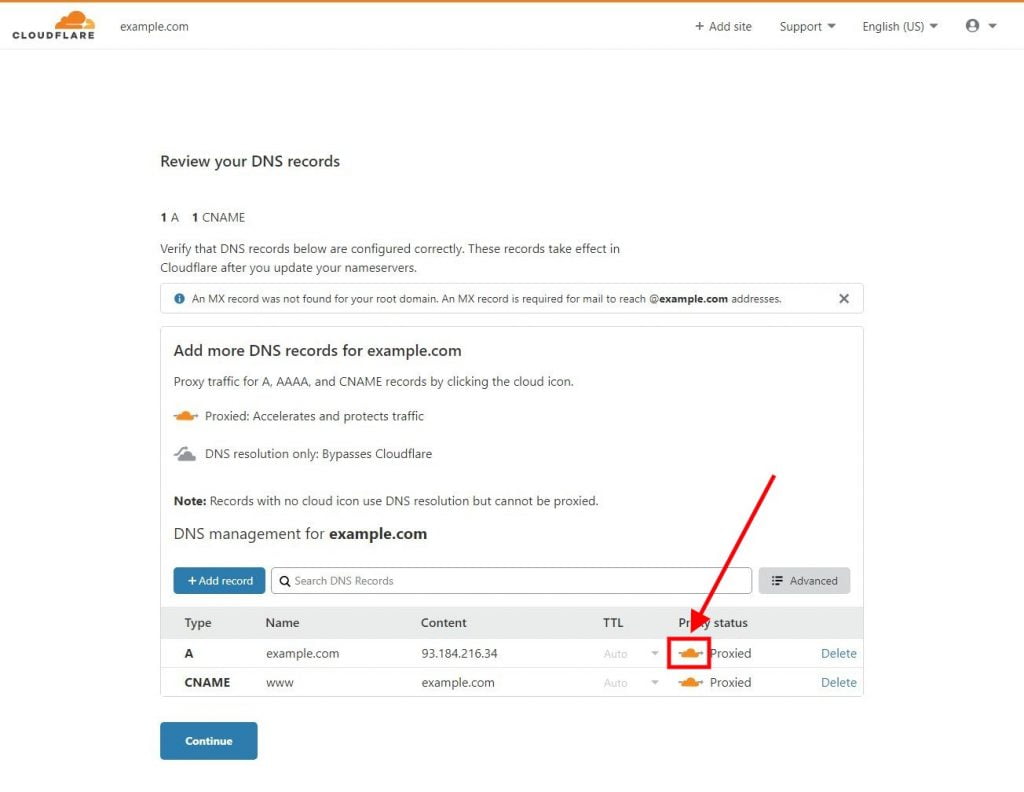
Now you will see the existing DNS records for that domain name. You can add, edit, delete any of the records from the page. But if your domain doesn't have any existing DNS records, you won't see any records here.
From this page, make sure your domain has an A record pointing to the IP address of your web server. You will get this IP address from your web hosting provider. If you use a subdomain like www.example.com to access your site, you will also need to have an A record or CNAME record for that subdomain. These records will help access your site. But if these records don't already exist, you will be able to add them from this page using the + Add record button. And don't worry, you can always change these records later.
However, make sure that the cloud icon for your domain name is orange instead of gray. This is a must in order to use Cloudflare's CDN with your site. Then click on Continue.
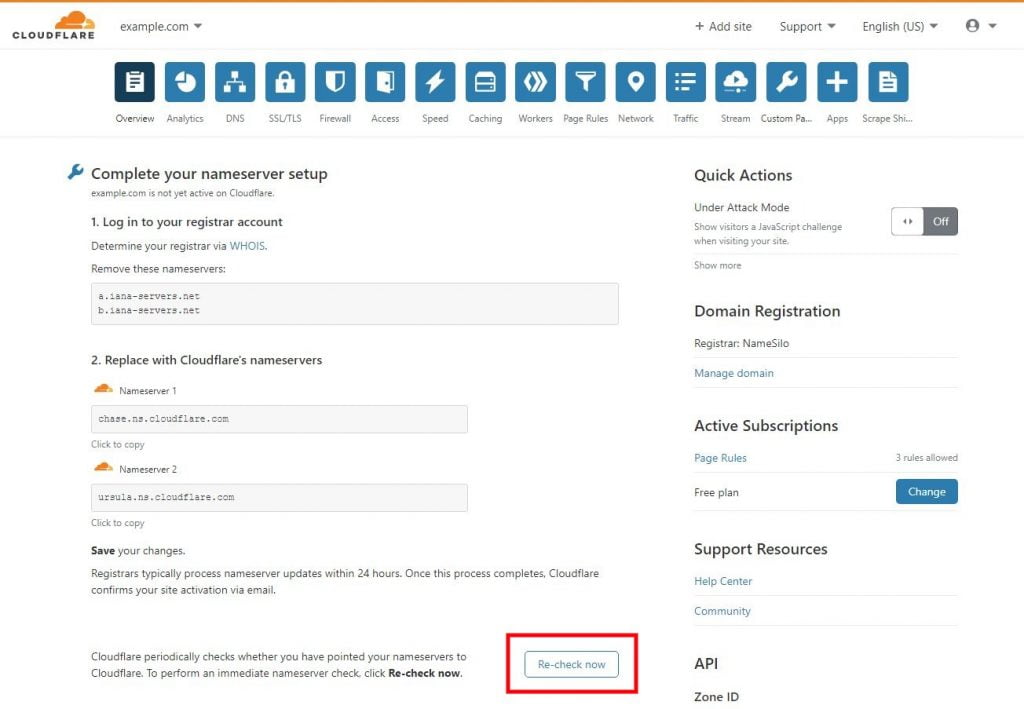
Then the next page will show your existing nameserver records and the two nameserver records for your Cloudflare account. What you will need to do is replace those existing records with your Cloudflare records.
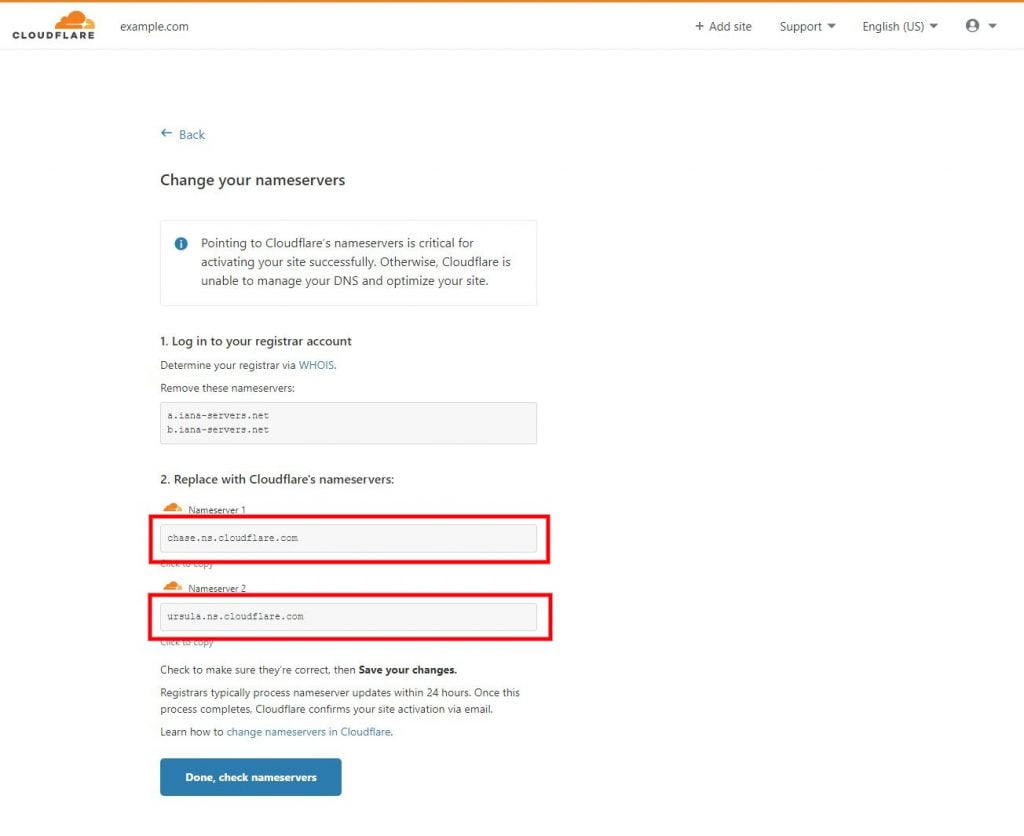
In order to change the nameserver records of your domain, first you will need to go to your domain registrar's website then change the nameservers from there. So, go to the website of the provider from whom you have bought your domain name like NameCheap, Godaddy, or anyone else. Then log into your account and change the nameserver records of the domain you want to use with Cloudflare.
This article by Cloudflare about changing domain nameservers to Cloudflare will help you in doing that. Just click on the name of your domain registrar and you will see step by step instructions about how to change nameservers from that registrar. But if you don't see your domain registrar's name, you will need to find out how to do it there.
When you are done with that, come back to the Cloudflare's page where you left off and click on the Done, check nameservers button.
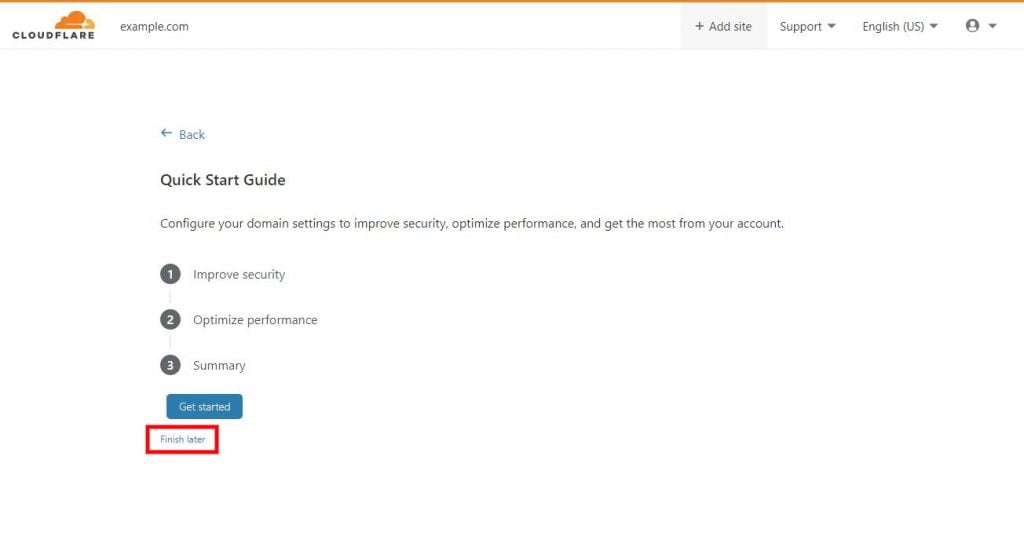
Then on the Quick Start Guide page, click on Finish later as you will be able to change all the settings later.
Then you will see the complete your nameserver setup page. This page is shown because it may take a while for Cloudflare to see your updated nameserver records. You can click on the Re-check now button to add your domain to the queue of Cloudflare.
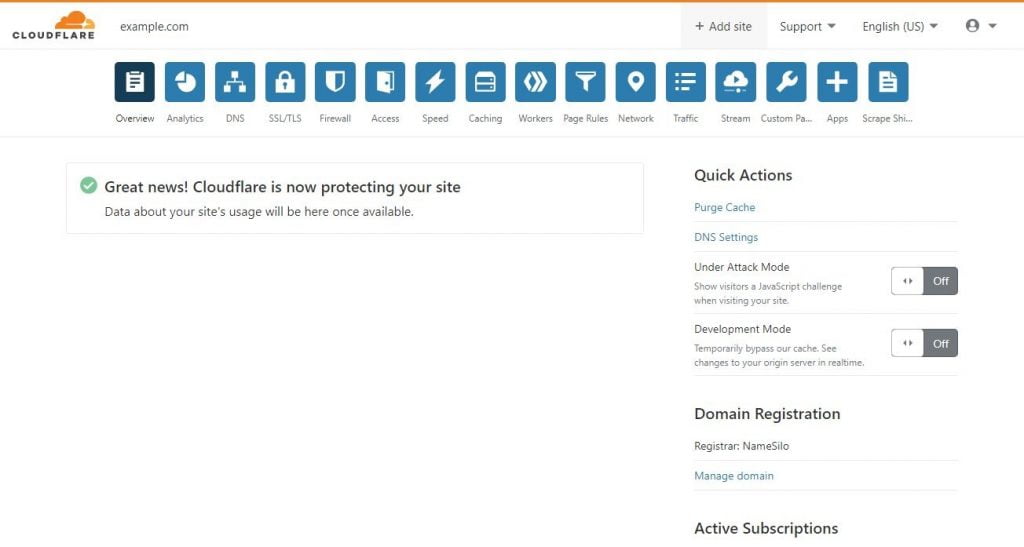
Though it will tell you to check back in a few hours, the nameserver records are generally verified within minutes. So, to check if your domain name has been verified, refresh the page. But if you have left the page, open the Overview page from Cloudflare dashboard. Once it is verified, you will see it on the page like the following:
LiteSpeed Cache Cloudflare Setup
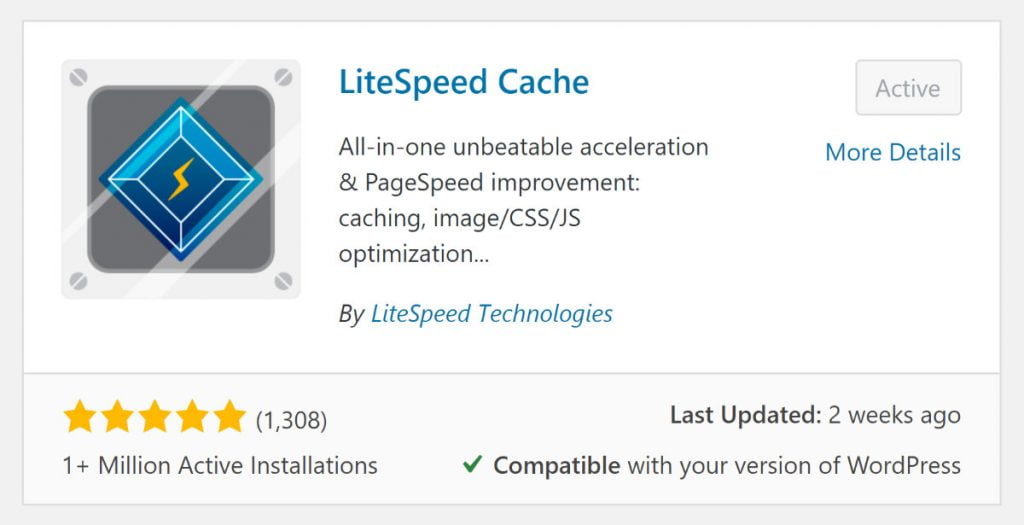
Now go to the dashboard of your WordPress site for which you just setup Cloudflare DNS. Then install and activate LiteSpeed cache plugin if you haven't already done that.
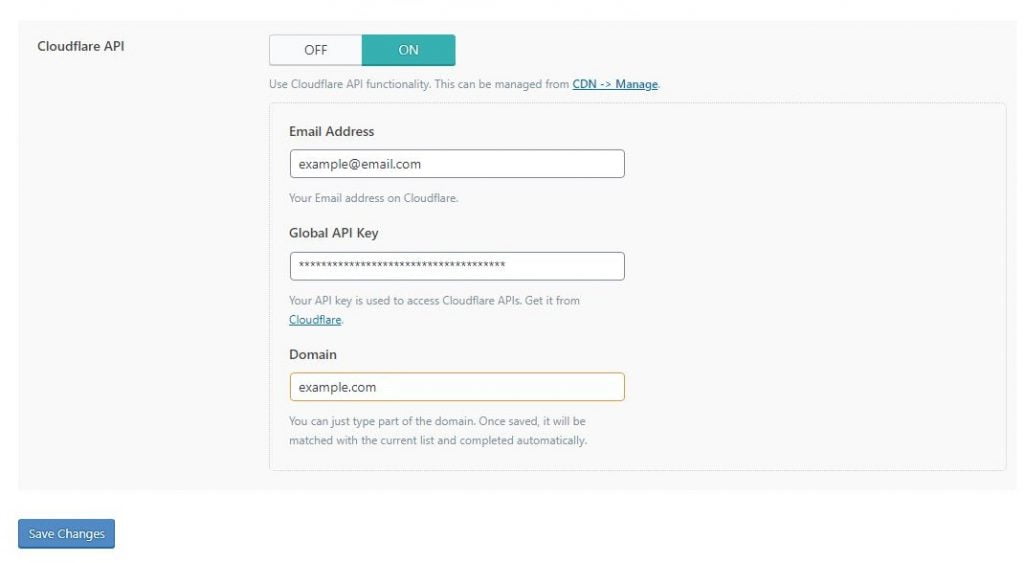
Now from the WordPress dashboard, go to LiteSpeed Cache > CDN > CDN Settings. Then scroll down to the Cloudflare API section.
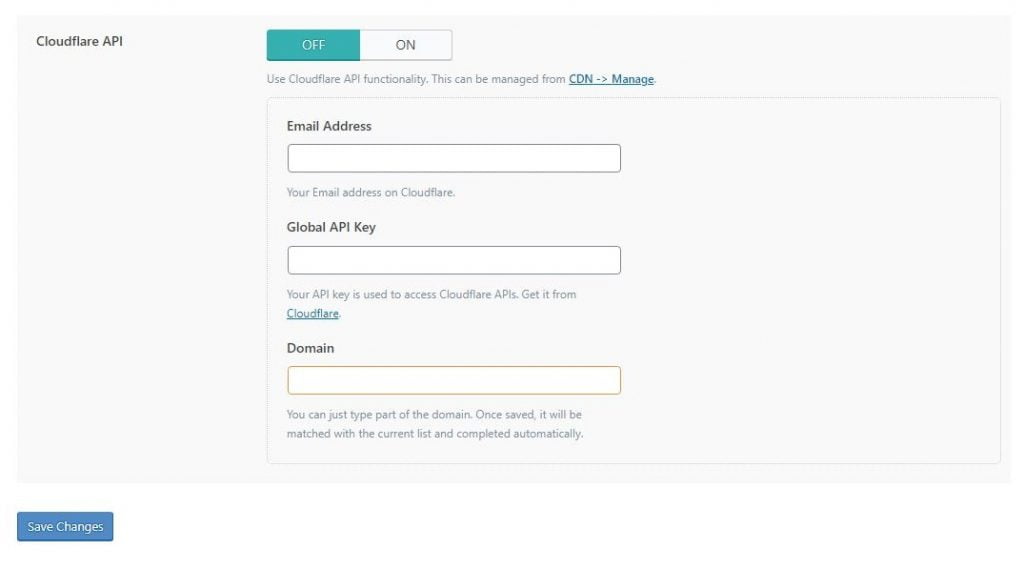
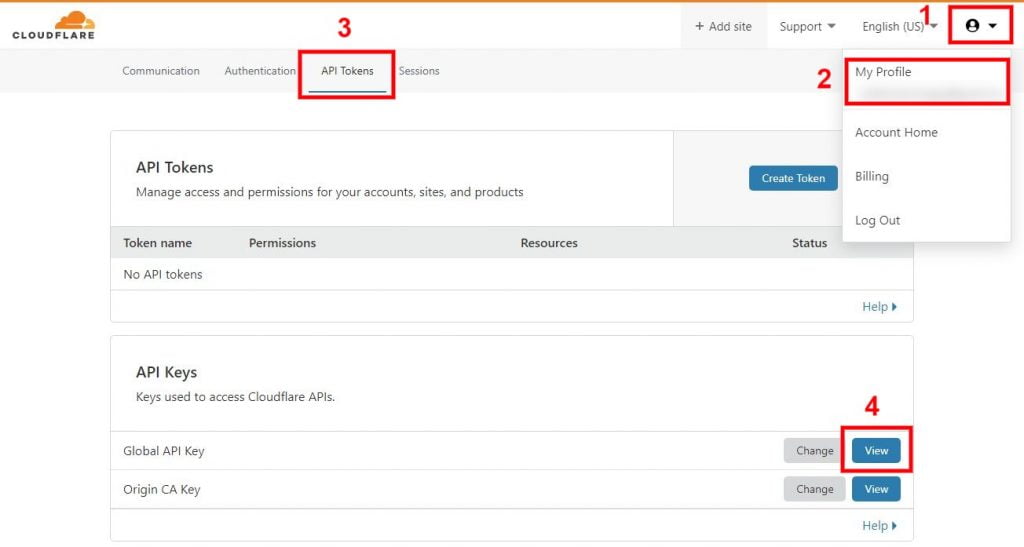
Here, in the Email Address field, enter the email address which you have used in your Cloudflare account. Then in the Domain field, enter the domain name of the website you are currently on. Then for the Global API Key field, you will need to go to your Cloudflare account.
So, go to dash.cloudflare.com and log into your account. There, click on your profile icon then My Profile > API Tokens. Now to see get your Global API Key, click on the View button for Global API Key. Then you will be prompted to enter your password and after that, you will get the key. Copy that key to use in the LiteSpeed Cache plugin.
Now paste your Global API Key in the LiteSpeed Cache plugins' settings page where you left off. Then turn ON the button beside the Cloudflare API option. Then Click on Save Changes from the page.
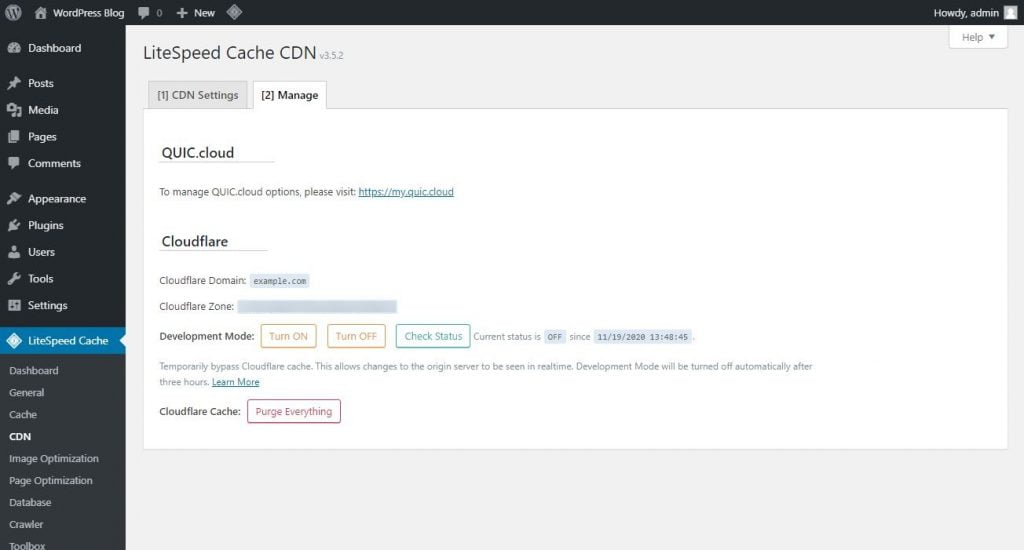
Now that you have saved your Cloudflare information, if you go to the Manage tab from this page, you will see your associated Cloudflare Domain name, Zone, Development Mode options, and Purge Everything button for Cloudflare cache.
Remember to setup your LiteSpeed Cache settings according to your need. Because the LiteSpeed Cache plugin settings won't affect how caching work on Cloudflare CDN, I am not including it in this article. But you can use this LiteSpeed Cache settings guide for that.
When you add Cloudflare API to LiteSpeed Cache, it will give you option to manually clear all cache from Cloudflare, and to enable Development Mode of Cloudflare from your WordPress dashboard. However, that's pretty much all the benefit you are going to get from this. So, when you update any page, post, or do any kind of changes in WordPress, LiteSpeed Cache isn't going to notify that to Cloudflare.
Therefore, the HTML cache in Cloudflare won't be automatically removed and so your visitors will end up seeing stale contents when you are serving HTML files from Cloudflare CDN. That's just the beginning of the problems. Your visitors may see what you see on your site as a logged-in user. For instance, they may see the admin bar, customization options, and other things that you see when logged in as an admin. Additionally, you may end up not seeing these options even when you are logged in.
Apart from these, Cloudflare will cache pages with dynamic contents, aka pages that shouldn't be cached. This will result in visitors seeing wrong contents like seeing contents that aren't intended for them but for some other visitors.
All these problems will occur because of wrong dynamic caching setup in Cloudflare CDN. So we will need to fix that problem now.
You know what you can just turn off the Cloudflare API option from the LIteSpeed Cache > CDN > CDN Settings page because keeping it on won't give any real benefit as discussed above. Then follow the next sections to setup Cloudflare CDN properly with your WordPress site.
Use Cloudflare Plugin
The official Cloudflare plugin for WordPress will be a good way to use dynamic HTML caching with Cloudflare CDN. It will automatically purge pages, posts, and some other content from the Cloudflare CDN when you update them from WordPress. So, that's a good start towars a proper caching setup. Let's see how you can set it up on your WordPress site.
First install and activate the Cloudflare plugin on your WordPress site.
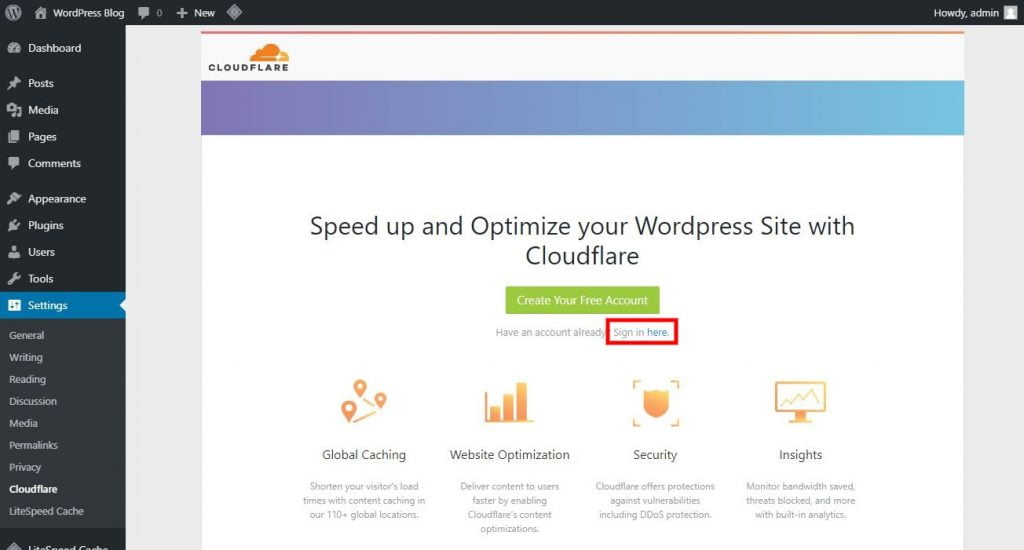
Then from your WordPress dashboard, go to Settings > Cloudflare. There click on the sign in here link to in to connect your Cloudflare account with this Cloudflare plugin.
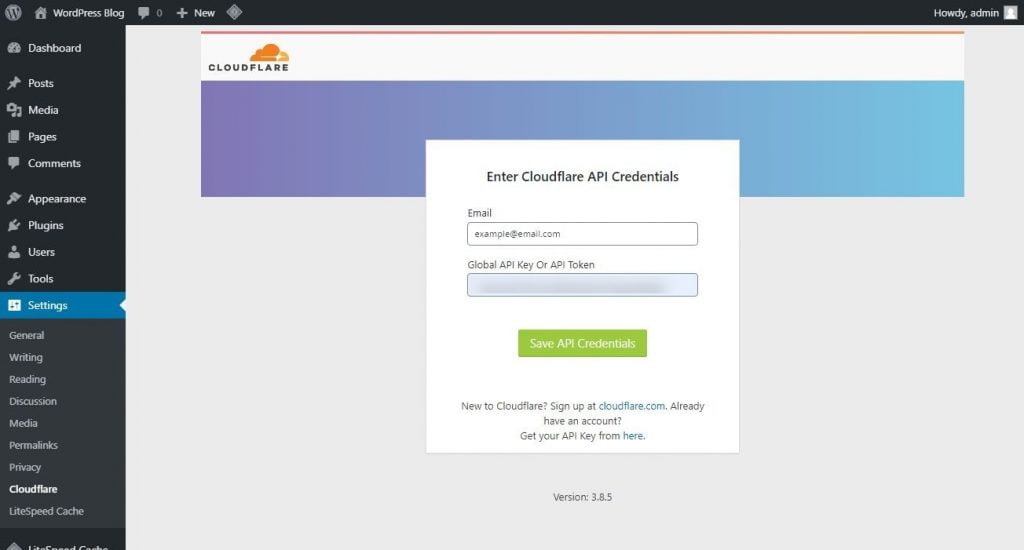
Now you will be prompted to enter your Cloudfare API Credentials. In the Email field, enter the email ID you used to create your Cloudflare account. In the Global API Key Or API Token field, you can use the Global API Key that you found from your Cloudflare account by clicking on your profile icon then My Profile > API Tokens page in the previous section.
In this same page you will also find a button saying Create Token in the API Tokens section. You can create an API Token from here and use it in the Cloudflare plugin instead of using the Global API Key. This will also be the safest option in terms of security perspective. But Global API Key will also work here. So, enter either one of that in the Global API Key Or API Token field. Then click on the Save API Credentials button.
Now you will see the Home tab of the Cloudflare plugin. Here in the Apply Recommended Cloudflare Settings for WordPress section, you can click on the Apply button. This will automatically update your domain's setting inside your Cloudflare account. These optimized settings will be optimized specifically for WordPress sites. So, I recommend doing that. You can also see which settings this option applies by going to this WordPress recommended settings description page by Cloudflare.
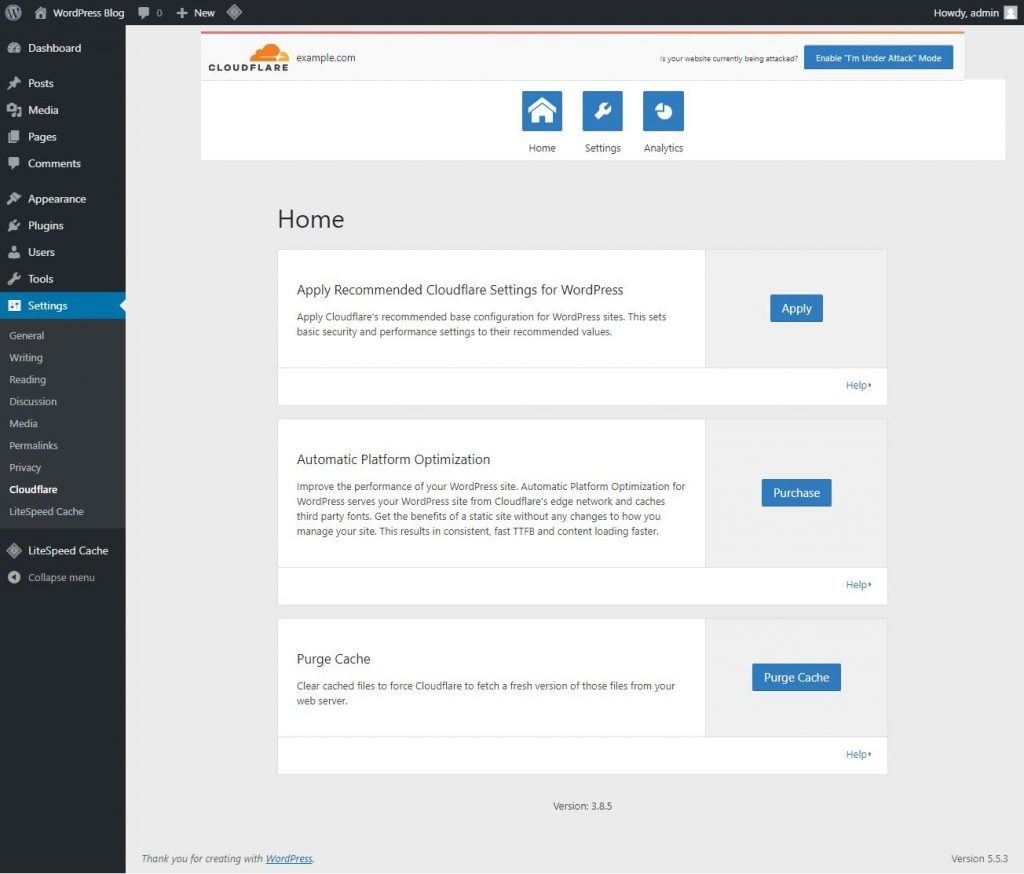
Then the next Automatic Platform Optimization section is for enabling Cloudflare APO on your site. But this isn't the scope of this article.
In the Purge Cache section, when you click on the Purge Cache button, it will give you options to purge all cache for your site or to purge cache for specific files using URLs. This will be helpful if you want to manually clear cache from Cloudflare CDN from the WordPress dashboard without going to your Cloudflare account.
Now comes the most part in this plugin which is automatic cache purging from Cloudflare based on the actions on WordPress. Go to the Settings tab from the Cloudflare settings page. Here, turn On the Auto Purge Content On Update option. While turning it on, it will show you a confirmation popup. There click on I'm Sure.
Here is what Cloudflare says this option does:
When a user adds, edits, or deletes a post, page, attachment, or comment - any associated URLs are purged from the Cloudflare cache.
When you switch a theme or customise a theme within the WordPress admin panel, the cache will automatically be cleared too.
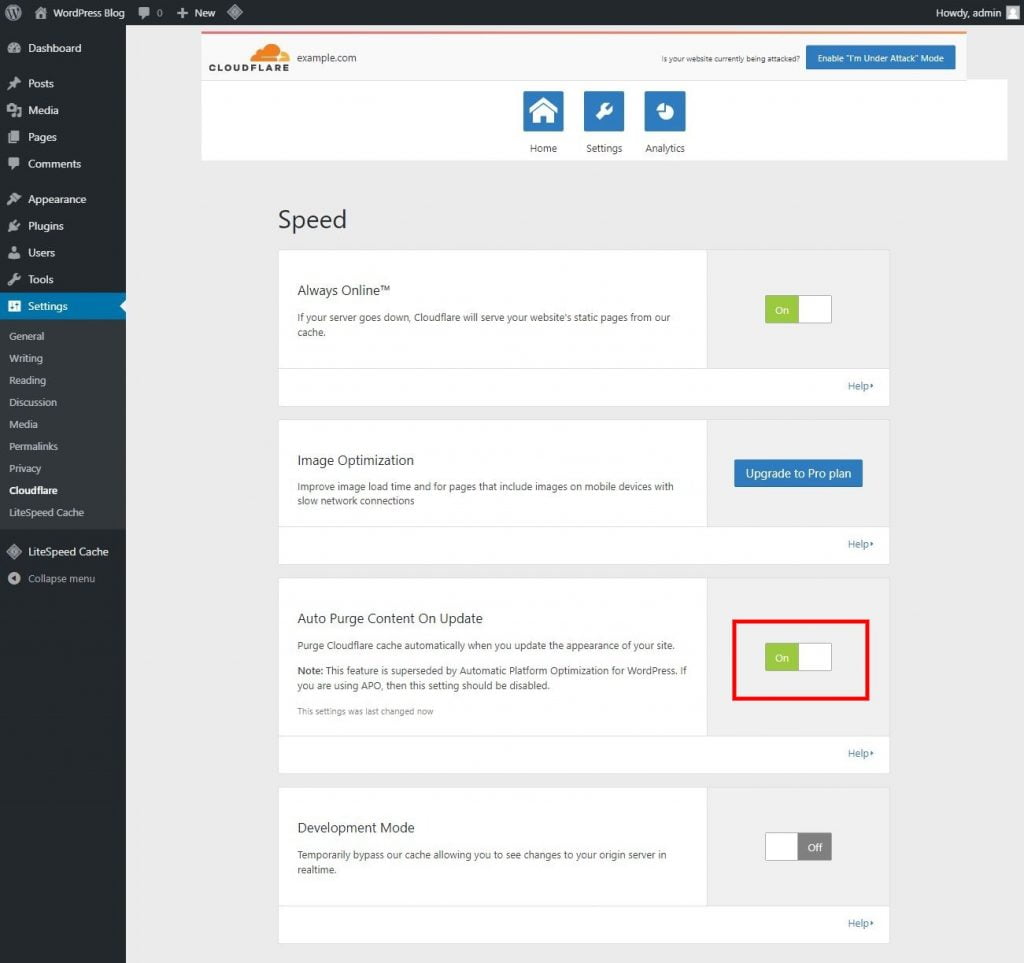
You will get some additional options in this settings page like the option of changing Always Online option, turning on or off Developer Mode, choosing Security Level, changing Automatic HTTPS Rewrites option, and some other options for premium plan users of Cloudflare. Keep these settings how they are. But of course, you can make use them whenever needed.
Now we are done with setting up Cloudflare plugin but we still need to do one thing before we can start using HTML caching in Cloudflare.
Go to your Cloudflare dashboard. Then on the Page Rules tab. Now click on the Create Page Rule button.

Now, in the first input field, you will need to enter your domain name followed by /*. If you use your root domain like example.com, use example.com/* but if you use a subdomain like www.example.com, use www.example.com/* format. Then in the next two fields, select Cache Level in the first field and Cace Everything in the second field. Then click on Save and Deploy.
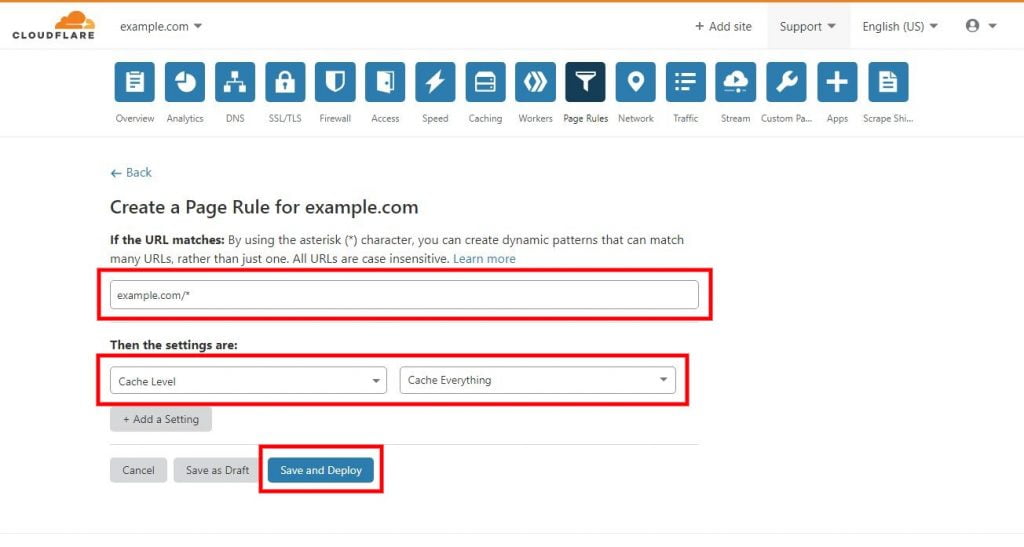
Once it is setup, the page rule will look like this:
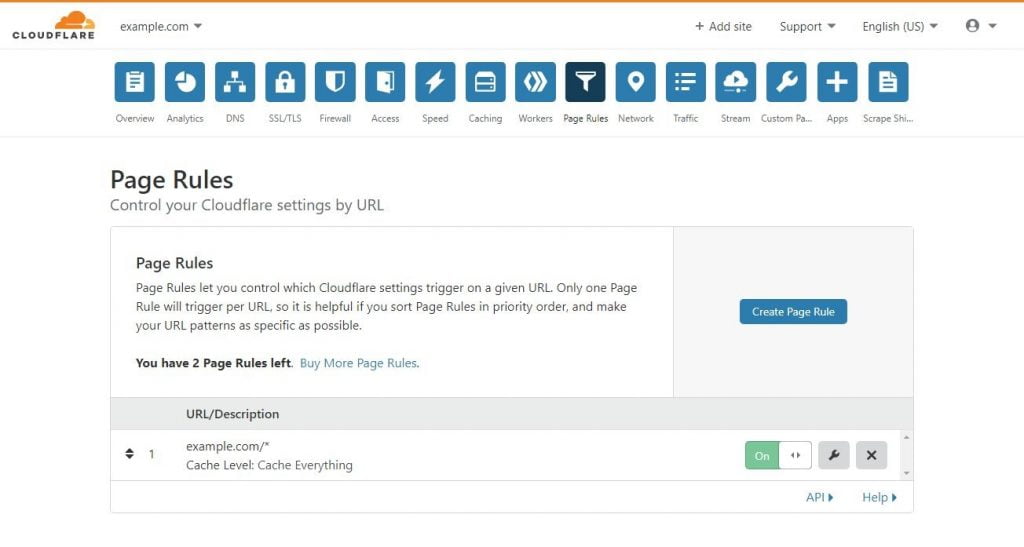
This page rule will instruct Cloudflare to also cache your HTML files. And combined with the Auto Purge Content On Update setup in the Cloudflare plugin, you should have a pretty good HTML caching system in place.
Though this setup will help with automatically purging cache from Cloudflare, it won't do any good for the caching issue with logged in users. For that, you can use another plugin mentioned in the next section. In fact, you can remove this plugin and this page rule because the next plugin will pretty much do everything this Cloudfare plugin does, solve the caching issue with logged users, automatically create the previous page rule, and do some more.
Use WP Cloudflare Super Page Cache Plugin
This WP Cloudflare Super Page Cache plugin will give you a lot of features that will solve the dynamic caching issues with Cloudflare while using WordPress. Like solving the caching issue with logged in users, the issue with automatically purging cache from Cloudflare CDN, disabling caching for pages with dynamic contents (the pages that shouldn't be cached), and many other problems will be solved by using this plugin.
In fact, its features will be the closest to the features of Cloudflare APO when compared to any other plugins. You won't get all the benefits of Cloudflare APO with this plugin but it will give you some additional benefits that you won't get in APO. For instance, it will give you granular control over which contents should be cached, support with other plugins, and many more things.
The caching problem with logged in users, automatic cache purging issue, and many other issues that occur with dynamic caching will be solved when using this WP Cloudflare Super Page Cache plugin. It will make your LiteSpeed Cache Cloudflare CDN setup a seamless experience.
Now, install and activate it on your WordPress site.
Then from your WordPress dashboard, go to Settings > WP Cloudflare Super Page Cache. There you will see option to connect your Cloudflare account with this plugin.
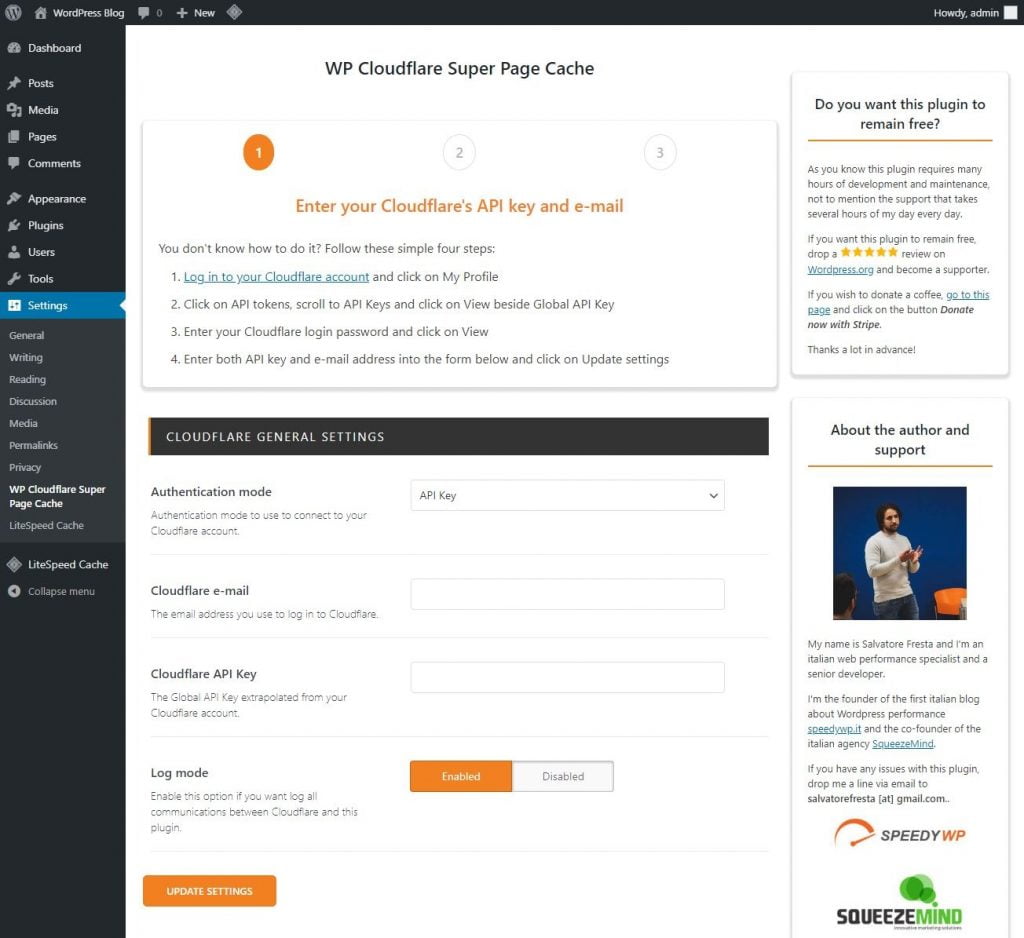
In the Authentication mode, you will get two options to either use your Cloudflare API Key or API Token. If you select the API Key option, you can use the Global API Key that you found from your Cloudflare dashboard by clicking on your profile icon then My Profile > API Tokens page in the previous section.
From this page, If you want to select the API Token option from the Authentication mode, you can
You can also create an API Token from this page using the Create Token button from the API Tokens section. Then you will be able to use this API Token instead of the API Key for connecting the plugin with Cloudflare. Again, using API Token will also be the safest option from a security perspective. But API Key options will also work. So, select either the API Key or the API Token option from the Authentication mode dropdown.
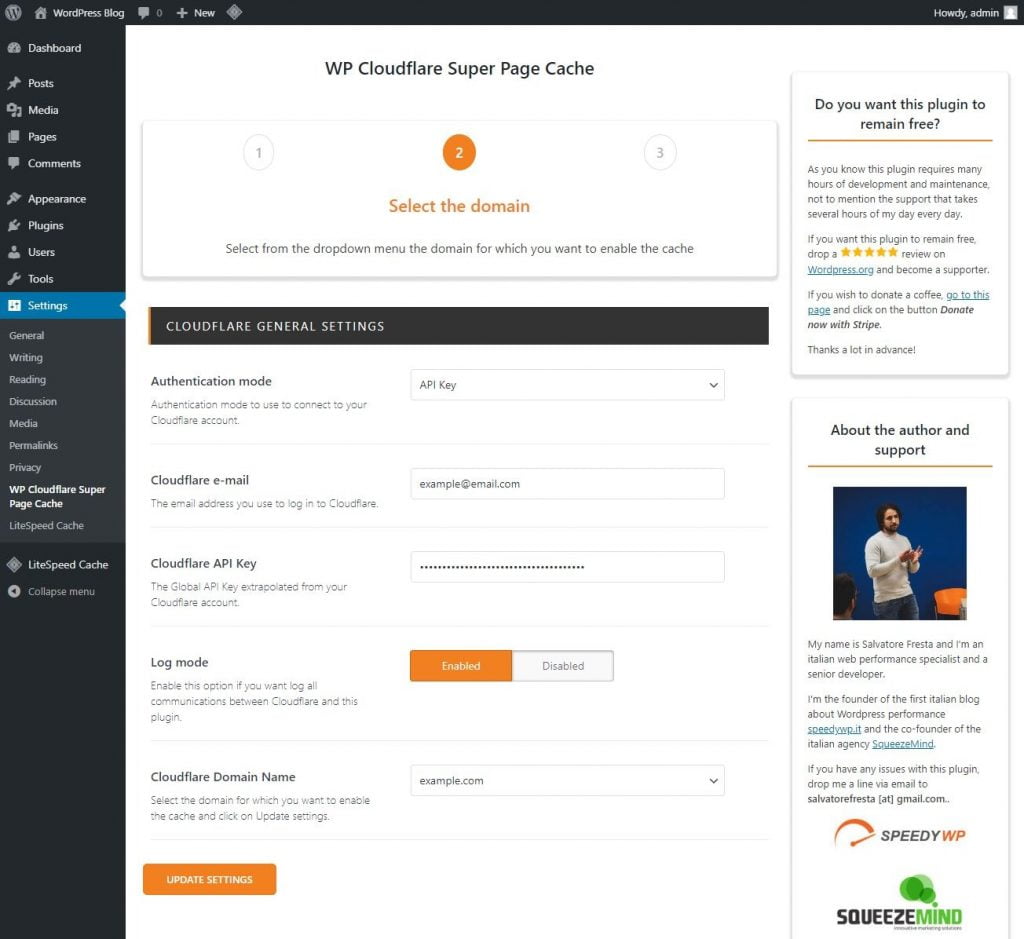
Then fill up the Cloudflare email ID, API Key, API Token, or domain name field according to your selection. Keep the Log Mode to the default Enabled as it may help you get support if anything doesn't work properly but you can also Disable it. Then click on the Update Settings button.
If you choose API Key method, after clicking on the Update Settings button, you will see another option for Cloudflare Domain Name where you will need to select your domain name and click again on the Update Settings button.
On the next page, click on Enable Page Caching Now button. This will automatically create a Cache Everything page rule for your domain inside your Cloudflare account. And therefore it will instruct Cloudflare to also cache the dynamic HTML files of your website.
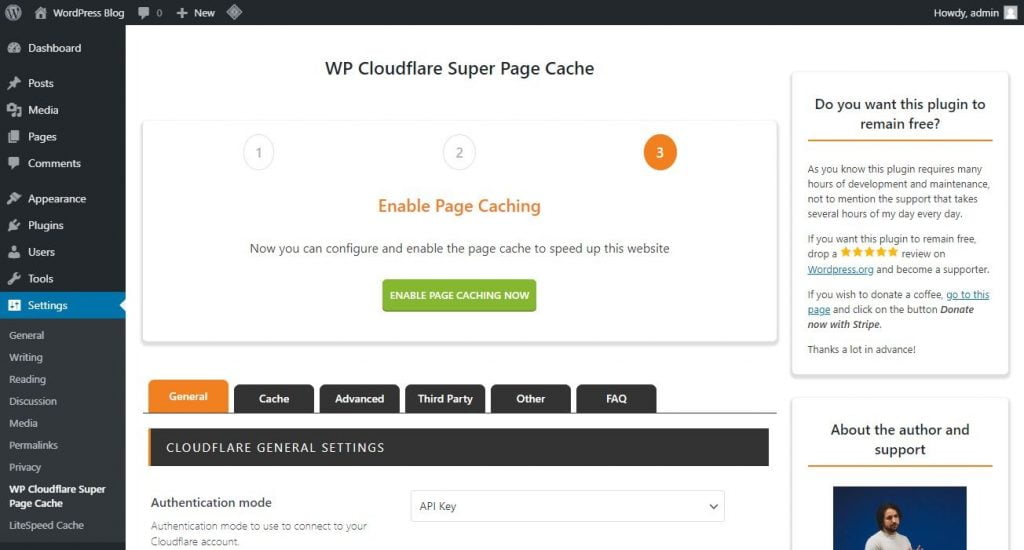
This will be pretty much enough for most people to serve all their website contents (including dynamic HTML files and static files like CSS, JS, images, and others) from Cloudflare CDN without incurring any problem. But I will go through some other important settings in this plugin so that you don't have to face any problems down the road.
This will also help you get the most from this plugin and solve any problems that might have arrived because of your specific WordPress setup. For instance, your web server like LiteSpeed, Apache, or NGINX, and the use of a caching plugin, in this case, LiteSpeed Cache can cause issues with this plugin. So, I will address them here.
In order to improve compatibility, WP Cloudflare Super Page Cache recommends turning off the caching feature from any other caching plugin. This also applies to the LiteSpeed Cache plugin. From this plugin's settings page, go to the Third Party tab and scroll down to the LiteSpeed Cache Settings section.
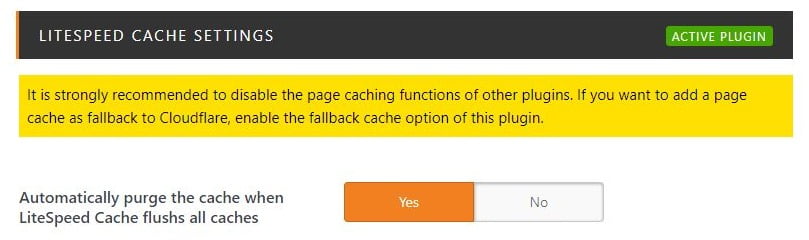
Here, because of having the LiteSpeed Cache plugin activated, you will see this warning asking you to disable the caching from the LiteSpeed Cache plugin. This will improve compatibility of this plugin with LiteSpeed Cache plugin. But don't worry, you don't need to disable the optimization options from LiteSpeed Cache Plugin. This warning is just to turn off the caching of LiteSpeed Cache.
Also, if you turn off the caching from LiteSpeed Cache, you can turn on the caching feature from this plugin. Let's do that and then turn off the caching from the LiteSpeed Cache plugin. If you don't face any problem without following this warning, you can get away without doing this setup. As per my testing, so far, I haven't faced any issues keeping the caching turned on in my LiteSpeed Cache plugin.
If you are in a LiteSpeed server, disabling caching from the LiteSpeed Cache plugin will mean you will no longer be able to use the amazing server level caching feature of using LiteSpeed server and LiteSpeed Cache together. So, you can first see if you face any problem without doing it and then decide if you want to do it. But if you not in a LiteSpeed server, you can comfortably follow this setup as you aren't taking advantage of the faching feature of LiteSpeed Cache any way.
To complete the setup of turning on the caching of WP Cloudflare Super Page Cache and turning off the caching of LiteSpeed Cache, follow the below instructions.
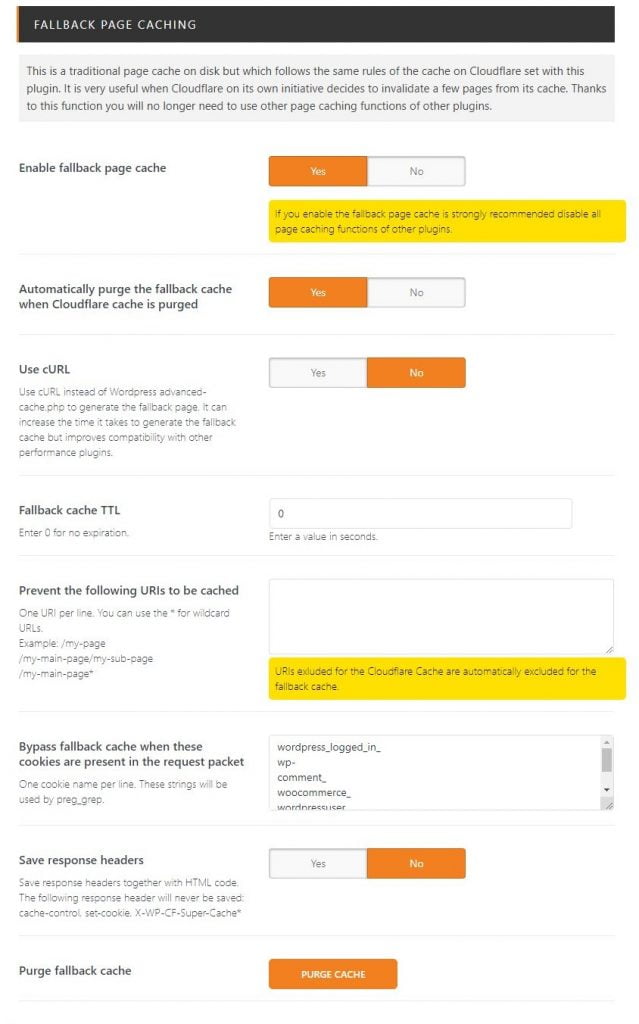
First, go to the Cache tab from the settings page of the WP Cloudflare Super Page Cache plugin.
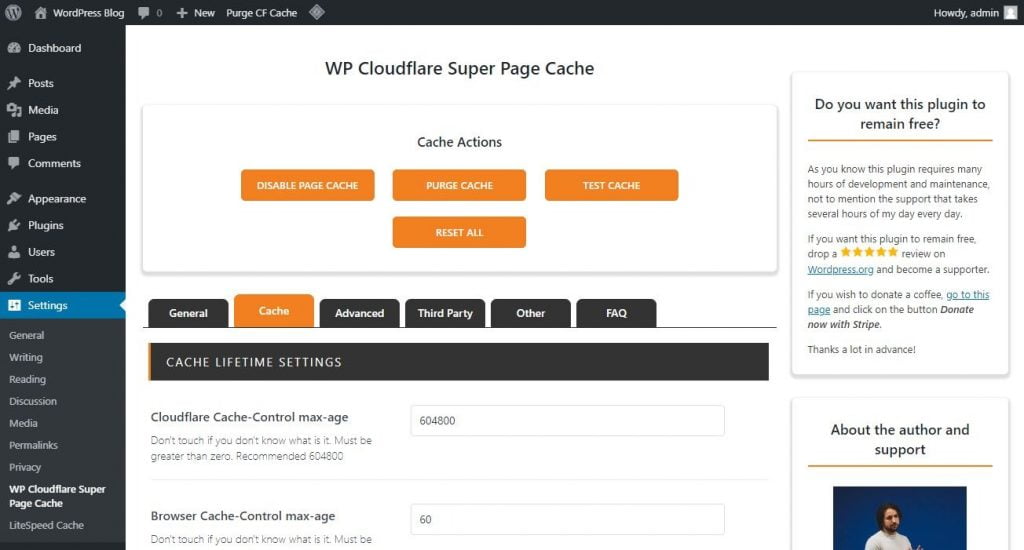
Now scroll down to the Fallback Page Caching section. There, select Yes for the Enable fallback page cache option. Then it will show you some more options which you can keep as default unless you find one that meets your requirement. Then go down the page and click on the Update Settings button.
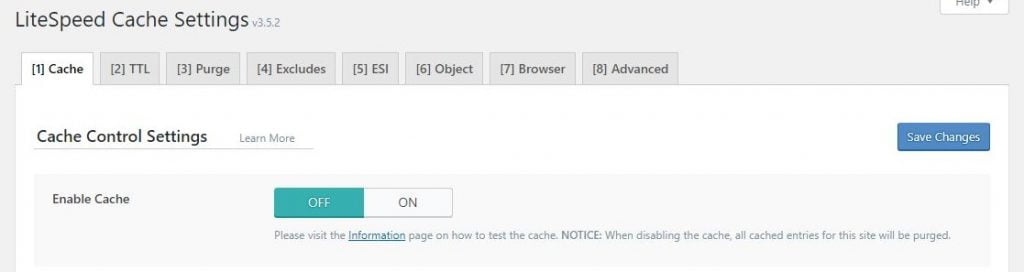
Now from your WordPress dashboard, go to LiteSpeed Cache > Cache then in the Cache tab. From there, turn Off the Enable Cache feature and then click on the Save Changes button. This will disable caching from LiteSpeed Cache and purge all its cache.
Now you are done setting up the WP Cloudflare Super Page Cache plugin with the LiteSpeed Cache plugin. This means you can take full advantage of LiteSpeed Cache Cloudflare CDN setup for both dynamic HTML files as well as static files.
All the problems that come with setting up WordPress site's dynamic file caching in Cloudflare should now be solved for you. So, no more caching problem with logged in users, or problem with automatically purging cache from Cloudflare CDN.
Conclusion
Both LiteSpeed Cache and Cloudflare are one of the best in their services. They also do complete optimization for WordPress sites. LiteSpeed Cache has QUIC.cloud CDN where Cloudflare has Automatic Platform Optimization (APO). But the optimization of LiteSpeed Cache is better than Cloudflare APO and the Cloudflare CDN is better than QUIC.cloud CDN. So, you can get a much better result by combining the best of them instead of just sticking to one. Sticking to one provider's services would, however, give you a much effortless experience since the seamless integration within their own products is too convenient to undermine.
Thank you so much for a very detailed guide. I learned a lot from your blog. Now I can happily turn off Quic.cloud's CDN and start using Cloudflare. As my testing, Quic.cloud's CDN is still not stable in comparison to Cloudflare.
I found it working pretty okay. But they are still in beta so stability can be an issue.
Hi admin.
Which CDN service are you currently using?
Right now I am on QUIC.cloud as it works the most seamlessly with the LiteSpeed Cache plugin. Also, even though Cloudflare has more nodes and gives faster speed, those additional nodes reduce the cache hit ratio. But that is something more important for my current usage than a slightly faster CDN performance.
Hi,
As per above settings with WP cloudflare super page with Fallback Page Caching with litespeed caching, how come logged-in user caching will work ? as per the plugin it will bypass the logged-in users..it wont cache for logged-in..let me know if i am wrong..
Dinu
You are right, the WP CloudFlare Super Page Cache plugin won't cache logged in users.
Here is an FAQ taken from their plugin page:
"Q: Do you allow to bypass the cache for logged in users even on free plan?
A: Yes. This is the main purpose of this plugin."
Hi,
Thanks for the reply and confirmation...I have a website over 1500 pages..i just started using litespeed plugin with cloudflare..i have forum also within the website..i want logged-in users to get cache privately or in individual folder with respective to their names or ids..how we can achieve this using cloudflare- workers or fallback cache or other methods...
Can you advise ..
Thanks.
Dinu
You are welcome.
Even though your situation may be different, you might want to reconsider before going ahead with private caching. That's because, as you said, you have 1500 pages and privately caching all those pages will require a lot of storage and may even slow down your server speed. At the same time, private caching benefits can only be enjoyed by any visitors only from the second visit to the same page. So, if they aren't repeatedly visiting the same page, they won't get any faster speed from private caching but you will incur a cost as stated previously. Also, forum contents are changing all the time, whereas cache is used to store and deliver the same contents, so because of the necessity to deliver up-to-date contents in forums, private caching may also not do any good.
You can read more about private caching and caching in general from this article.
Hi,
Thanks for the immediate response, pls find the gtmetrix report : https://gtmetrix.com/reports/www.dealsemperor.com/XY6EzR9k/
and my website is https://www.dealsemperor.com/, as of now I am in shared hosting...i am planning to move to VPS which should be good and fast to take logged in users within millisecond when it is not cache...
pls let me know how can i reduce the page weight/size to make load faster..
Thanks...
You can use this TTFB improvement guide as a starting point. Then use the LiteSpeed cache settings from this page which will give you a better understanding of which settings to use.
If that still doesn't give you a satisfactory result, you might need to rework your webpages which would take more work. So, just try the first two and then go from there.
Hi,
I like the clarity with which you explain your recommendations. This definitely cleared some things up in my mind. Although some things are still very confusing to me. Primarily because I'm trying to use Cloudflare with Litespeed cache while having APO turned on at the same time. For what I understand from your guide you seem to suggest this would be a good idea. (or even the best option). Although you don't give any specific instructions on how to do this in the best way possible which, right now, left me a bit confused and with a couple of questions. Here are some of them:
1. Do I need to keep the "Cache everything" Page Rule I have APO turned on in Cloudflare (and of course in to official cloudflare wp plugin as well)
2. Your guide say that I should turn "Auto Purge Content On Update " on when using Litespeed with Cloudflare. But do this recommendation remain when I use APO? The official instructions below the Auto Purge in the Cloudflare plugin is saying: "Note: This feature is superseded by Automatic Platform Optimization for WordPress. If you are using APO, then this setting should be disabled." Should the be OFF or ON when using Litespeed cache with cloudflare AND Automatic Platform Optimization?
3. Do all your other instructions still apply if I'm using APO or are they only for if I'm using Cloudflare without APO?
I have a lot of trouble finding a good guide on what settings to use for Litespeed cache with Cloudflare and APO turned on. Would you be willing explain this or even link me to a guide that does. I been searching for hours now but there seem to be no clear instructions out there yet. At least no guide that does not presuppose a lot of technical understanding. Maybe this is an idea for some new awesome content for you?
Thanks for an great article!
Hey Emil,
Here are the answer to your questions:
1. Cloudflare APO has been built to make everything easier, so you don't need to worry about the Cache everything rule. When you turn on APO, Cloudflare will do this for you automatically.
2. Cloudflare APO also takes care of Auto Purge Content On Update automatically. So, you can just keep it turned off as they recommend.
3. If you are using the official Cloudflare plugin, its settings described in this guide should still apply when you are using APO. And as you guessed, while using the official Cloudflare plugin, you don't need to use the other plugins or methods mentioned in this guide. So, their settings aren't really a concern.
As for a guide, you can read their Cloudflare APO article to better understand how it works which may also help you decide its proper settings.
By the way, thanks a lot for your appreciation. And I will consider this content idea for my future guides.
What are the benefits of LiteSpeed with this type of setup? It is not used when there is a cache HIT in Cloudflare and WP Cloudflare Super Page Cache's fallback cache is used on misses.
This setup not only helps with caching and issues caused by caching but also helps in many other areas necessary to optimize your site for speed.
I was also wondering what actually the benefit of the litespeed caching plugin is if you bypass/tun of the caching in the plugin and also quic cloud. you could also just us the cloudflare super cache plugin and use autooptimize for minifyong css, js and html. can you go a bit into details what‘s the purpose uf having the litespeed plugin activated in your setup?
Hello,
I'm so confused after this article. When I'm configuring everything like in that guide, do I need a Media library CDN like Cloudinary? Because I have massive problems with media and I saw Cloudinary. So do I need this or can I use it also in combination with that in your tutorial?
And another question: Do I need this WP Cloudflare Super Page Cache plugin when I'm using Cloudflare APO?
Best regards
Francesco
Hi Francesco,
This LiteSpeed Cache with Cloudflare setup guide is specifically for delivering your website files such as HTML, CSS, JS, and images from Cloudflare CDN. If you have problems with managing images, you can use services like Cloudinary which will also take care of image delivery from their CDN. But if you store images on your WordPress site, Cloudflare will deliver those images from their CDN. So, if you want, you can use both Cloudinary and Cloudflare without any issues.
If you are using Cloudflare APO, the official Cloudflare plugin should be enough and in that case, you won't need the WP Cloudflare Super Page Cache plugin.
Thanks for sharing this! I wanna try them, but will the WP Cloudflare Super Cache plugin work well with Jetpack and Autoptimize?
Now I'm using Cloudflare (with just one Page Rule not to cache wp-admin) and Jetpack's site acceleration all turned on, it seems like everything works fine, all images are served through Jetpack's CDN and almost all other static files served through Cloudflare,
Except for the CSS and js generated by Autoptimize, they get MISS in the cf-cache-status. Why is that? Any recommendation? Or should I just uninstall Autoptimize?
What do you mean by "almost all other static files served through Cloudflare"? I am only asking because if you are using Autoptimize for your CSS and JS, and Jetpack for images, then you probably don't have many static files left for Cloudflare, maybe except a few fonts. So, just to be sure, can you double-check if you have the Cloudflare proxy turned on for your domain from the DNS settings page of Cloudflare? Also, if any of your files are getting served from Cloudflare at all to identify if it is working fine on your site?
Anyway, Autoptimize CSS and JS should be served from Cloudflare just fine. So, maybe you can try finding out if there is any other issue with your setup.
Yes thanks, all clear now.
I disabled Jetpack CDN so all files are served by Cloudflare. Firstly the cf-cache-status got miss, but it turns out that it needs a second request to be hit. Autoptimize works fine, too.
I'm going to try caching HTML now.
Thanks again!
Cloudflare delivers cached files only from the second request. You can read more about this in this Cloudflare CDN article.
edit: It seems that from my browser, some images, CSS, and JS files are still getting cf-cache-status: miss, despite it's been the 5th request. Is that OK? Or did I do something wrong?
It may happen because you are logged in, in which case, it should be just fine. It may also happen if your browser has already cached these files before they were delivered from Cloudflare's cache. Try loading your site in incognito mode of your browser and see if everything works fine.
Hello, I am the admin of Educationweb.com.gh, adsense ads shows almost instantly when logged in dashboard but when logged out it takes up to an hour for the ads to display, I am on a litespeed server using litespeed cache, Cloudflare and Cloudflare WP super cache. Help me solve the issue please
Hey George,
As you are facing the issue only when not logged in, it may be a problem with caching. You can try disabling caching in LiteSpeed Cache by turning off Disable All Features option from LiteSpeed Cache > Toolbox > Debug Settings, and in Cloudflare by turning on its Development Mode. Then see if any of them creates an issue.
Hi,
Thanks for your article!
Gave us some rally good insight in fine tuning.
The only thing I would add is that it seems Litespeed cache and Cloudflare aren't a perfect match anymore, because we ran into issue (pages showing up broken, like the theme was missing, etc) and the Litespeed team told us in a ticket to disable the Litespeed cache if we had Cloudflare cache enabled. We are using the free version, so no APO. Sop at the moment only Cloudflare cache is enbled and Litespeed is now only used to optimize images instead of Imagify. A real bummer, because we also don't want to miss out on the protection and performance Cloudflare provides.
--
In general, we always advise our plugin users not to enable cache or any optimization features in our plugin that they've already enabled in another plugin such as CF APO. CF dynamic cache is known to interfere with LSCWP cache. This is indeed the reason why you can only use LSCWP for image optimization for the time being. I'm not surprised you had a problem with our crawler, either, for the same reason. As you know, the crawler is a page pre-cacher.
Honestly, there's really not much we can do for you unless you disenable caching with Cloudflare.
--
Regards,
Robert
Can someone please elucidate on whether it would be better to use the Litespeed/Quic Cloud(QC)/Cloudflare(CF) set up, but with CF delivering the static content as a sub-domain CDN and QC delivering the dynamic content (all within the CF DNS set up).
If anyone has tried this set, please let us know whether the results are any better than using the Api set up that Litsespeed plugin provides.
This article and video from Litespeed, suggests the CF Subdomain route is better, but I have not seen anything to confirm this is the case.
thttps://quic.cloud/docs/cdn/dns/using-cloudflare-with-quic-cloud-cdn/#with-cloudflare%E2%80%99s-default-configuration it https://www.youtube.com/watch?v=Y5JCiHmAjzk
Thanks for this post. Did have to do a lot of tweaking with Litespeed Cache afterwards. It seemed to mess up my site a bit here and there. I think it was the html minify that was the boogyman.
Is there any reason you choose to use WP Clouflare Super Page Cache over WP Fastest Cache, since that one has way beter reviews, way more downloads and also a cloudflare API/connection?
Also; do you still use CF > speed > optimization > auto minify, or do you leave that to Litespeed Cache?
Here is how I see this, WP Clouflare Super Page Cache has been built to utilize Cloudflare's free plan to its full extent without going through any complicated setups. And as far as I can tell, it does a great job with that. On the contrary, WP Fastest Cache and all other WordPress caching plugins are not built for Cloudflare specifically. So, you should get better results with WP Clouflare Super Page Cache while using Cloudflare. But if your aren't using Cloudflare, the other plugins will be the way to go.
Try testing with auto minify on and off to see which gives best result for your specific setup.
Had to shut litespeed off because I kept getting a 403 error and I even put in the cloudflare Global API token etc.. was only happening on mobile phones. Desktop seems to load wordpress site just fine. I also went through the litespeed settings and turned off mostly everything to no avail. Not sure, but can't have the site down.
Also wanted to mention that it said 403 port 443 or something like that... again only on mobile.
Still, QUIC.cloud doesn't support DNSSEC. You set up your domain along with DNSSEC for security reasons, QUIC.cloud will be gone for you. Anyone aware of a workaround here?
Thanks for writing up such a good guide. Now i am using litespeed cache with cloudflare and i have disabled minify options in cloudflare and have enabled APO.
my question is after making changes to site should i be clearing litespeed cache from wp dashboard and then go to cloudflare dashboard clear cache again?
My page has this rendering issue and i believe its something to do with my caching system.
Is it a good idea to use this on a social network site that runs buddyress and with user generated content?
can i use WP Cloudflare Super Page Cache plugin to exclude specific URL's to be cache. If yes, Is it the same as the "rules" on cloudflare? I am paying for rules on CF so if it works on WP Cloudflare Super Page Cache, that means i can remove the rules from CF and add it to WP Cloudflare Super Page Cache plugin. Is that correct ?
One more question, did i understand well, I turn off "enable cache" from the litespeed plugin and turn it on the WP Cloudflare Super Page Cache plugin? Sorry, it's confusing because you suggested at first to keep both enable and see if it cause conflict so we can keep the power of the litespeed plugin.
Hi,
First of all i'd like to thank you for this guide. I've been able to improve my webshop from 50% performance in GTMetrix to 95% on avarge due to the Cloudflare, Litspeed and WP Cloudflare configuration! I only have one remaining question that I would like to address;
We do host an B2B-webshop for which it is required that people will be signed in. Most of our visitors will actually be signed in during their complete visit. After enabling above configuration I can see that /?swcfpc=1 is being appended to all of my URL's. Whenever I compare a page for a non-logged in user (performance of DevTools says loading time is 900 ms) with a logged in user (DevTools then tells me it's 4000 ms) I can see a huge increase in loading time for the logged in users. Is there any way I can handle this with the current configuration as, of course, i'd like to have a loading time of <1000 ms for all logged-in users.
I am looking forward to your reply and thanks in advance.
Artigo muito bom. Vou testar as dicas.
this is a very helpful discussion and worth trying
This is a damn helpful guide. Thanks to the author for all given explanations. After implementing all the settings / pluggin recommended in this guide, the mobile menu of my astra theme sometime misbehave on mobile devices. Can anybody help me resolving this issue.
Hil, I am a bit confused by the secrion in which you say that enabling the Cloudflare API option in the Litespeed Cache CDN Settings, will result in dynamic content caching problems from Cloudflare. That section is referring to a non default Cloudflare CDN setup in which everything is cached correct? Is it assuming that a Page Rule of Cache Everything in Cloudflare is used?
Because from what I know the default behaviour of Cloudflare is to cache only static content. I want to know, because I am interested in using Cloudflare to cache only static content for my website and the use of the Cloudflare API option would be convenient if it did not automatically result in dynamic content caching from Cloudflare.
Thanks in advance,
Themis
Why do you turn LiteSpeed cache to off at end? Doesn’t that make the LiteSpeed cache plugin useless?
This article really helped speed up my Quiz Website Siliconhell
I do have a bit of CLS That I am investigating
Thank you for sharing your knowledge with us