Setting up WP Rocket with Cloudflare CDN can be the perfect solution for getting the best speed out of your WordPress website. The Cloudflare WP Rocket combination is also a very popular choice. That's because WP Rocket is one of the most popular WordPress speed optimization plugin and Cloudflare is one of the most popular CDN provider. So, the setup makes sense for many people.
However, it is more than challenging to get the best feature of Cloudflare CDN, which is full-page caching, to work on your site without any issue. For instance, it may show old contents on your website, break your website contents or layout, and others. That's where this article will be the most helpful to you for the WP Rocket Cloudflare CDN setup with the best settings.
What is WP Rocket
WP Rocket is one of the most popular plugins for WordPress speed optimization. Its simplicity and top-notch performance made it one of the most used plugins in its class even though it is a completely premium plugin when almost all its competitors offer a free version of their plugins.

The most appealing feature of WP Rocket is its performance. It works out of the box for most sites and allows you to reap its benefits without even touching any of its settings. And if you spend a little time configuring the settings of this plugin, you will be able to get the best speed out of your WordPress site.
That is to say, its settings are super simple for anyone even for complete beginners which is a very important feature of WP Rocket. Most other WordPress optimization plugins will give you a ton of customization options that may be good for advanced users but are not of any help for the regular users. That's because the optimization settings requires thorough understanding of many technical concepts and jargons.
Even though, WP Rocket has one of the simplest interfaces, you don't miss out on any important features. In fact, it gives you some features that aren't even offered by many other premium plugins like the Critical CSS feature.
In short, it is one of the best plugins you can have for optimizing your WordPress site speed.
RocketCDN
RocketCDN is a CDN service built into the WP Rocket plugin. It uses StackPath CDN provider for delivering the static files like CSS, JS, and images of your WordPress site. It works like any other regular CDN provider so it isn't for caching dynamic HTML files. But WP Rocket made it simpler to set up the CDN by including it directly inside the plugin settings.
RocketCDN, however, requires a separate subscription that costs $7.99/month in addition to the WP Rocket plugin price.
What is CloudFlare
Cloudflare is a very popular provider of DNS and CDN services. Even though we are most interested in their CDN in this article, we will also need to use their awesome DNS in order to use their CDN.
Even though both their DNS and CDN services are free, they are one of the best. In fact, their DNS has the fastest speed of any DNS provider. Take a look at this test result from DNSPerf where you will see Cloudflare is consistently the fastest DNS proivder.

Their CDN is also of similar quality and are constantly providing one of the fastest CDN services. Here is CDN test result from CDNPerf where Cloudflare ranks among the fastest few.
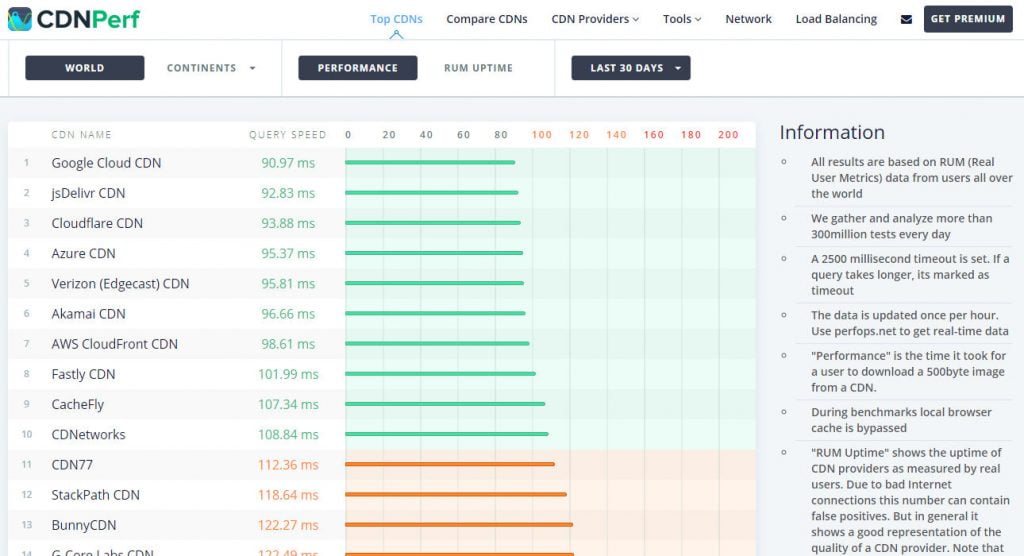
So, it is pretty evident, Cloudflare services are top of the line and can definitely improve your website speed. Their large infrastructure with 200+ datacenters all over the world are a very good reason for such a performance from them. And when combined with the fact that you are getting all these for free, Cloudflare easily becomes the best choice of any website optimization.
Besides, unlike traditional CDN providers, Cloudflare is a reverse proxy CDN provider. This means, besides doing everything other CDN providers do, Cloudflare can also cache dynamic HTML files, also know as full-page caching. This allows for a much faster load speed of your WordPress website.
By the way, here is how you can improve the initial website speed called TTFB of your website.
However, full-page caching requires careful setup for dynamic sites such as WordPress in order to work properly. Otherwise, it may end up breaking your site and do a lot more harm than good. For example, your visitors may end up seeing the WordPress admin bar that only you as an admin are supposed to see or vice versa. They may also see contents that aren't for them but for someone else like for a different member in your membership site.
These are the problems Cloudflare tried to solve by introducing their new APO.
Cloudflare APO
Cloudflare APO (Automatic Platform Optimization) has been introduced as a solution to the long-lived problem of serving HTML pages of dynamic websites. As a new service, Cloudflare APO is now available for only WordPress sites but may become available for other platforms in the future.
When website pages need to be generated based on who is visiting the page and then served to the visitors, this becomes a problem for caching. That's because caching will mean storing the generated webpage once and then serving it to all others. So, the contents generated for someone may also be served to someone else even if the contents were different for both. And this is caused in dynamic sites like the ones created by WordPress because the webpages are generated every time they are accessed based on the particular user.
This is why serving HTML pages of dynamic websites is not only challenging in Cloudflare but also in all other reverse proxy CDN providers. In fact, regular CDN providers don't even offer the serving full-page caching of dynamic websites. However, the advent of Cloudflare APO makes this very simple for you. So, you can enjoy the fast speed of your WordPress site without needing to go through any complicated setup process.
However, Cloudflare APO is a paid service. It costs $5/month. But if you don’t want to use this paid service, there is a great alternative for you. In fact, this article is about how you can use the WP Rocket plugin with Cloudflare’s CDN completely for free without requiring APO.
But going with APO is still one of your best options so if you would want to go that route, you may want to read this review of Cloudflare APO.
RocketCDN vs Cloudflare
RocketCDN is a traditional CDN service that only serves static files (in this case CSS, JS, and images) of your website. But Cloudflare is a reverse proxy CDN provider so apart from serving those static files, it can also serve the dynamic HTML files of your website.
The HTML file is the very first thing that loads on your visitors' browsers and all other files are loaded after that. So, by using HTML caching in Cloudflare, you can not only improve your total website speed but also improve how fast your website visitors start seeing your website contents on their screen.
Should I Use RocketCDN or Cloudflare
Cloudflare, as a reverse proxy CDN provider, can serve both your static and dynamic files where RocketCDN can only serve the static files. So, Cloudflare can do all that RocketCDN does and more. Therefore, you can only use Cloudflare and not RocketCDN.
However, you can also choose to use both at the same time so that your static files are delivered from RocketCDN and your dynamic files are delivered from Cloudflare.
As a general recommendation, you can get just fine results using just Cloudflare for most sites. But if your website doesn't have that many visitors and if your website has global visitors, you may get a better result from using both RocketCDN and Cloudflare because of how these two CDNs work.
StackPath auto-populates all its data centers with the files that are served from any of its data centers. But, even though Cloudflare has a faster CDN, it doesn't auto-populate its data centers so more visitors are served uncached pages which results in slower speed to those people. You can read more about why Cloudflare may not be a good choice for low traffic websites in this article.
Setup WP Rocket with Cloudflare
It is pretty easy to setup WP Rocket with Cloudflare. I will give you step by step instructions on how you can do that. And also how you can use a free plugin as an alternative to Cloudflare APO. Though that plugin wouldn’t give you all the same features of Cloudflare APO, it will give you enough to properly setup Cloudflare CDN with your WordPress site. But if you can spend $5/month, go with Cloudflare APO. I strongly recommend that.
This setup article is specifically for serving your entire WordPress site from Cloudflare CDN. Normally, Cloudflare only serves static files like CSS, JS, images, and other files but not HTML files as this is generally considered as dynamic file type. Serving dynamic files from CDN creates all sorts of problems if not set up properly. That’s why Cloudflare doesn’t automatically serve HTML files. But being able to also serve the dynamic HTML files from the CDN will give your site the fastest speed. Your website’s TTFB will reduce significantly, and the total load time will also decrease.
Static file caching is automatically done from Cloudflare without requiring any special setups. That’s why this article will be about properly setting up HTML file caching so that you can serve both static and dynamic files from Cloudflare CDN.
Setup Cloudflare DNS
In order to use the CDN of Cloudflare, you will also need to use its DNS. So, let’s start by setting up that.
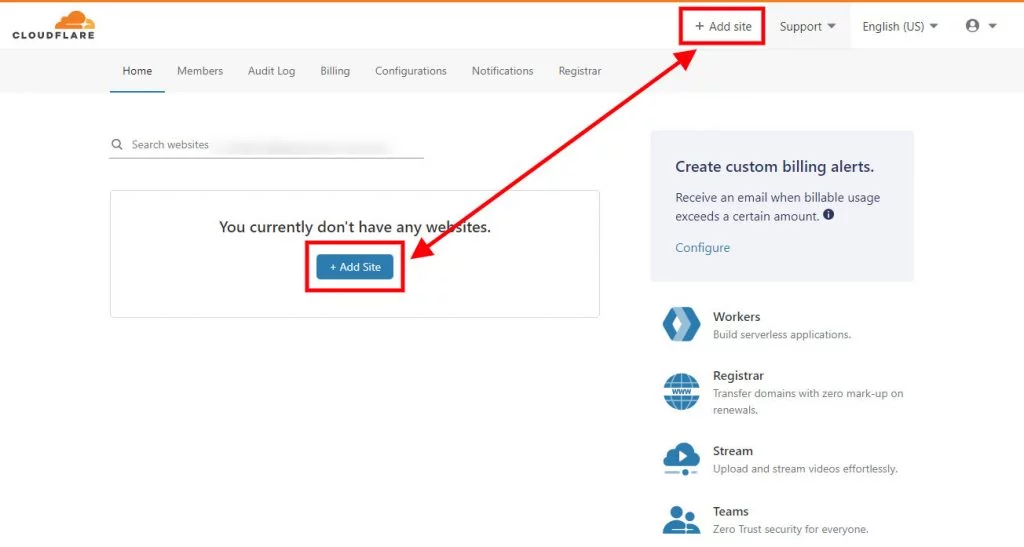
First, go to dash.cloudflare.com then log into your account. If you don’t have an account, create one for free and then log in.
Now you will be inside the cloudflare dashboard. From here click on the + Add site bttuon.
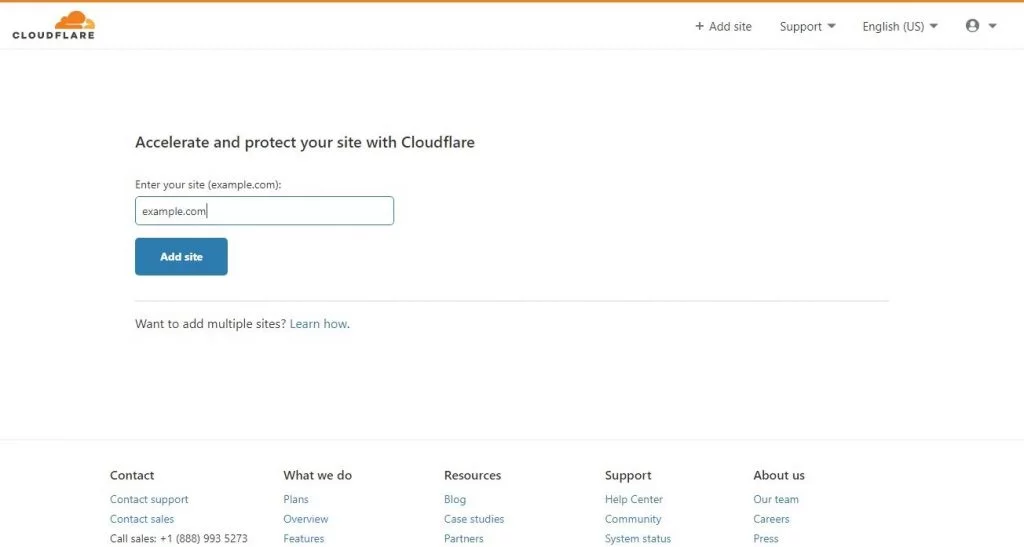
Then on the next page, enter your site in the specified format. Then click on Add site button.
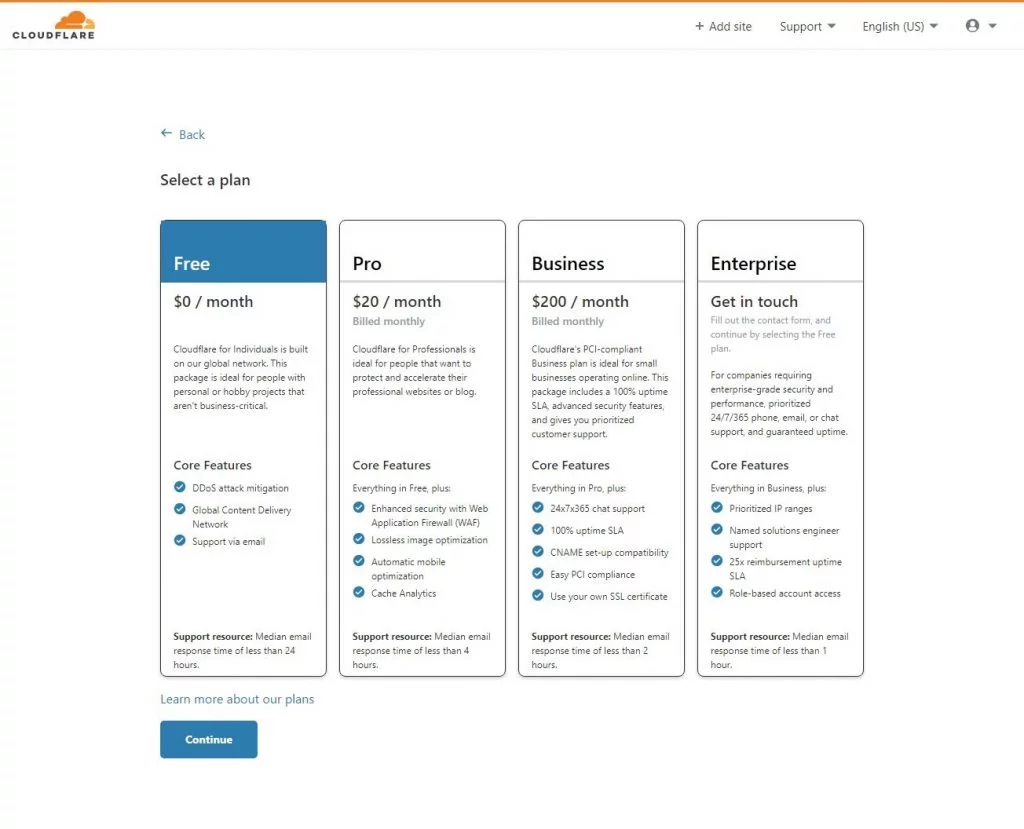
Then you will be prompted to choose a Cloudflare plan. Choose the Free plan from here then click on Choose.
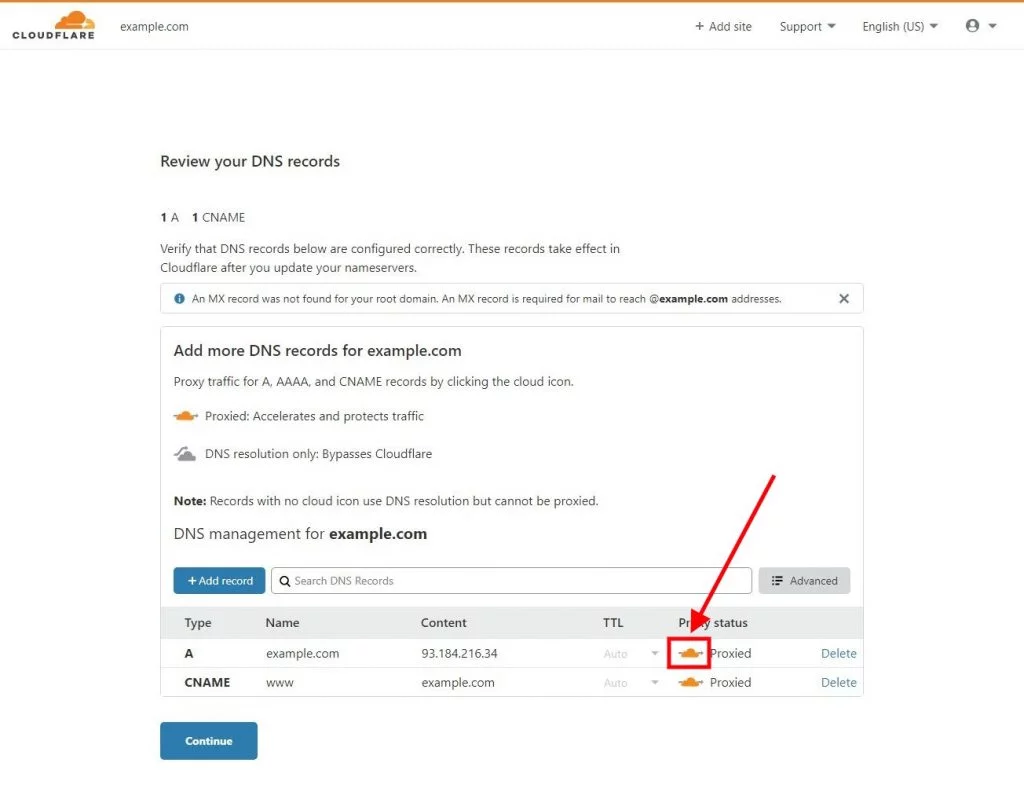
Now you will see the existing DNS records for that domain name. You can add, edit, delete any of the records from the page. But if your domain doesn’t have any existing DNS records, you won’t see any records here.
From this page, make sure your domain has an A record pointing to the IP address of your web server. You will get this IP address from your web hosting provider. If you use a subdomain like www.example.com to access your site, you will also need to have an A record or CNAME record for that subdomain. These records will help access your site. But if these records don’t already exist, you will be able to add them from this page using the + Add record button. And don’t worry, you can always change these records later.
However, make sure that the cloud icon for your domain name is orange instead of gray. This is a must in order to use Cloudflare’s CDN with your site. Then click on Continue.
Then the next page will show your existing nameserver records and the two nameserver records for your Cloudflare account. What you will need to do is replace those existing records with your Cloudflare records.
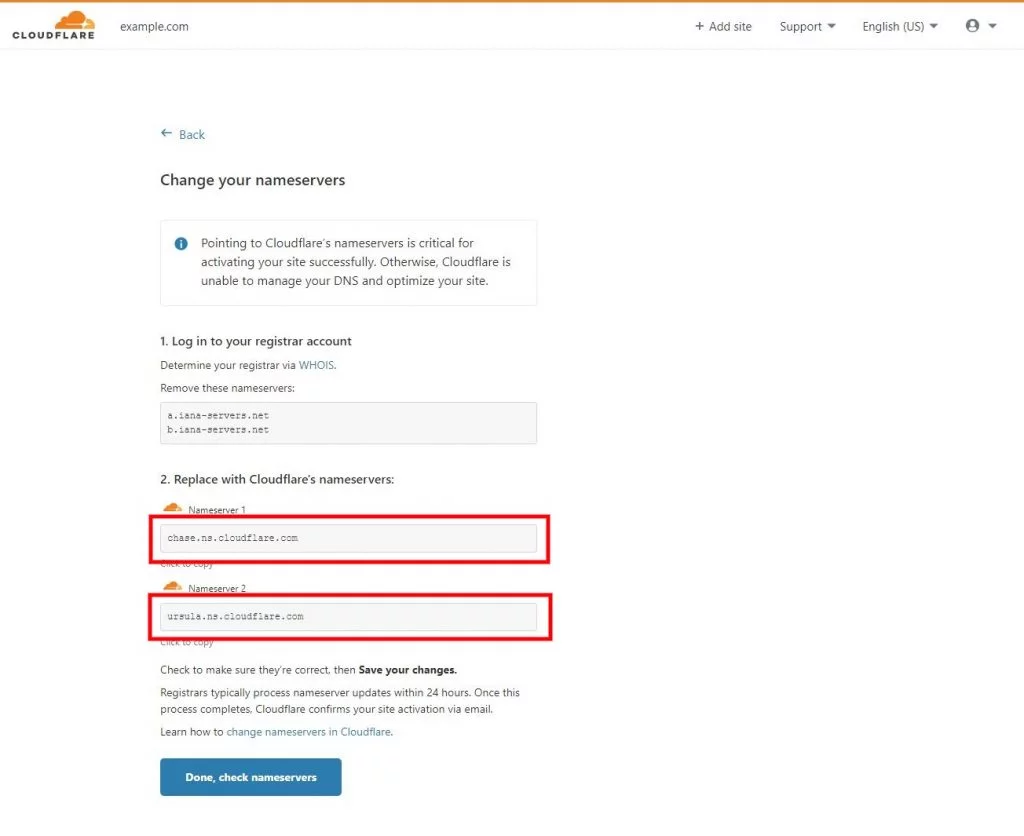
In order to change the nameserver records of your domain, first you will need to go to your domain registrar’s website then change the nameservers from there. So, go to the website of the provider from whom you have bought your domain name like NameCheap, Godaddy, or anyone else. Then log into your account and change the nameserver records of the domain you want to use with Cloudflare.
This article by Cloudflare about changing domain nameservers to Cloudflare will help you in doing that. Just click on the name of your domain registrar and you will see step by step instructions about how to change nameservers from that registrar. But if you don’t see your domain registrar’s name, you will need to find out how to do it there.
When you are done with that, come back to the Cloudflare’s page where you left off and click on the Done, check nameservers button.
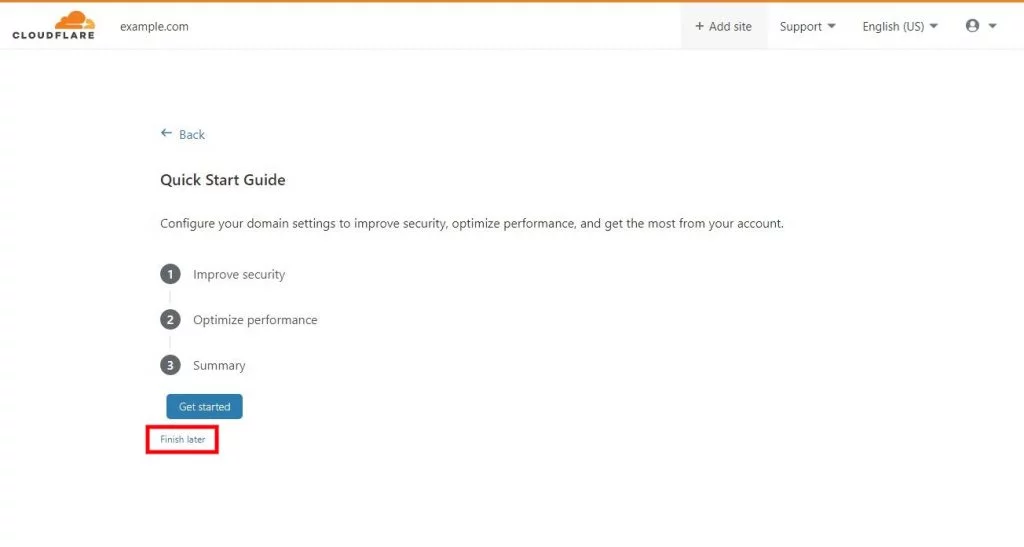
Then on the Quick Start Guide page, click on Finish later as you will be able to change all the settings later.
Then you will see the complete your nameserver setup page. This page is shown because it may take a while for Cloudflare to see your updated nameserver records. You can click on the Re-check now button to add your domain to the queue of Cloudflare.
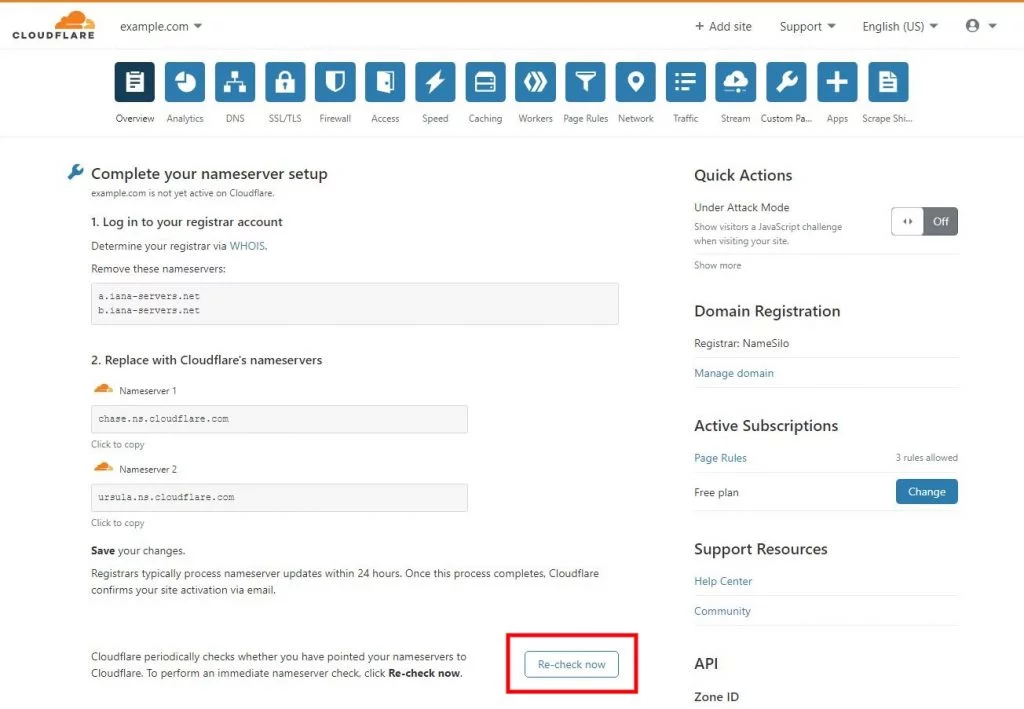
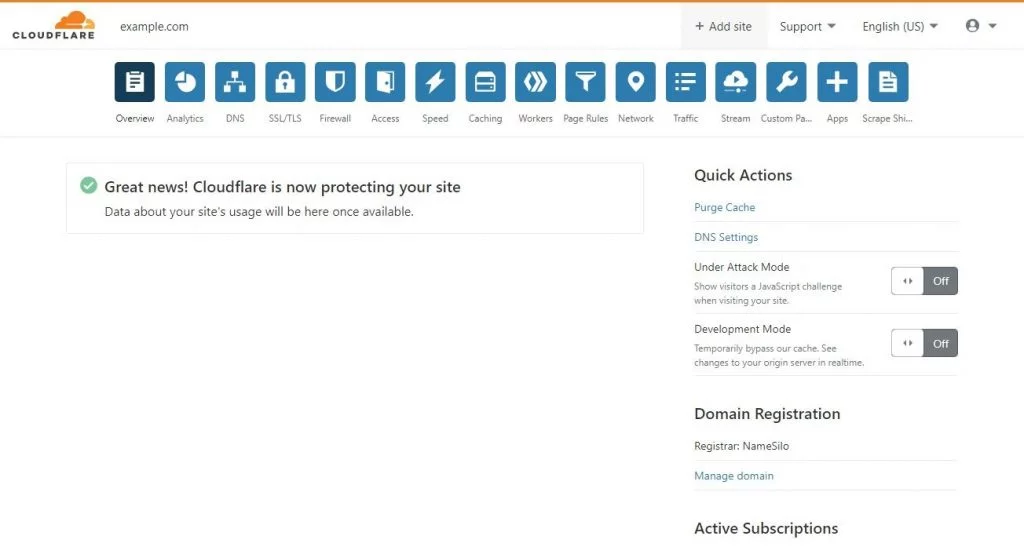
Though it will tell you to check back in a few hours, the nameserver records are generally verified within minutes. So, to check if your domain name has been verified, refresh the page. But if you have left the page, open the Overview page from Cloudflare dashboard. Once it is verified, you will see it on the page like the following:
Use WP Rocket's Cloudflare add-on
WP Rocket provides an add-on to easily configure Cloudflare while using its full page caching feature. This Cloudflare add-on will help sync the cache purging of WP Rocket with Cloudflare. This way, whenever WP Rocket purges any cached files, it will automatically instruct Cloudflare to also purge the cache of the same files.
If you haven't already installed WP Rocket, install and activate it and then follow the instructions provided below.

Now, you will need to activate the Cloudflare add-on from WP Rocket. To do that, go to Settings > WP Rocket > Add-ons from your WordPress dashboard. Then turn On the button beside the Cloudflare option. This will reveal a new Modify Options button inside the Cloudflare add-on section and also a new Cloudflare option under the Settings > WP Rocket > Add-ons menu in the WP Rocket settings page.
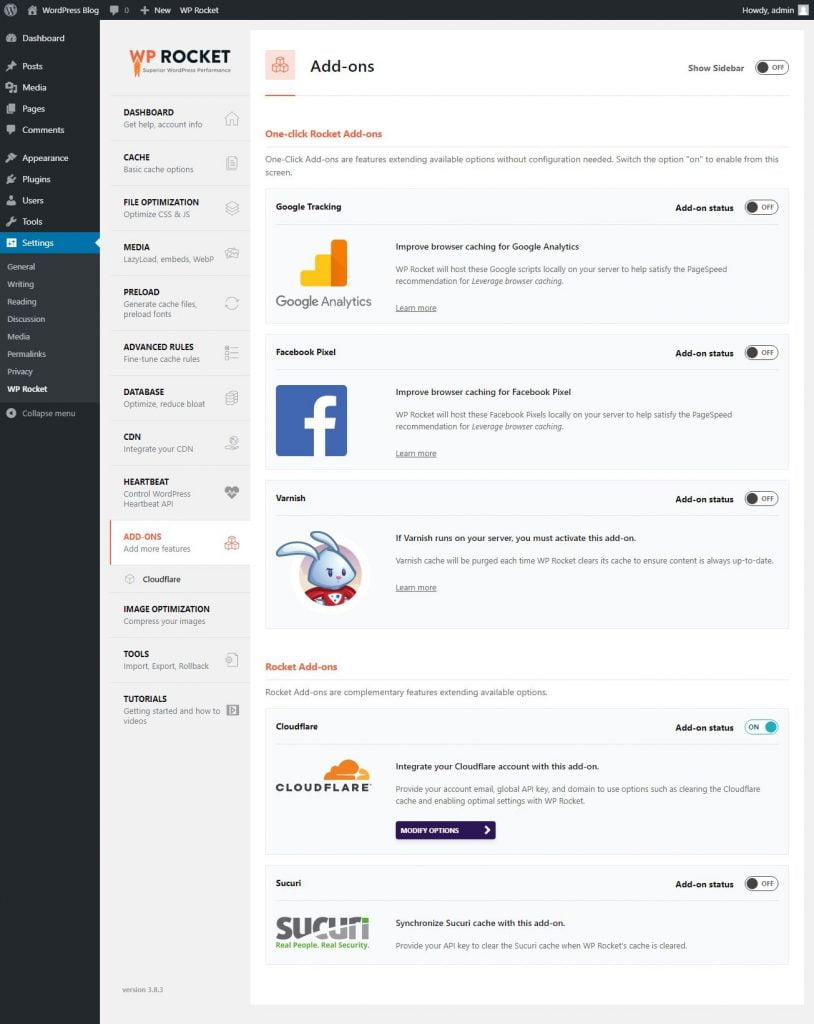
Click on either the Modify Options button or the Cloudflare option to see the settings page for the Cloudflare addon. Then you will see options to enter your Cloudflare credentials. This part is necessary to give the WP Rocket plugin access to your Cloudflare account.
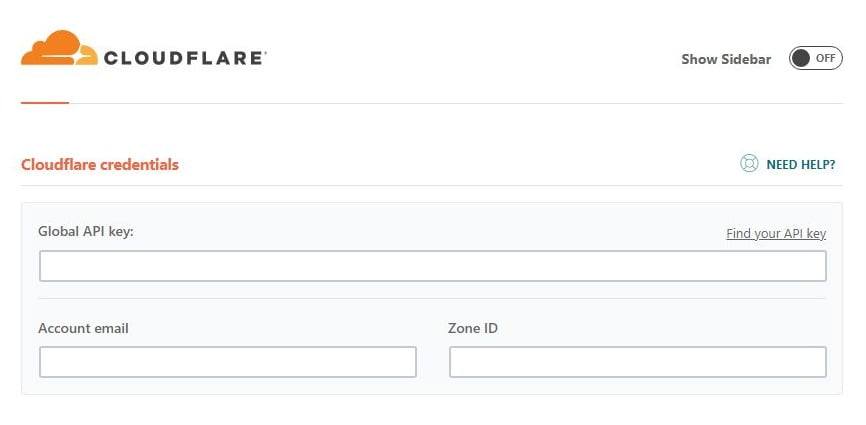
For the Global API key field, you will need to go to your Cloudflare account and then get the key from there. To do that, go to dash.cloudflare.com and log into your account. There, click on your profile icon then My Profile > API Tokens. Now to see get your Global API Key, click on the View button for Global API Key. Then you will be prompted to enter your password and after that, you will get the key. Copy that key to use in the WP Rocket plugin.
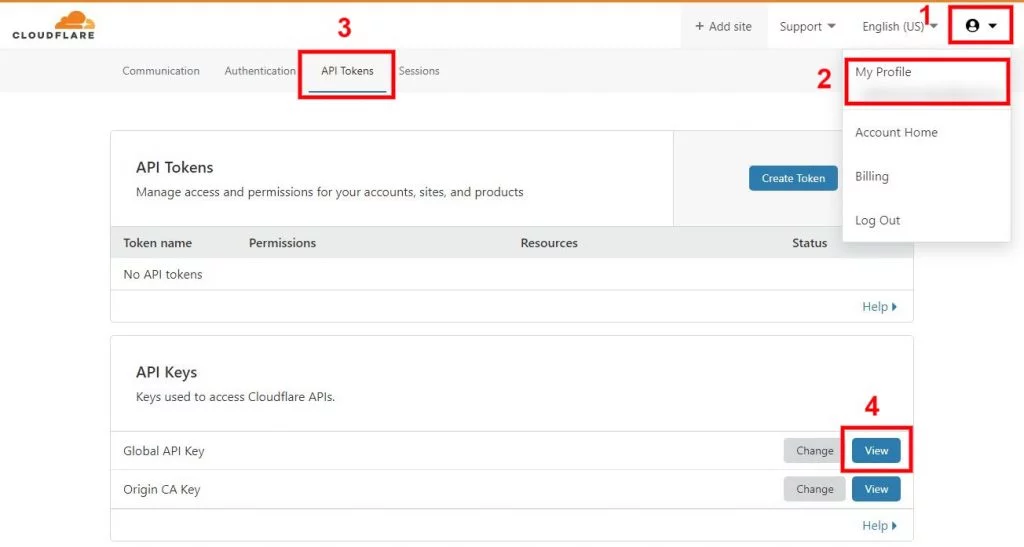
Now paste the key in the Global API key field in the WP Rocket plugins’ settings page where you left off. In the Account email field, enter the email address you use to log in to your Cloudflare account.
For the Zone ID field, go back to your Cloudflare account. There, open the Overview page of the domain for which you are setting up Cloudflare.
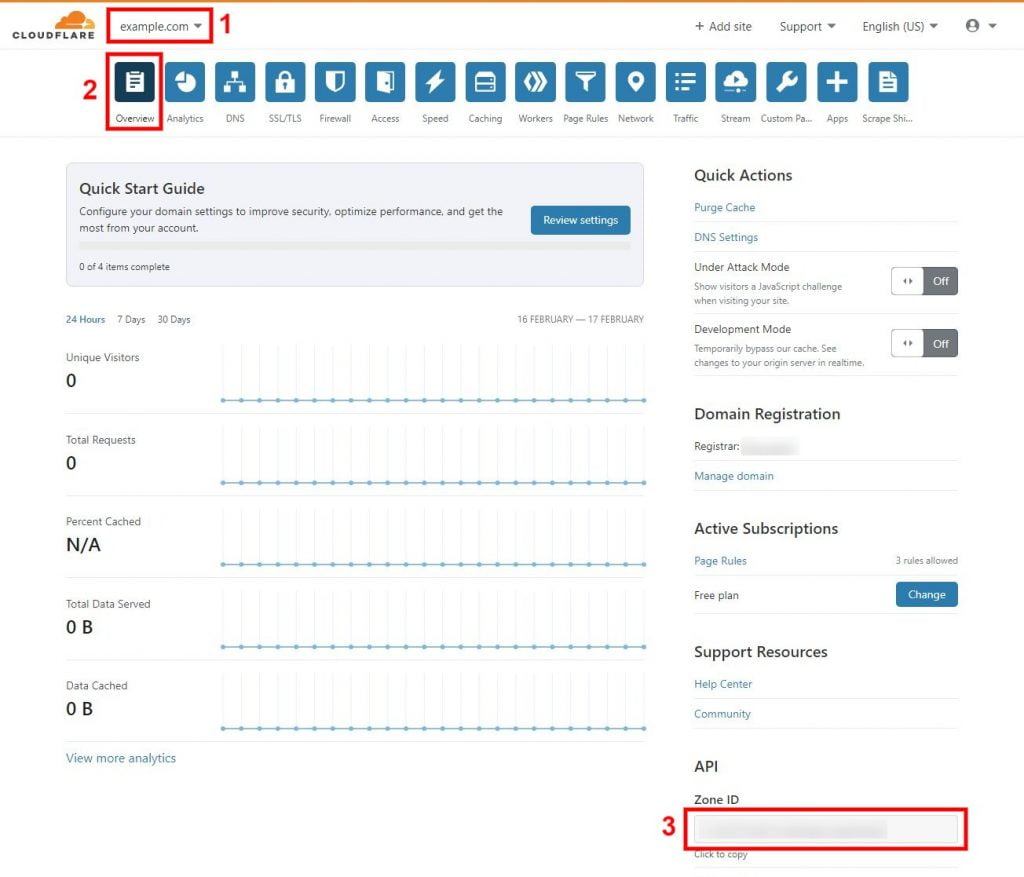
On that page, you will see the Zone ID specific to that domain. Copy that Zone ID then go back to the Cloudflare credentials section in WP Rocket and paste it in the Zone ID field. Then Click on Save Changes from the page.
Now that you have set up Cloudflare in the WP Rocket plugin, you can use take advantage of the other options in the Settings > WP Rocket > Cloudflare page. Those options will let you make some changes to your Cloudflare account without needing to go and make those changes on your Cloudflare account. Those options are described below:
Development mode - Turning on development mode will activate the Development Mode from your domains' Overview page in Cloudflare (this option is also available in the Caching > Configuration page of your domain in Cloudflare). Development mode is used to debug your site so Cloudflare will temporarily stop their edge caching, minification, polish, and railgun features for your site. Once you turn on the development mode, it will last for 3 hours and after that, the development mode will be automatically turned off.
Optimal settings - Turning on this option will automatically apply some settings on your Cloudflare account that is recommended by WP Rocket. Those settings are as follows:
- Set Caching Level to Standard from Caching > Configuration page of your domain in Cloudflare
- Set Browser Cache TTL to 1 year from Caching > Configuration page of your domain in Cloudflare
- Activate JavaScript, CSS, and HTML options in the Auto Minify section from Speed > Optimization page of your domain in Cloudflare
- Deactivate Rocket Loader from Speed > Optimization page of your domain in Cloudflare
Relative protocol - Turning on this option will remove http: or https: from before all static file (CSS, JS, image) URLs which can be helpful to avoid mixed content error. But this option is only recommended if your SSL/TLS encryption mode is set to Flexible from SSL/TLS > Overview page of your domain in Cloudflare. But turning this option on is not recommended if your SSL/TLS encryption mode is set to Full.
Clear All Cloudflare Cache Files - This button will allow you to clear all cache of your website from Cloudflare.
Though, the Cloudflare add-on of WP Rocket is a good way to automatically purge cache from Cloudflare in accordance with WP Rocket, this isn't going to solve other issues caused from using full page caching. For instance, your visitors may see what you see on your site as a logged-in user. To illustrate, they may see the admin bar, customization options, and other things that you see when logged in as an admin. Additionally, you may end up not seeing these options even when you are logged in.
Apart from this, Cloudflare will cache pages with dynamic contents, aka pages that shouldn’t be cached. This will result in visitors seeing wrong contents like seeing contents that aren’t intended for them but for some other visitors.
All these problems will occur because of wrong dynamic caching setup in Cloudflare CDN. So we will need to fix that problem now.
You know what, you can just turn Off the Cloudflare add-on from the Settings > WP Rocket > Add-ons page because keeping it on won’t solve most of the issues discussed above. Then follow the next sections to setup Cloudflare CDN properly with your WordPress site.
Use Cloudflare Plugin
The official Cloudflare plugin for WordPress will be a good way to use dynamic HTML caching with Cloudflare CDN. It will automatically purge pages, posts, and some other content from the Cloudflare CDN when you update them from WordPress. So, that’s a good start towars a proper caching setup. Let’s see how you can set it up on your WordPress site.
First install and activate the Cloudflare plugin on your WordPress site.
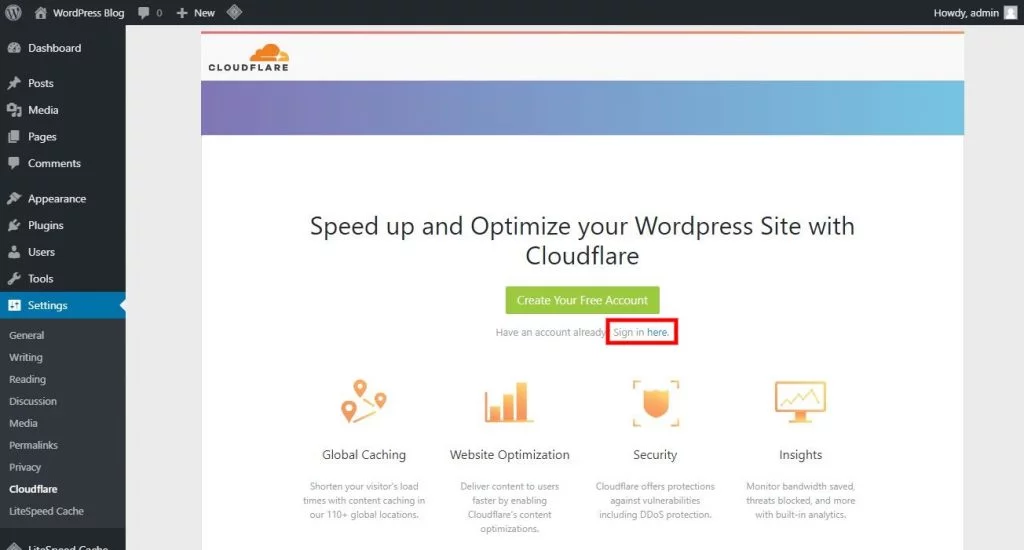
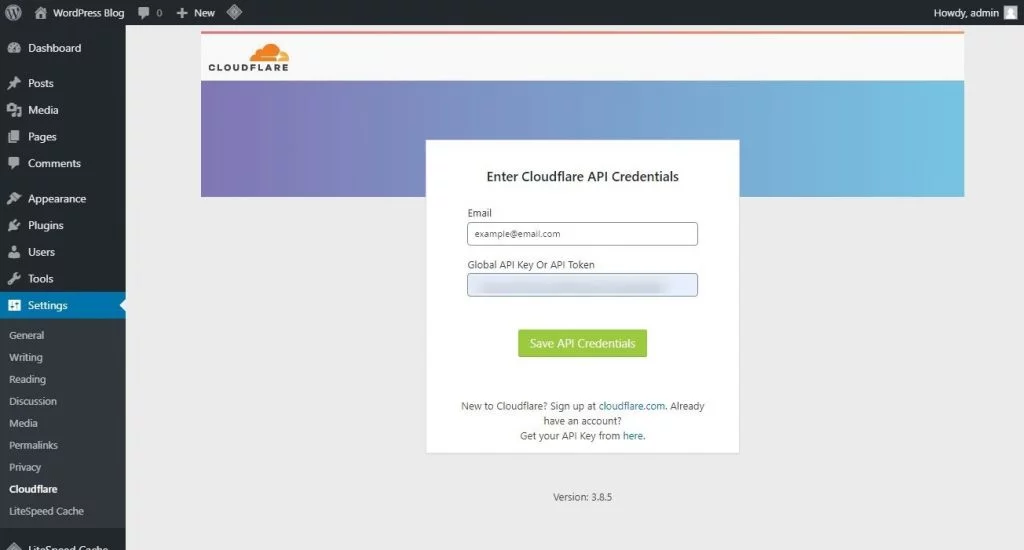
Then from your WordPress dashboard, go to Settings > Cloudflare. There click on the sign in here link to in to connect your Cloudflare account with this Cloudflare plugin.
Now you will be prompted to enter your Cloudfare API Credentials. In the Email field, enter the email ID you used to create your Cloudflare account. In the Global API Key Or API Token field, you can use the Global API Key that you found from your Cloudflare account by clicking on your profile icon then My Profile > API Tokens page in the previous section.
In this same page you will also find a button saying Create Token in the API Tokens section. You can create an API Token from here and use it in the Cloudflare plugin instead of using the Global API Key. This will also be the safest option in terms of security perspective. But Global API Key will also work here. So, enter either one of that in the Global API Key Or API Token field. Then click on the Save API Credentials button.
Now you will see the Home tab of the Cloudflare plugin. Here in the Apply Recommended Cloudflare Settings for WordPress section, you can click on the Apply button. This will automatically update your domain’s setting inside your Cloudflare account. These optimized settings will be optimized specifically for WordPress sites. So, I recommend doing that. You can also see which settings this option applies by going to this WordPress recommended settings description page by Cloudflare.
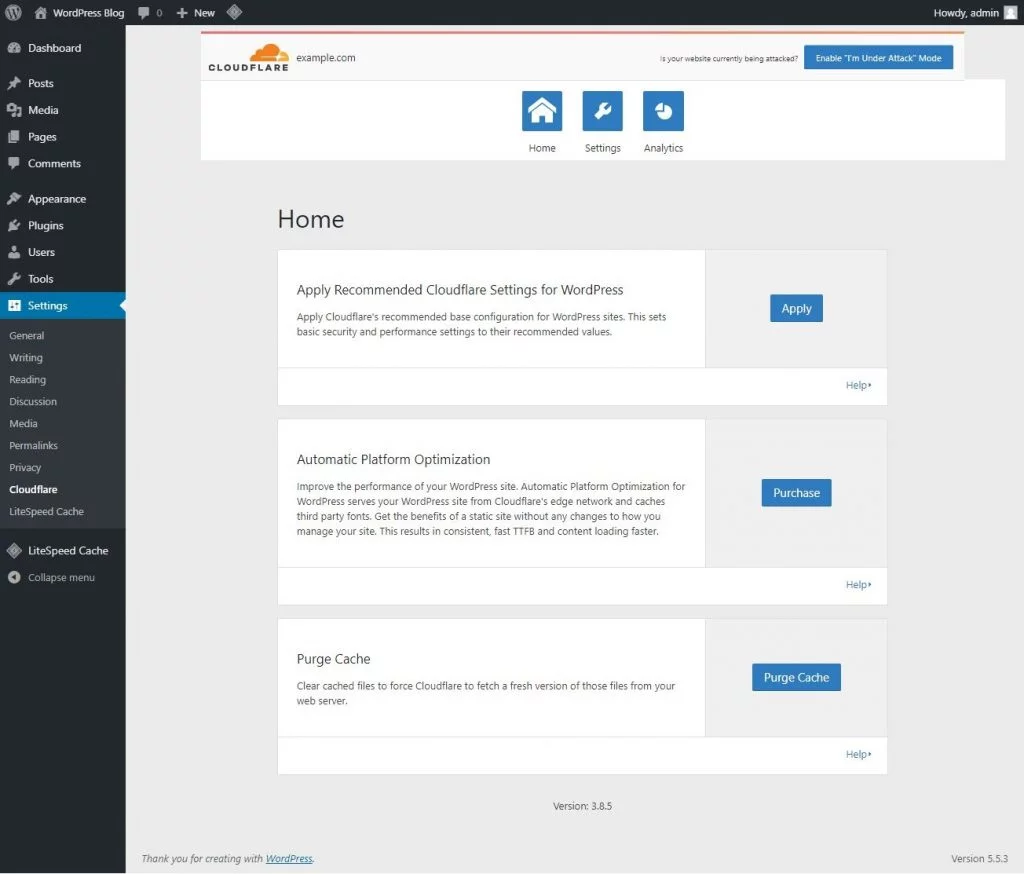
Then the next Automatic Platform Optimization section is for enabling Cloudflare APO on your site. But this isn’t the scope of this article.
In the Purge Cache section, when you click on the Purge Cache button, it will give you options to purge all cache for your site or to purge cache for specific files using URLs. This will be helpful if you want to manually clear cache from Cloudflare CDN from the WordPress dashboard without going to your Cloudflare account.
Now comes the most part in this plugin which is automatic cache purging from Cloudflare based on the actions on WordPress. Go to the Settings tab from the Cloudflare settings page. Here, turn On the Auto Purge Content On Update option. While turning it on, it will show you a confirmation popup. There click on I’m Sure.
Here is what Cloudflare says this option does:
When a user adds, edits, or deletes a post, page, attachment, or comment – any associated URLs are purged from the Cloudflare cache.
When you switch a theme or customise a theme within the WordPress admin panel, the cache will automatically be cleared too.
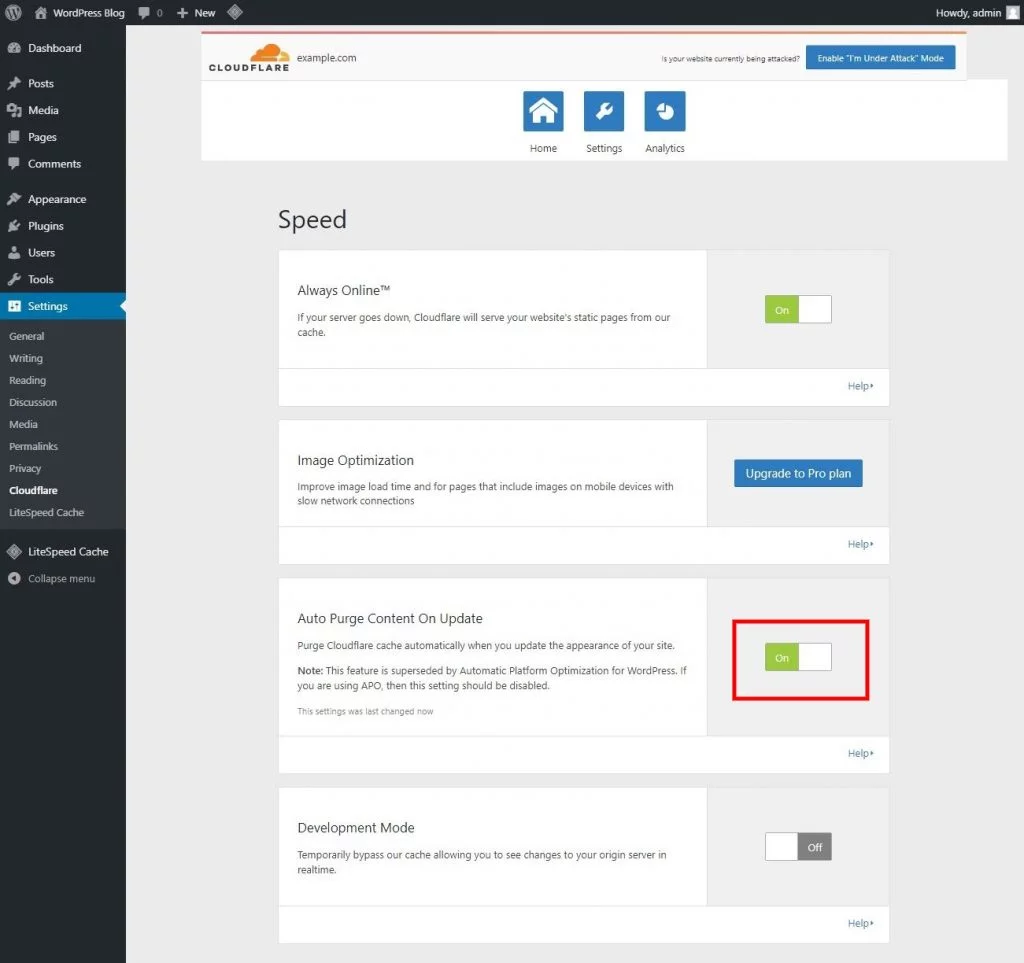
You will get some additional options in this settings page like the option of changing Always Online option, turning on or off Developer Mode, choosing Security Level, changing Automatic HTTPS Rewrites option, and some other options for premium plan users of Cloudflare. Keep these settings how they are. But of course, you can make use them whenever needed.
Now we are done with setting up Cloudflare plugin but we still need to do one thing before we can start using HTML caching in Cloudflare.
Go to your Cloudflare dashboard. Then on the Page Rules tab. Now click on the Create Page Rule button.
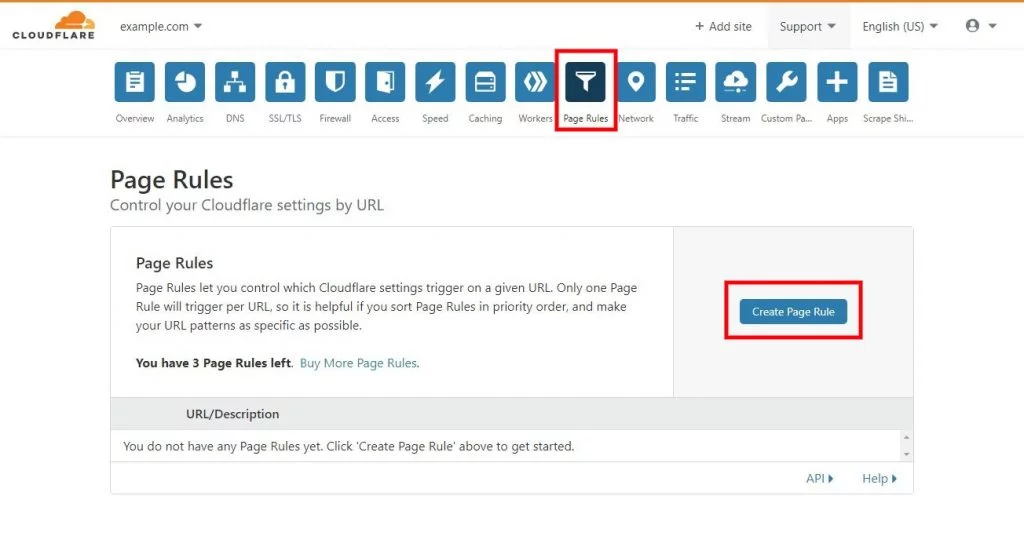
Now, in the first input field, you will need to enter your domain name followed by /*. If you use your root domain like example.com, use example.com/* but if you use a subdomain like www.example.com, use www.example.com/* format. Then in the next two fields, select Cache Level in the first field and Cace Everything in the second field. Then click on Save and Deploy.
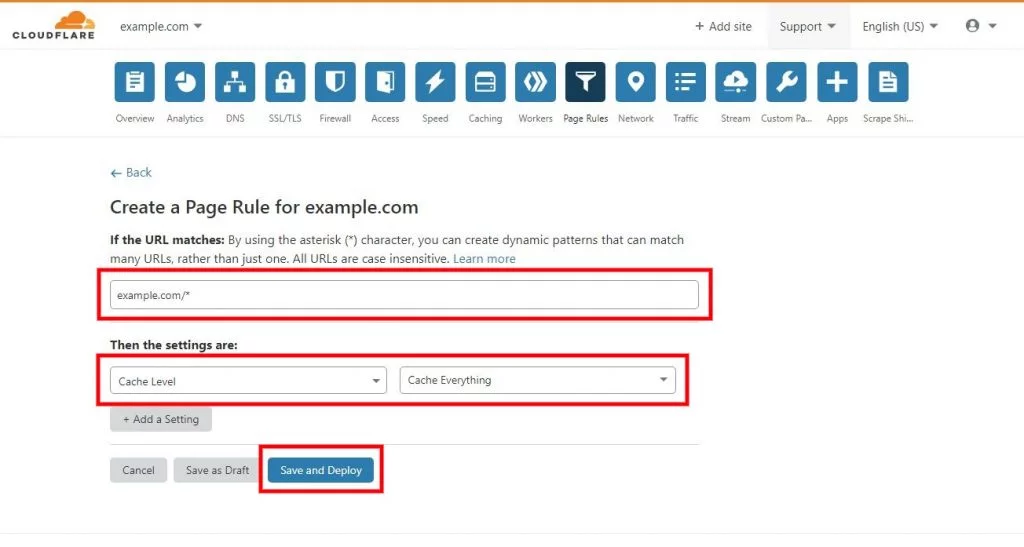
Once it is setup, the page rule will look like this:
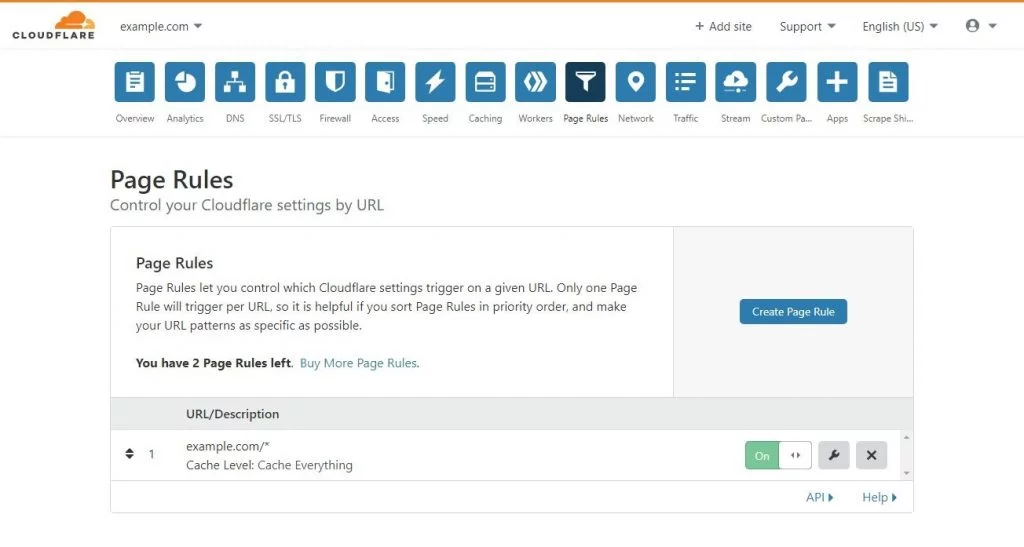
This page rule will instruct Cloudflare to also cache your HTML files. And combined with the Auto Purge Content On Update setup in the Cloudflare plugin, you should have a pretty good HTML caching system in place.
Though this setup will help with automatically purging cache from Cloudflare, it won’t do any good for the caching issue with logged in users. For that, you can use another plugin mentioned in the next section. In fact, you can remove this plugin and this page rule because the next plugin will pretty much do everything this Cloudfare plugin does, solve the caching issue with logged users, automatically create the previous page rule, and do some more.
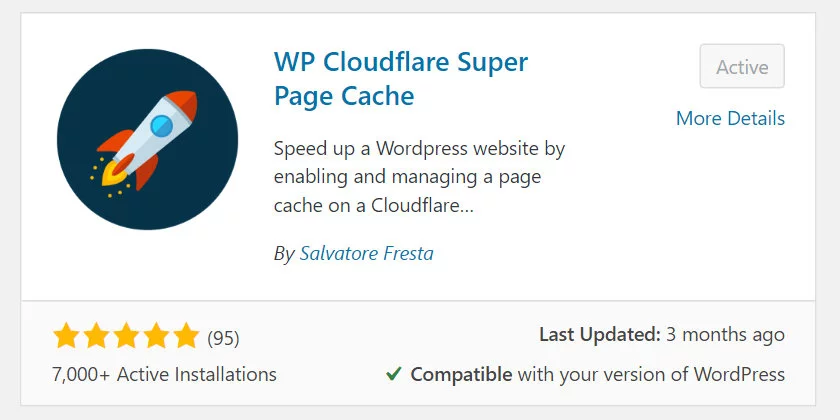
Use WP Cloudflare Super Page Cache Plugin
This WP Cloudflare Super Page Cache plugin will give you a lot of features that will solve the dynamic caching issues with Cloudflare while using WordPress. Like solving the caching issue with logged in users, the issue with automatically purging cache from Cloudflare CDN, disabling caching for pages with dynamic contents (the pages that shouldn’t be cached), and many other problems will be solved by using this plugin.
In fact, its features will be the closest to the features of Cloudflare APO when compared to any other plugins. You won’t get all the benefits of Cloudflare APO with this plugin but it will give you some additional benefits that you won’t get in APO. For instance, it will give you granular control over which contents should be cached, support with other plugins, and many more things.
The caching problem with logged in users, automatic cache purging issue, and many other issues that occur with dynamic caching will be solved when using this WP Cloudflare Super Page Cache plugin. It will make your WP Rocket Cloudflare CDN setup a seamless experience.
Now, install and activate it on your WordPress site.
Then from your WordPress dashboard, go to Settings > WP Cloudflare Super Page Cache. There you will see option to connect your Cloudflare account with this plugin.
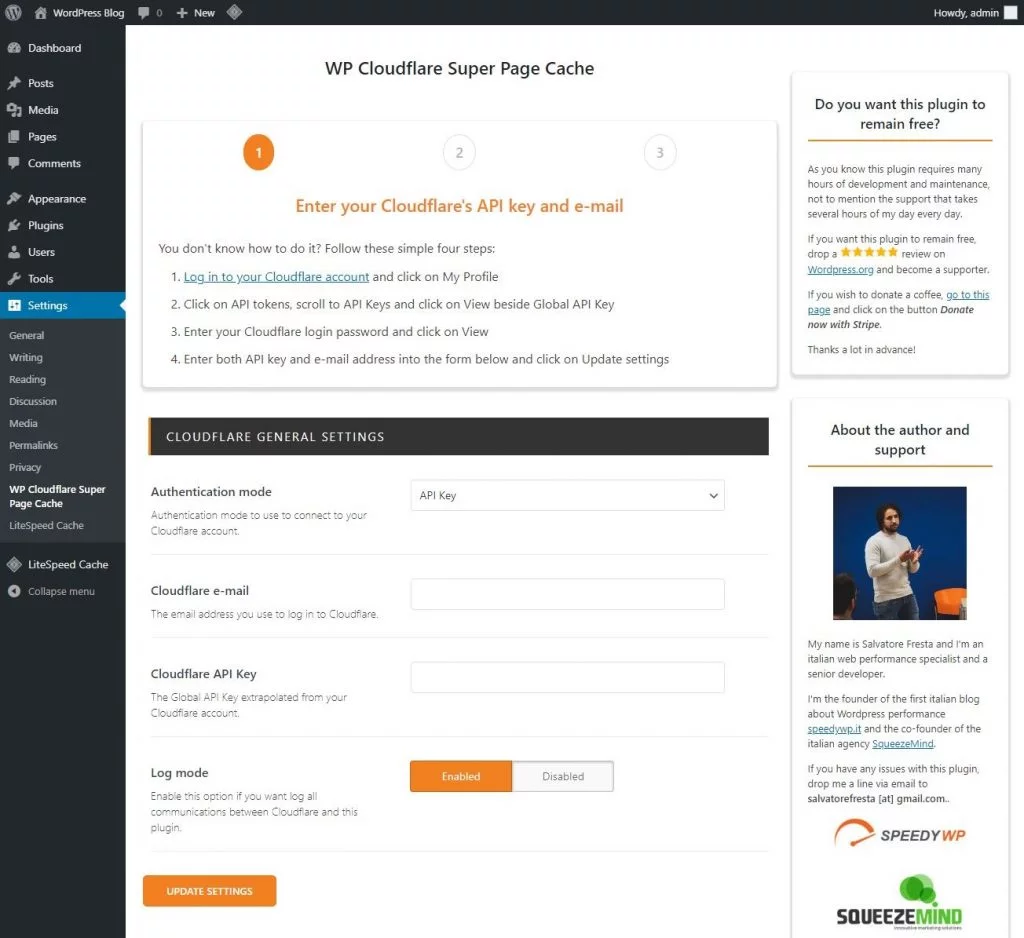
In the Authentication mode, you will get two options to either use your Cloudflare API Key or API Token. If you select the API Key option, you can use the Global API Key that you found from your Cloudflare dashboard by clicking on your profile icon then My Profile > API Tokens page in the previous section.
From this page, If you want to select the API Token option from the Authentication mode, you can
You can also create an API Token from this page using the Create Token button from the API Tokens section. Then you will be able to use this API Token instead of the API Key for connecting the plugin with Cloudflare. Again, using API Token will also be the safest option from a security perspective. But API Key options will also work. So, select either the API Key or the API Token option from the Authentication mode dropdown.
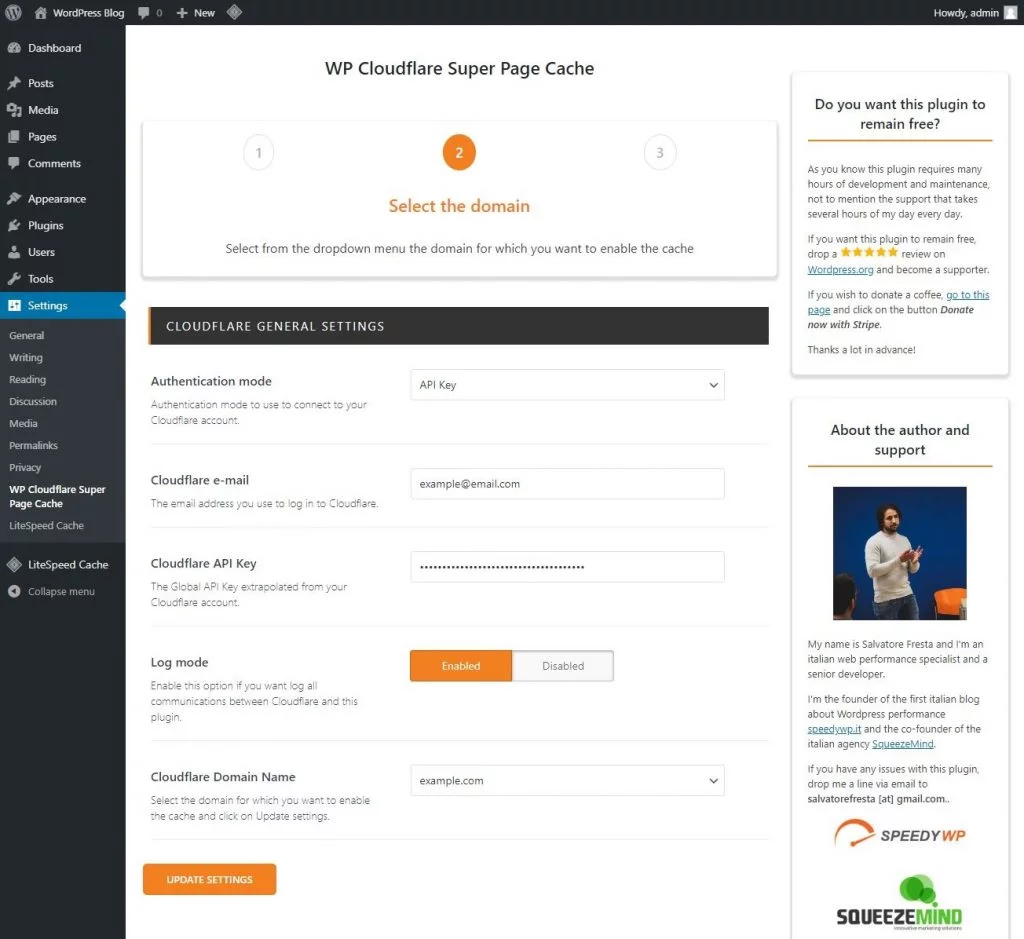
Then fill up the Cloudflare email ID, API Key, API Token, or domain name field according to your selection. Keep the Log Mode to the default Enabled as it may help you get support if anything doesn’t work properly but you can also Disable it. Then click on the Update Settings button.
If you choose API Key method, after clicking on the Update Settings button, you will see another option for Cloudflare Domain Name where you will need to select your domain name and click again on the Update Settings button.
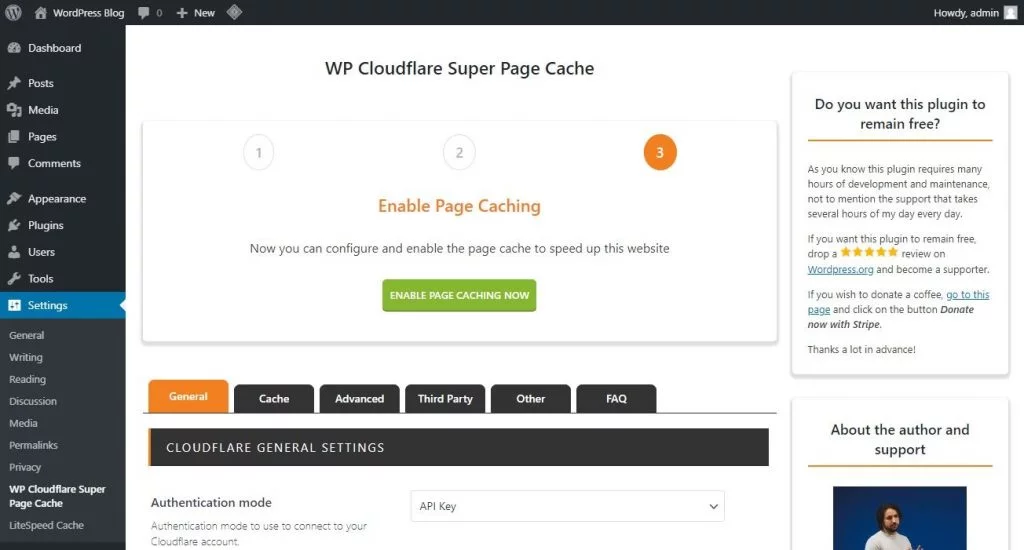
On the next page, click on Enable Page Caching Now button. This will automatically create a Cache Everything page rule for your domain inside your Cloudflare account. And therefore it will instruct Cloudflare to also cache the dynamic HTML files of your website.
This will be pretty much enough for most people to serve all their website contents (including dynamic HTML files and static files like CSS, JS, images, and others) from Cloudflare CDN without incurring any problem. But I will go through some other important settings in this plugin so that you don’t have to face any problems down the road.
This will also help you get the most from this plugin and solve any problems that might have arrived because of your specific WordPress setup. For instance, your web server like LiteSpeed, Apache, or NGINX, and the use of a caching plugin, in this case, WP Rocket can cause issues with this plugin. So, I will address them here.
In order to improve compatibility, WP Cloudflare Super Page Cache recommends turning off the caching feature from any other caching plugin. This also applies to the WP Rocket plugin. From this plugin’s settings page, go to the Third Party tab and scroll down to the WP Rocket Settings section.

Here, because of having the WP Rocket plugin activated, you will see this warning asking you to disable the caching from the WP Rocket plugin. This will improve compatibility of this plugin with WP Rocket plugin. But don’t worry, you don’t need to disable the optimization options from WP Rocket Plugin. This warning is just to turn off the caching of WP Rocket.
Also, if you turn off the caching from WP Rocket, you can turn on the caching feature from this plugin. Let’s do that and then turn off the caching from the WP Rocket plugin. If you don’t face any problem without following this warning, you can get away without doing this setup. As per my testing, so far, I haven’t faced any issues keeping the caching turned on in my WP Rocket plugin.
To complete the setup of turning on the caching of WP Cloudflare Super Page Cache and turning off the caching of WP Rocket, follow the below instructions.
First, go to the Cache tab from the settings page of the WP Cloudflare Super Page Cache plugin.
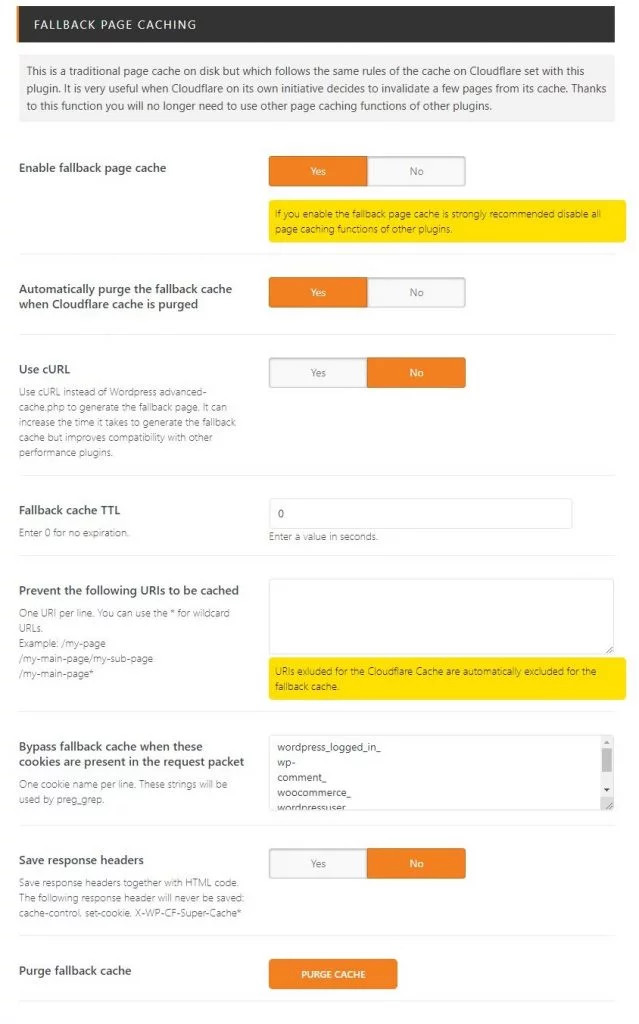
Now scroll down to the Fallback Page Caching section. There, select Yes for the Enable fallback page cache option. Then it will show you some more options which you can keep as default unless you find one that meets your requirement. Then go down the page and click on the Update Settings button.
Disable WP Rocket Page Caching
Now you have turned on the caching in the WP Cloudflare Super Page Cache plugin. So, you can turn off the page caching of the WP Rocket plugin. However, the WP Rocket plugin doesn't come with an option to disable its page caching. But it provides a separate plugin for doing just that. Additionally, the WP Cloudflare Super Page Cache plugin gives you an even easier option to disable the caching of the WP Rocket plugin. So, you can use any of these two methods to disable page caching in WP Rocket. Here is how to do both.
Disable WP Rocket Page Caching from WP Cloudflare Super Page Cache
The WP Cloudflare Super Page Cache plugin provides an easy option to turn off page caching from the WP Rocket plugin. In order to do so, go to the Third Party tab from the WP Cloudflare Super Page Cache plugin's settings page. Then scroll down to the WP Rocket Settings section. Here, you will need to select Yes for the Disable WP Rocket page cache option. Then go down the page and click on the Update Settings button.
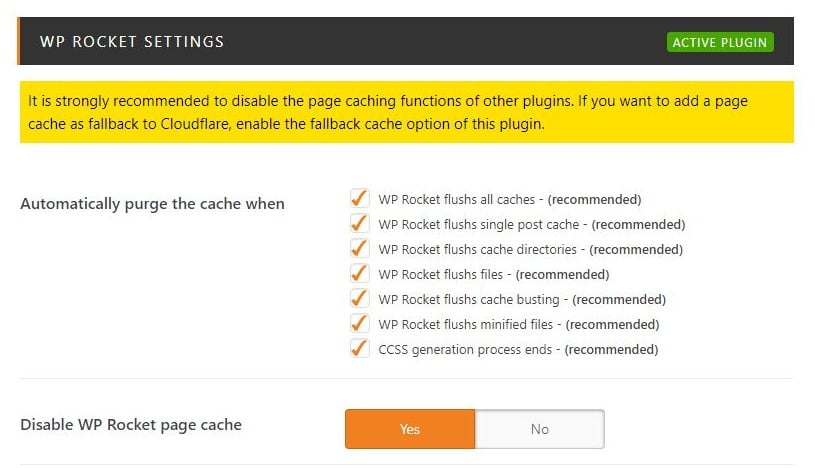
This will disable page caching of the WP Rocket plugin without needing to install any additional plugin. But if you want another way to disable the caching of WP Rocket, follow the next section.
Disable WP Rocket Page Caching from WP Rocket | Disable Page Caching plugin
Even though WP Rocket doesn't come with any option to turn off its page caching, they provide another helper plugin called WP Rocket | Disable Page Caching. You can download and install this plugin from this WP Rocket No Cache GitHub repository.

You will need to just download, install, and activate that plugin to disable WP Rocket caching. It doesn't come with any settings, so you don't need to worry about it. And if you ever want to use the caching of WP Rocket, just deactivate that plugin.
Now you are done setting up the WP Cloudflare Super Page Cache plugin with the WP Rocket plugin. This means you can take full advantage of WP Rocket Cloudflare CDN setup for both dynamic HTML files as well as static files.
All the problems that come with setting up WordPress site’s dynamic file caching in Cloudflare should now be solved for you. So, no more caching problem with logged in users, or problem with automatically purging cache from Cloudflare CDN.
Conclusion
Both WP Rocket and Cloudflare are one of the best providers for the the services they provide. When combined, they do complete optimization for WordPress sites. You optimize your site using the awesome optimization of WP Rocket plugin and then deliver your website to the visitors using the very fast Cloudflare's CDN. This way, you get an astounding result by using them both on your WordPress site.
I really want to speed up my site to the best but my server response time remains high very time
Great Tutorial, been looking all over the internet for, easy to understand. Helped me easily connect my site to Cloud Flare. Thanks alot
I have been working with WordPress for 15 years, this is by far the best Cloudflare guide I have read, it's now my go to resource. Most websites I can get down to 1 - 1.5seconds loading time. Except for sites that fun Elementor, I'm not a massive fan of it, I always see fonts taking up 0.5mb page size but will work on trying to optimise that. Thanks for taking the time to put this together.
WP Rocket with Cloudflare = best performance
The "Use WP Cloudflare Super Page Cache Plugin" seetings is for logged in users right?... c
.
my site is not a logged site 4 users. so can i go on with the cloudflare plugin method right?